210
Detail program description - Control adjust
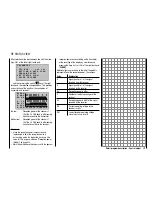
L.R-VOLT
Lowest operating voltage of the
receiver since it was last turned on, in
volts
SENSOR1
Indicates the values of the optional
telemetric sensor 1 in volts and °C
SENSOR2
Indicates the values of the optional
telemetric sensor 2 in volts and °C
Signal quality (S-QUA)
The signal quality (S-QUA) is sent "live" over the return
channel of the receiver to the transmitter and indicates
the signal strength in %.
Reception power (S-dbm)
The reception power (S-dbm) is indicated with negative
values, which means a value of zero is the maximum
value (= best reception) and the lower the values are,
the poorer the reception power! The range test before
operation, among other things, is important for this.
Note:
With negative numbers the evaluation of a number is
reversed: The higher the number following the minus
symbol, the lower the value is. Therefore, a reception
power of -80 dBm, for example , is poorer than one with
-70 dBm.
Perform the range test as described on page 71 and
77 before each fl ight and, in doing so, simulate all servo
movements which also take place during the fl ight. The
range must be at least 50 m on the ground with the
range test activated. At this distance, the value shown
under "S-dBm" in the "
RX DATAVIEW
" display may
not be greater than -80 dBm in order to guarantee safe
operation. Your should never be operated with a lower
value (e. g. -85 dBm). Check the installation of the
receiver system and the position of the antenna.
The reception power should not drop below -90 dBm
during operation. Otherwise, reduce the distance of the
model. Normally, however, the acoustic range warning
(peep tone interval 1 s) is triggered before this value is
reached in order to guarantee safe operation.
Signal strength (S-STR)
The signal strength (S-STR) is displayed in %. In
general, an acoustic range warning (peep tone interval
1 s) is issued as soon as the receiver signal becomes
too week in the return channel. However, since the
transmitter has a signifi cantly higher transmission power
than the receiver, the model can still be safely operated.
For the sake of safety, the distance to the model should
be reduced until the warning tone goes silent again.
Receiver temperature (R-TEM.)
Make sure that your receiver remains within the
permissible temperature range during all fl ight
conditions (ideally between -10 and 55 °C).
The receiver temperature limit at which a warning is
issued can be adjusted in the submenu "
RX SERVO
TEST
" under "ALARM TEMP+" (50 … 80 °C and
"ALARM TEMP" (-20 … +10 °C). When the value
is undercut or exceeded, an acoustic signal follows
(continuous peep tone) and "
TEMP.E
" appears at the
top right of all "RX" receiver submenus. In addition,
the parameter "
R-TEM
" is shown inversely on the "
RX
DATAVIEW
" display page.
Data packages (L PACK TIME)
Indicates the longest time span in ms in which data
packages are lost in the transmission from the
transmitter to the receiver. In practice, that is the longest
time span in which the remove control system has
entered into fail-safe mode.
Receiver operating voltage (R-VOLT)
Always check the operating voltage of the receiver.
Never operate or even start your model if the operating
voltage is too low.
The receiver low voltage warning can be adjusted
between 3.0 and 6.0 volts in the submenu "
RX SERVO
TEST
" under "ALARM VOLT". If this range is undercut,
an acoustic signal is issued (repeating double peep tone
(long/short)) and "
VOLT.E
" appears at the top right of
all "
RX
" receiver submenus.| In addition, the parameter
"
R-VOLT
" is shown inversely in the "
RX DATAVIEW
"
submenu.
The current receiver battery voltage is also displayed in
the default display, see page 24.
Minimum receiver operating voltage (L.R-VOLT)
"L.R-VOLT" indicates the minimum operating voltage of
the receiver since the last time it was switched on.
If this voltage should deviate signifi cantly from the
current "R-VOLT" operating voltage, the receiver battery
may be too heavily encumbered by the servos. The
consequence is voltage drops. In this case, use a more
powerful voltage supply in order to achieve maximum
operational safety.
Sensor 1 + 2
Indicates the values of the optional telemetric sensors
1 and 2 in volts and °C, if applicable. A description of
these sensors can be found in the appendix.
Summary of Contents for mx-20 Hott
Page 41: ...41 Your notes...
Page 49: ...49 Your notes...
Page 55: ...55 Your notes...
Page 81: ...81 Your notes...
Page 85: ...85 Your notes...
Page 89: ...89 Your notes...
Page 99: ...99 Detail program description Control adjust...
Page 127: ...127 Detail program description Control adjust...
Page 131: ...131 Detail program description Control adjust...
Page 163: ...163 Detail program description Control adjust...
Page 191: ...191 Detail program description Control adjust...
Page 207: ...207 Detail program description Control adjust...
Page 228: ...228 Detail program description Control adjust...
Page 229: ...229 Detail program description Control adjust...
Page 251: ...251 Detail program description Control adjust...


