208
Detail program description - Control adjust
Telemetry
The transmitter and receiver data as well as the data
for optional telemetric sensors (see Appendix) can be
viewed and programmed in the "
Telemetry
" menu.
The receiver data is transmitted to the transmitter
through the return channel integrated in the HoTT
receiver.
One telemetry sensor can be connected through the
telemetry input to each of the receivers GR-12S HoTT
(Order No.
33505
), GR-12 HoTT (Order. No.
33506
),
GR-16 (Order. No.
33508
) and GR-24 HoTT (Order. No.
33512
).
The corresponding "
Telemetry
" menus always keep
these and future receivers up to date with the latest
version and ensures enhancement with future functions
or languages.
Note:
After registering your product at https://www.graupner.
de/de/service/produktregistrierung you are automatically
informed of new updates.
Important information:
This manual depicts the available functions at the
•
time of printing.
As already indicated in the section "Connection
•
of multiple receivers" on page 69 and 74, multiple
receivers can be connected as necessary for each
model.
During the later operation, however, only
the receiver which was activated in the line "TEL.
EMPF." of the "Telemetry" menu, is capable
of establishing a telemetric connection to the
transmitter!
However, that also means the inverse,
that only this receiver can be addressed through the
Telemetry menu! If necessary, therefore, the selection
must be changed before settings can be made on a
specifi c receiver:
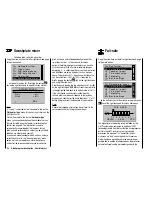
TELEMETRY
SETTING & DATA VIEW
SENSOR SELECT
RF STATUS VIEW
VOICE TRIGGER
TEL.RCV
BIND. 1
When adjusting the settings of the remote
•
control, make absolutely sure that the transmitter
antenna is always far enough away from the
receiver antennae! To be on the safe side, keep
them at least one meter apart. Otherwise you
run the risk of a faulty connection for the return
channel and malfunction as a result.
Since the telemetric data between transmitter and
•
receiver is only exchanged after the fourth data
package, the data transmission requires a certain
amount of time for technical reasons, so the reaction
to the operating keys and changes to settings take
place with a delay. Therefore, the delay is not due to
an error.
Programming on the model or on sensors may only
•
take place if the model is on the ground. Only carry
out the settings with the motor switched off and
the battery disconnected! Otherwise, undesired
programming cannot be ruled out.
For example, a servo test initiated accidentally
could cause the model to crash and cause personal
injury and/or property damage. Observe the safety
instructions on pages 4-7 of this manual and the
individual respective manuals.
All settings (such as fail-safe, servo direction
•
reversal, servo travel, mixer and curve settings, etc.)
made through the "
Telemetry
" menu are only saved
in the receiver and, therefore, are adopted along with
it in the course of the conversion of a receiver to a
different model, if applicable. Therefore, to be on the
safe side, re-initialize your HoTT receiver if you want
to use the receiver in a different model; see "Reset"
on page 43.
Only program the servo direction reversal, servo
•
travel, mixer and curve settings through the
mx-20
-
specifi c standard menus "
Servo adjustment
" page
90, "
Dual Rate / Expo
" page 108 and 112, "
Channel
1 curve
" page 116 and 119, etc. Otherwise, the
settings superimpose one another, which can lead to
complexity or even problems in the later operation.
With the channel assignment function of the
•
Telemetrymenu integrated in themx-20 HoTT, control
functions can also be assigned with distribution to
multiple receivers or multiple receiver outputs can
even be assigned with the same control function,
such as the ability to activate two servos per aileron
instead of only one individual servo, etc.
We also
recommend exercising extreme during the
programming.
Summary of Contents for mx-20 Hott
Page 41: ...41 Your notes...
Page 49: ...49 Your notes...
Page 55: ...55 Your notes...
Page 81: ...81 Your notes...
Page 85: ...85 Your notes...
Page 89: ...89 Your notes...
Page 99: ...99 Detail program description Control adjust...
Page 127: ...127 Detail program description Control adjust...
Page 131: ...131 Detail program description Control adjust...
Page 163: ...163 Detail program description Control adjust...
Page 191: ...191 Detail program description Control adjust...
Page 207: ...207 Detail program description Control adjust...
Page 228: ...228 Detail program description Control adjust...
Page 229: ...229 Detail program description Control adjust...
Page 251: ...251 Detail program description Control adjust...


