197
Detail program description - Control adjust
last received correct signal, temporarily stored in the
receiver. This feature is confi gured by the settings as
described below. This feature also suppresses brief
interference caused by e. g. local drops in fi eld strength,
which otherwise result in the familiar "glitches". In this
case, the red LED lights up on the receiver.
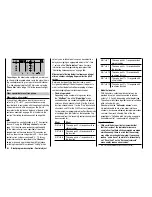
If you have selected a PCM transmission mode for the
active model memory but have not yet carried out the
fail-safe programming, you will see a warning message
on the screen when you switch on the transmitter:
Fail Safe
setup
t.b.d.
Programming procedure
The "Fail Safe" function determines the behavior of the
receiver if communication between the transmitter and
the receiver is disrupted. Receiver outputs 1 … 12 can
optionally …
preserve the current position ("hold"):
1.
if communication is disrupted, all servos programmed
to "hold" mode remain at the positions judged to
be the last valid positions by the receiver until the
receiver picks up another valid control signal, or
move to a freely selectable position ("Pos") if
2.
interference should occur, following the expiry of the
"time delay".
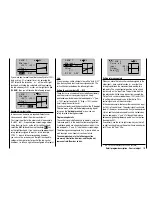
Use the arrow keys
on the left or right touch pad
to select the desired servo connection from 1 to 12 (
)
and then briefl y tap the center
SET
key on the right touch
pad, so as to switch as you please between the "hold"
( ) and "Pos" mode ( ):
1 2 3 4 5 6
STO
FAIL SAFE
Pos
hold
DELAY : 0.25s
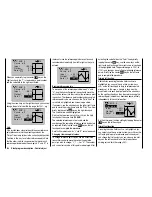
Following this, use the arrow keys
on the left or
right touch pad to select the "DELAY" option shown at
the bottom of the display …
7 8 9 10 11 12
STO
FAIL SAFE
Pos
hold
DELAY : 0.25s
… and then briefl y tap the center
SET
key on the right
touch pad. Now use the touch pad's arrow keys to make
your choice from the four possible time delays (0.25 s,
0.5 s, 0.75 s and 1 s) offered.
Simultaneously tapping the arrow keys
or
on
the right touch pad (
CLEAR
) ) will reset the highlighted
fi eld back to its default value of 0.25 s.
Following this, use the arrow keys
on the left
or right touch pad to select the
STO
fi eld at the
bottom right of the screen. Then, use the associated
transmitter controls to move the servos, which you have
switched to position mode, into the desired positions
SIMULTANEOUSLY.
Briefl y tap the center
SET
key on the right touch pad
to store these positions as the fail-safe setting for the
receiver, so that it can revert back to them if interference
is experienced.
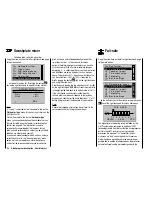
Successful storage of the positions is confi rmed briefl y
on the screen:
7 8 9 10 11 12
STO
Position
stored
FAIL SAFE
Pos
hold
DELAY : 0.25s
Caution:
Ensure you make use of this safety net by at least
programming the following for a fail-safe incident:
for glow-powered models, set the motor throttle
position to idle; for electric models, set the motor
function to stop, or "Hold" for heli models. If
interference should occur, the model is then less
likely to fl y off on its own and cause damage to
property or even personal injury. Consider asking an
experienced pilot for advice.
Summary of Contents for mx-20 Hott
Page 41: ...41 Your notes...
Page 49: ...49 Your notes...
Page 55: ...55 Your notes...
Page 81: ...81 Your notes...
Page 85: ...85 Your notes...
Page 89: ...89 Your notes...
Page 99: ...99 Detail program description Control adjust...
Page 127: ...127 Detail program description Control adjust...
Page 131: ...131 Detail program description Control adjust...
Page 163: ...163 Detail program description Control adjust...
Page 191: ...191 Detail program description Control adjust...
Page 207: ...207 Detail program description Control adjust...
Page 228: ...228 Detail program description Control adjust...
Page 229: ...229 Detail program description Control adjust...
Page 251: ...251 Detail program description Control adjust...


