Chapter 28: Microsoft Exchange Integration
368
MAXCS ACC 6.7 Administration Manual
Exchange
synchronization
uses only the Extension’s first and last names as
the link.
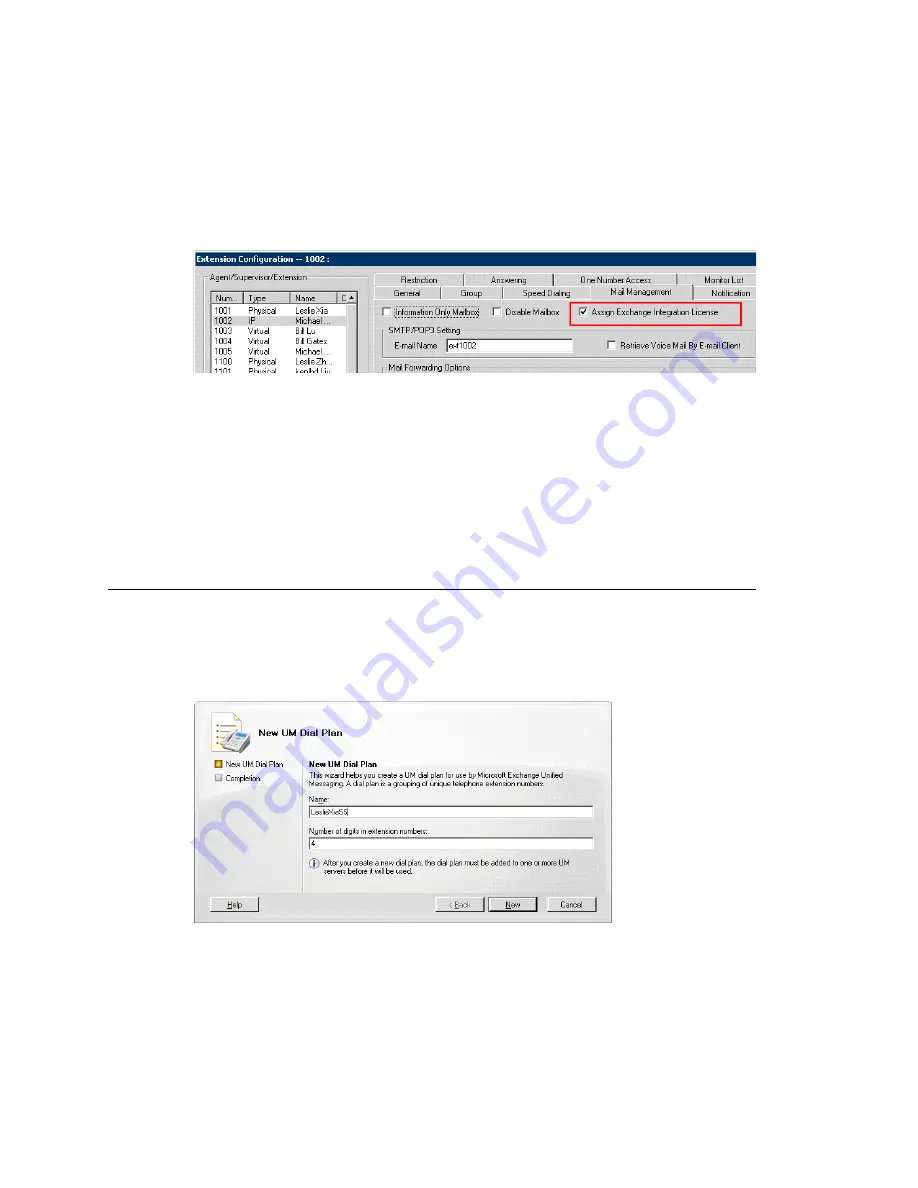
6. For users whose voice mails will be integrated with Exchange, check
Assign
Exchange Integration License
on the Extension Configuration screen’s
Management
tab (see Figure 155). Make sure that the
E-mail Name
field contains
alphanumeric characters only and does not contain other characters such as spaces
( ) or periods ( . ).
Figure 155. Assigning the Exchange Integration license to a user
Note:
Each user needs to access their mailbox once via an e-mail client (Outlook,
Outlook Express, Outlook Web Access) before synchronization will start working
for that user.
This is all you need to do if you selected the
Synchronize with Exchange
option in the
Voice Mail Configuration Screen. If necessary, see “Testing for Synchronization” on page
380 and “Troubleshooting Tips” on page 380.
Additional Steps for Bridged Access and
Native VM Integration
In addition to the steps given thus far in this chapter, follow these additional steps for
Bridged Access and Native VM integrations.
1. Create a dial plan in Exchange. In the Exchange Management Console, go to
Organization Configuration > Unified Messaging
, and click
New UM Dial Plan
.
Figure 156. Creating a new UM dial plan. In this example, the name of the dial plan is
“LeslieXiaSS”.
2. Enter a name for the dial plan and length of extension numbers. The digit length
must be the same as the extension number length in MAXCS. Then click
New
.
The digit length you
enter must match
the digit length of
extensions in
MAXCS
Summary of Contents for ACC 6.7
Page 16: ...2 MAXCS ACC 6 7 Administration Manual ...
Page 44: ...Chapter 2 System Requirements and Installation 30 MAXCS ACC 6 7 Administration Manual ...
Page 56: ...Chapter 3 Getting Around MaxAdministrator 42 MAXCS ACC 6 7 Administration Manual ...
Page 98: ...Chapter 6 Voice Mail Configuration 84 MAXCS ACC 6 7 Administration Manual ...
Page 108: ...Chapter 7 Auto Attendant Configuration 94 MAXCS ACC 6 7 Administration Manual ...
Page 124: ...Chapter 9 Call Recording Configuration 110 MAXCS ACC 6 7 Administration Manual ...
Page 128: ...Chapter 10 Application Extension Configuration 114 MAXCS ACC 6 7 Administration Manual ...
Page 180: ...Chapter 12 Trunk Configuration 166 MAXCS ACC 6 7 Administration Manual ...
Page 186: ...Chapter 13 In Call Routing Configuration 172 MAXCS ACC 6 7 Administration Manual ...
Page 234: ...Chapter 16 Setting Up IP Extensions 220 MAXCS ACC 6 7 Administration Manual ...
Page 246: ...Chapter 17 AltiGen IP Phone Configuration 232 MAXCS ACC 6 7 Administration Manual ...
Page 256: ...Chapter 18 Mobile Extension Configuration 242 MAXCS ACC 6 7 Administration Manual ...
Page 270: ...Chapter 19 Hunt Group Configuration 256 MAXCS ACC 6 7 Administration Manual ...
Page 274: ...Chapter 20 Paging Group Configuration 260 MAXCS ACC 6 7 Administration Manual ...
Page 370: ...Chapter 26 Redundancy Configuration 356 MAXCS ACC 6 7 Administration Manual ...
Page 404: ...Chapter 29 TAPI Integration 390 MAXCS ACC 6 7 Administration Manual ...
Page 426: ...Chapter 30 Tools and Applications 412 MAXCS ACC 6 7 Administration Manual ...
Page 448: ...434 MAXCS ACC 6 7 Administration Manual ...


