


Shield
Note:
The cropping shield shades the image area that will be deleted or hidden. When Shield is selected, you can specify color and
opacity for the shield. When Shield is deselected, the area outside the cropping marquee is revealed.
6. Do one of the following:
To complete the crop, press Enter (Windows) or Return (Mac OS), click the Commit button in the options bar, or double-click inside
the cropping marquee.
To cancel the cropping operation, press Esc or click the Cancel button in the options bar.
Crop an image using the Crop command
1. Use a selection tool to select the part of the image you want to keep.
2. Choose Image > Crop.
Crop an image using the Trim command
The Trim command crops an image by removing unwanted image data in different ways than the Crop command. You can crop an image by
trimming surrounding transparent pixels, or background pixels of the color you specify.
1. Choose Image > Trim.
2. In the Trim dialog box, select an option:
Transparent Pixels to trim away transparency at the edges of the image, leaving the smallest image containing nontransparent pixels.
Top Left Pixel Color to remove an area the color of the upper-left pixel from the image.
Bottom Right Pixel Color to remove an area the color of the lower right pixel from the image.
3. Select one or more areas of the image to trim away: Top, Bottom, Left, or Right.
Transform perspective while cropping | CS5
To learn how to transform perspective in CS6, see Transform perspective while cropping | CS6.
The Crop tool has an option that lets you transform the perspective in an image. Transforming the perspective is useful when working with images
that contain
keystone distortion
. Keystone distortion occurs when an object is photographed from an angle rather than from a straight
-
on view. For
example, if you take a picture of a tall building from ground level, the edges of the building appear closer to each other at the top than they do at
the bottom.
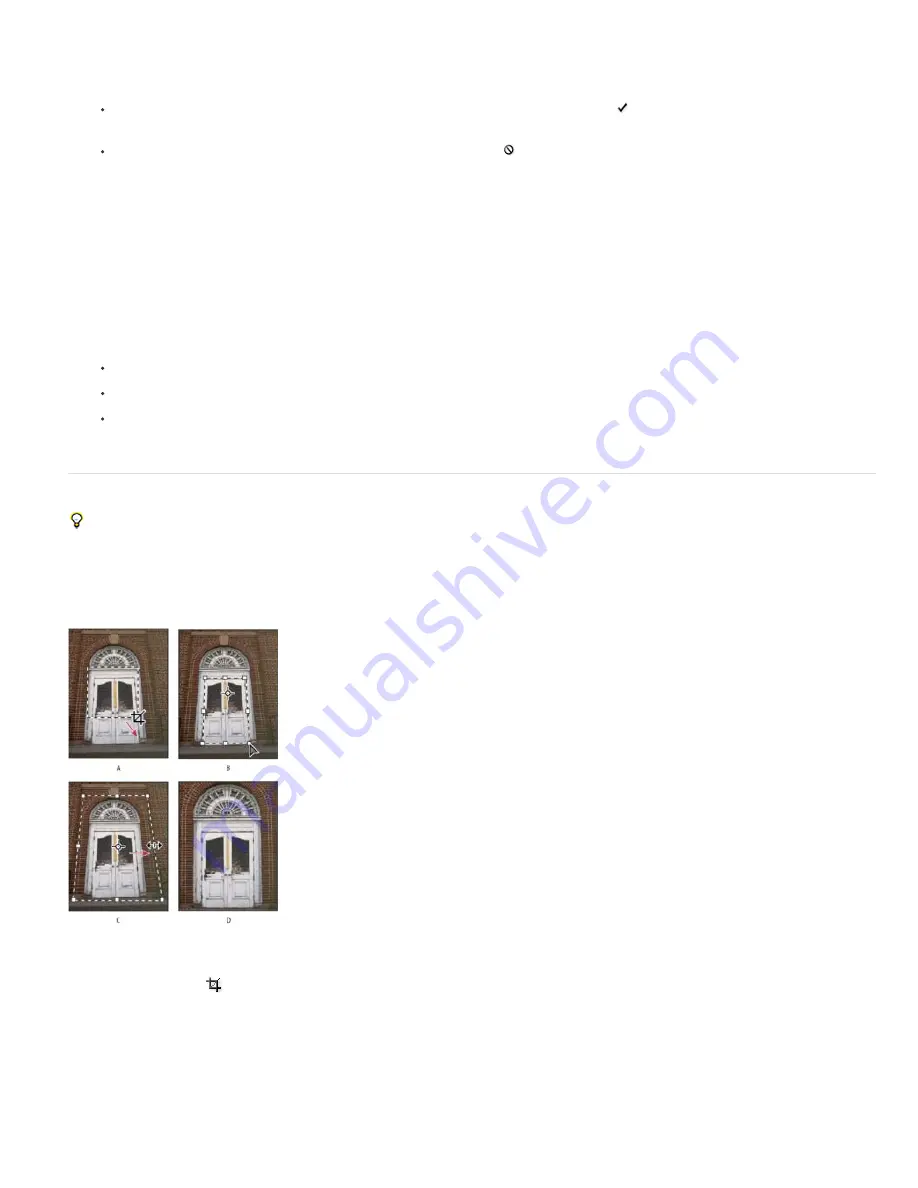
Steps to transform perspective
A. Draw initial cropping marquee B. Adjust cropping marquee to match the object’s edges C. Extend the cropping bounds D. Final image
1. Select the Crop tool
and set the crop mode.
2. Drag the cropping marquee around an object that was rectangular in the original scene (although it doesn’t appear rectangular in the image).
You’ll use the edges of this object to define the perspective in the image. The marquee doesn’t have to be precise—you’ll adjust it later.
You must select an object that was rectangular in the original scene or Photoshop might not produce the perspective transformation
you expected.
3. Select Perspective in the options bar, and set the other options as desired.
4. Move the corner handles of the cropping marquee to match the object’s edges. This defines the perspective in the image, so it is important
Summary of Contents for Photoshop CS6
Page 1: ...ADOBE PHOTOSHOP Help and tutorials...
Page 65: ...Legal Notices Online Privacy Policy...
Page 100: ...Image and color basics...
Page 108: ...Legal Notices Online Privacy Policy...
Page 176: ...Legal Notices Online Privacy Policy...
Page 182: ...Legal Notices Online Privacy Policy...
Page 193: ...applied to the original Smart Object More Help topics Legal Notices Online Privacy Policy...
Page 236: ...Legal Notices Online Privacy Policy...
Page 286: ...More Help topics Adjusting image color and tone in CS6 Legal Notices Online Privacy Policy...
Page 376: ...Legal Notices Online Privacy Policy...
Page 457: ...Text...
Page 461: ...Legal Notices Online Privacy Policy...
Page 548: ...Legal Notices Online Privacy Policy...
Page 570: ...Saving and exporting...
Page 598: ...Printing...
Page 627: ...Legal Notices Online Privacy Policy...
Page 646: ...Web graphics...
Page 662: ...Legal Notices Online Privacy Policy...
Page 722: ...Legal Notices Online Privacy Policy...
Page 730: ...Color Management...
Page 739: ......
Page 748: ......


