FEATURES
1-11
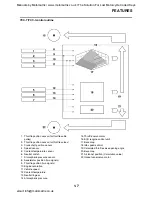
This mode cycles through five control func-
tions, allowing you to make the following set-
tings in the order listed below.
Display brightness:
• This function allows you to adjust the bright-
ness of the displays and tachometer to suit
the outside lighting conditions.
• Shift timing indicator light activity:
This function allows you to choose whether
or not the indicator light should be activated
and whether it should flash or stay on when
activated.
• Shift timing indicator light activation:
This function allows you to select the engine
speed at which the indicator light will be acti-
vated.
• Shift timing indicator light deactivation:
This function allows you to select the engine
speed at which the indicator light will be
deactivated.
• Shift timing indicator light brightness:
This function allows you to adjust the bright-
ness of the indicator light to suit your prefer-
ence.
NOTE:
In this mode, the right display shows the cur-
rent setting for each function (except the shift
timing indicator light activity function).
To adjust the brightness of the multifunction
meter displays and tachometer
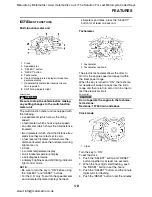
1. Turn the key to “OFF”.
2. Push and hold the “SELECT” button.
3. Turn the key to “ON”, and then release the
“SELECT” button after five seconds.
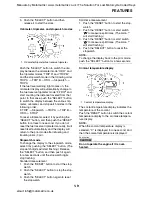
4. Push the “RESET” button to select the
desired brightness level.
5. Push the “SELECT” button to confirm the
selected brightness level. The control
mode changes to the shift timing indicator
light activity function.
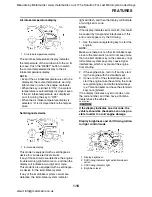
To set the shift timing indicator light activity
function
1. Push the “RESET” button to select one of
the following indicator light activity settings:
• The indicator light will stay on when acti-
vated. (This setting is selected when the
indicator light stays on.)
• The indicator light will flash when activated.
(This setting is selected when the indicator
light flashes four times per second.)
• The indicator light is deactivated; in other
words, it will not come on or flash. (This
setting is selected when the indicator light
flashes once every two seconds.)
2. Push the “SELECT” button to confirm the
selected indicator light activity. The control
mode changes to the shift timing indicator
light activation function.ry two seconds.)
To set the shift timing indicator light activation
function
NOTE:
The shift timing indicator light activation func-
tion can be set between 7000 r/min and 15000
r/min. From 7000 r/min to 12000 r/min, the indi-
cator light can be set in increments of 500 r/
min. From 12000 r/min to 15000 r/min, the indi-
cator light can be set in increments of 200 r/
min.
1. Push the “RESET” button to select the
desired engine speed for activating the
indicator light.
2. Push the “SELECT” button to confirm the
selected engine speed. The control mode
changes to the shift timing indicator light
deactivation function.
To set the shift timing indicator light deactiva-
tion function
NOTE:
• The shift timing indicator light deactivation
function can be set between 7000 r/min and
15000 r/min. From 7000 r/min to 12000 r/
min, the indicator light can be set in incre-
ments of 500 r/min. From 12000 r/min to
15000 r/min, the indicator light can be set in
increments of 200 r/min.
• Be sure to set the deactivation function to a
higher engine speed than for the activation
function, otherwise the shift timing indicator
light will remain deactivated.
1. Push the “RESET” button to select the
desired engine speed for deactivating the
indicator light.
2. Push the “SELECT” button to confirm the
selected engine speed. The control mode
changes to the shift timing indicator light
brightness function.
To adjust the shift timing indicator light bright-
ness
1. Push the “RESET” button to select the
desired indicator light brightness level.
2. Push the “SELECT” button to confirm the
selected indicator light brightness level.
The right display will return to the odometer
or tripmeter mode.
Manuals by Motomatrix / www.motomatrix.co.uk / The Solution For Lost Motorcycle Coded Keys
email: [email protected]


