3-2 System Preparation
3.2
Power ON/OFF
3.2.1 Power the System ON
CAUTION:
To ensure safe and effective system operation, you must perform daily
maintenance and checks. If the system begins to function improperly,
immediately stop scanning. If the system continues to function
improperly, fully shut down the system and contact the Mindray
Customer Service Department or a sales representative. If you use the
system in a persistent improperly functioning state, you may harm the
patient or damage the equipment.
Check before Powering ON
Check before the system is powered on:
No.
Check Item
1
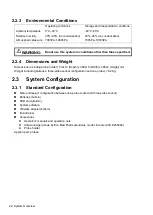
The temperature, relative humidity and atmospheric pressure meet the requirements of
the operating conditions. See “2.2.3 Environmental Conditions” for details.
2
There is no condensation.
3
There is no distortion, damage or dirt on the system and peripheral devices.
If any dirt is found, cleaning should be performed as illustrated in section “17 System
Maintenance.”
4
There are no loose screws on the display or the trolley.
5
There is no cable damage (e.g., power cord).
Maintain secure connections to the system at all times.
6
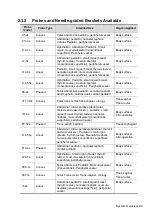
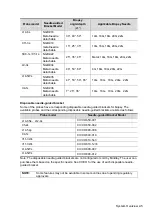
The probes and probe cables are free from damage or stains.
See chapter “13 Probes and Biopsy” for details of probe cleaning and disinfection.
7
No miscellaneous odds and ends are attached or affixed to the display.
8
Ensure that all connections are free from damage and remain clear of foreign object
blockages.
There are no obstacles around the system and its air vent.
9
Probe cleaning and disinfection.
10
The entire scanning environment and field must be clean.
11
The locking mechanism of the casters (if there is a trolley) works normally.
Summary of Contents for TE5
Page 1: ...TE7 TE5 Diagnostic Ultrasound System Operator s Manual Basic Volume ...
Page 2: ......
Page 6: ......
Page 12: ......
Page 24: ......
Page 36: ......
Page 54: ......
Page 110: ......
Page 115: ...Display Cine Review 6 5 6 Tap Return on the screen or tap Freeze to exit image compare ...
Page 120: ......
Page 124: ......
Page 156: ......
Page 174: ......
Page 192: ...12 18 Setup Select Advanced and do as follows Select MAPS and do as follows ...
Page 202: ...13 2 Probes and Biopsy C5 2s L12 4s L7 3s P4 2s L14 6s C11 3s L14 6Ns V11 3Ws P7 3Ts 7LT4s ...
Page 226: ...13 26 Probes and Biopsy NGB 034 NGB 035 ...
Page 250: ......
Page 272: ......
Page 276: ...A 4 Wireless LAN Tap Add Manually create a network profile to set ...
Page 282: ......
Page 318: ......
Page 322: ......
Page 323: ...P N 046 006959 07 1 0 ...


