Probes and Biopsy 13-27
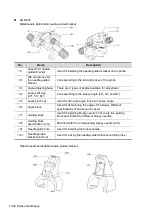
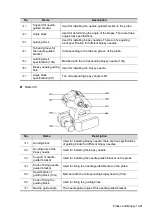
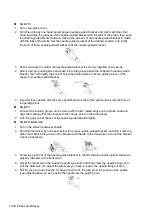
NGB-036
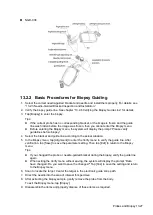
13.2.2 Basic Procedures for Biopsy Guiding
1. Select the correct needle-guided bracket and needle and install them properly. For details, see
“13.2.3 Needle-Guided Bracket Inspection and Installation.”
2. Verify the biopsy guide line. See chapter “13.2.6 Verifying the Biopsy Guide Line” for details.
3. Tap [Biopsy] to enter the biopsy.
Tips:
If the current probe has no corresponding bracket, or the image is frozen and the guide
line was hidden before the image was frozen, then you cannot enter the Biopsy menu.
Before entering the Biopsy menu, the system will display the prompt “Please verify
guidelines before biopsy.”
4. Select the bracket and guide line according to the actual situation.
5. In the Biopsy menu, tap [Alignment] to enter the Verify menu to verify the guide line. After
verification, tap [Save] to save the parameter setting. Then tap [Exit] to return to the Biopsy
menu.
Tips:
If you changed the probe or needle-guided bracket during the biopsy, verify the guide line
again.
When exiting the Verify menu without saving, the system will display the prompt “Data
have changed. Do you want to save the changes?” Tap [Yes] to save the setting and return
to the Biopsy menu.
6. Scan to locate the target. Center the target in the electronic guide zone path.
7. Direct the needle into the area of interest for specimen.
8. After extracting the biopsy sample, gently remove the probe from the body.
To exit the Biopsy menu: tap [Biopsy].
9. Disassemble the items and properly dispose of these items as required.
Summary of Contents for TE5
Page 1: ...TE7 TE5 Diagnostic Ultrasound System Operator s Manual Basic Volume ...
Page 2: ......
Page 6: ......
Page 12: ......
Page 24: ......
Page 36: ......
Page 54: ......
Page 110: ......
Page 115: ...Display Cine Review 6 5 6 Tap Return on the screen or tap Freeze to exit image compare ...
Page 120: ......
Page 124: ......
Page 156: ......
Page 174: ......
Page 192: ...12 18 Setup Select Advanced and do as follows Select MAPS and do as follows ...
Page 202: ...13 2 Probes and Biopsy C5 2s L12 4s L7 3s P4 2s L14 6s C11 3s L14 6Ns V11 3Ws P7 3Ts 7LT4s ...
Page 226: ...13 26 Probes and Biopsy NGB 034 NGB 035 ...
Page 250: ......
Page 272: ......
Page 276: ...A 4 Wireless LAN Tap Add Manually create a network profile to set ...
Page 282: ......
Page 318: ......
Page 322: ......
Page 323: ...P N 046 006959 07 1 0 ...

