10-6 Patient Data Management
10.2.7 Sending Image Files
NOTE:
Data saved this way can only be reviewed on the PC and cannot be restored to the
ultrasound system. See chapter “10.4.2 Patient Data View & Management” for details
about data backup.
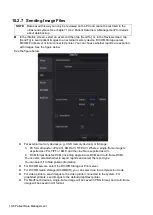
In the iStation screen, select an exam and then tap [Send To], or, in the Review screen, tap
[Send To] to send patient images to an external memory device, DICOM Storage server,
DICOM Print server or local connected printer. You can choose whether reports are exported
with images. See the figure below.
See the figure below.
For external memory devices (e.g., USB memory devices) or iStorage:
PC format transfer: JPG/AVI, BMP/AVI, TIFF/AVI. Where a single-frame image is
exported as JPG, TIFF or BMP, and the cine file is exported as AVI.
DCM format transfer: DCM (including single-frame DCM and multi-frame DCM).
You can also select whether to export reports and select the report type.
You can select if to hide patient information.
For DICOM servers, select the DICOM Storage or Print server.
For DICOM media storage (DICOMDIR), you can select cine file compression mode.
For video printers, send images to the video printer connected to the system. For
graph/text printers, send images to the default graph/text printer.
For MedTouch devices, single-frame image will be saved in PNG format, and multi-frame
image will be saved in AVI format.
Summary of Contents for TE5
Page 1: ...TE7 TE5 Diagnostic Ultrasound System Operator s Manual Basic Volume ...
Page 2: ......
Page 6: ......
Page 12: ......
Page 24: ......
Page 36: ......
Page 54: ......
Page 110: ......
Page 115: ...Display Cine Review 6 5 6 Tap Return on the screen or tap Freeze to exit image compare ...
Page 120: ......
Page 124: ......
Page 156: ......
Page 174: ......
Page 192: ...12 18 Setup Select Advanced and do as follows Select MAPS and do as follows ...
Page 202: ...13 2 Probes and Biopsy C5 2s L12 4s L7 3s P4 2s L14 6s C11 3s L14 6Ns V11 3Ws P7 3Ts 7LT4s ...
Page 226: ...13 26 Probes and Biopsy NGB 034 NGB 035 ...
Page 250: ......
Page 272: ......
Page 276: ...A 4 Wireless LAN Tap Add Manually create a network profile to set ...
Page 282: ......
Page 318: ......
Page 322: ......
Page 323: ...P N 046 006959 07 1 0 ...

