DICOM/HL7 11-15
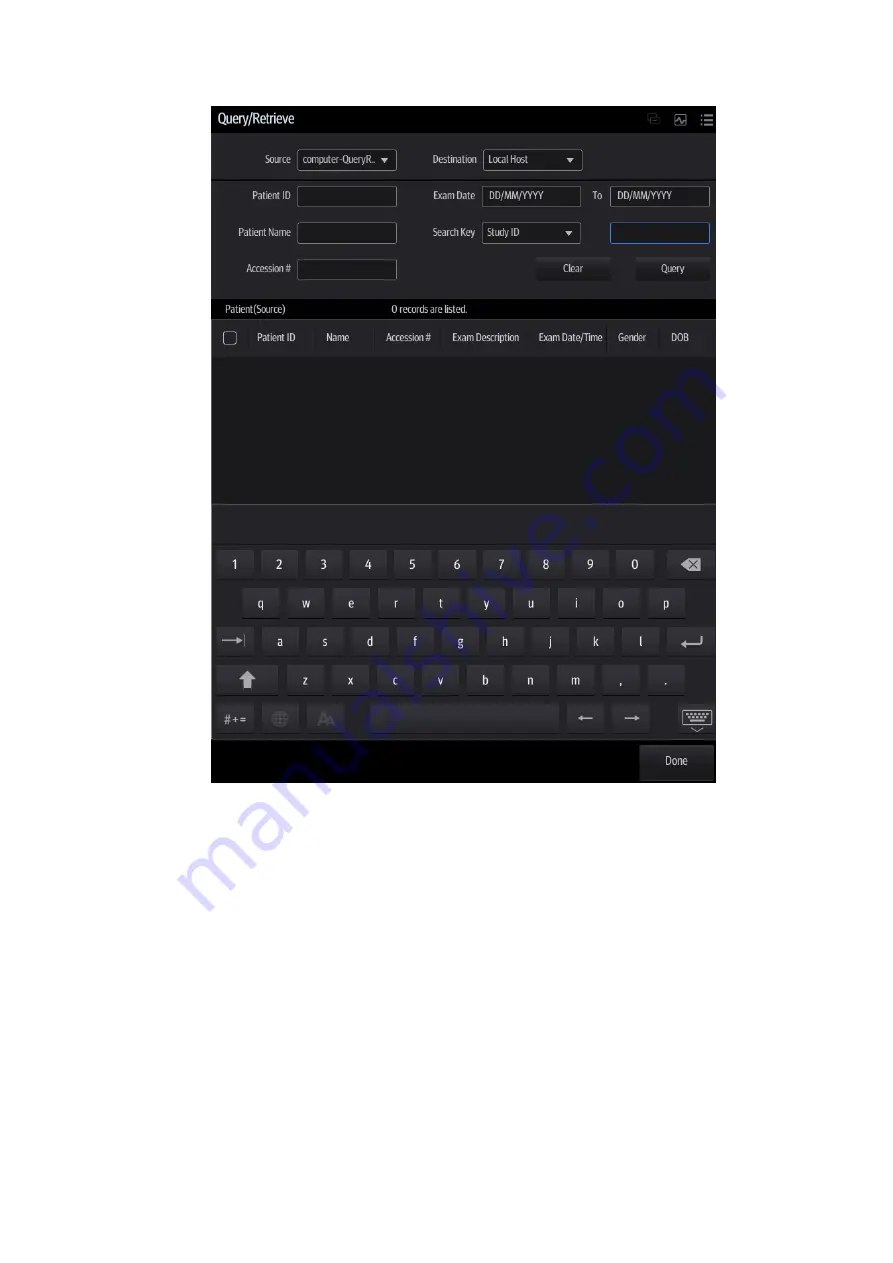
3. Select the server (both the source and the destination).
4. Enter the query information, such as Patient ID, Patient Name, Accession #, Exam Date or
keywords.
Tap [Clear] to empty the entered query information.
5. Tap [Query]. The system performs the query and lists the results in the patient (source) list.
You can perform further queries based on the results by entering new query information.
6. Select patient records according to the actual situation.
7. Tap [Retrieve] to retrieve the patient records in the DICOM query/retrieve server to the local
machine.
8. Tap [Done]. The retrieved patient records are listed in the iStation screen.
11.4 DICOM Media Storage
Patient data in the ultrasound system can be saved on external media in DCM format, while DCM
files can be accessed in the ultrasound system.
Media Storage
Summary of Contents for TE5
Page 1: ...TE7 TE5 Diagnostic Ultrasound System Operator s Manual Basic Volume ...
Page 2: ......
Page 6: ......
Page 12: ......
Page 24: ......
Page 36: ......
Page 54: ......
Page 110: ......
Page 115: ...Display Cine Review 6 5 6 Tap Return on the screen or tap Freeze to exit image compare ...
Page 120: ......
Page 124: ......
Page 156: ......
Page 174: ......
Page 192: ...12 18 Setup Select Advanced and do as follows Select MAPS and do as follows ...
Page 202: ...13 2 Probes and Biopsy C5 2s L12 4s L7 3s P4 2s L14 6s C11 3s L14 6Ns V11 3Ws P7 3Ts 7LT4s ...
Page 226: ...13 26 Probes and Biopsy NGB 034 NGB 035 ...
Page 250: ......
Page 272: ......
Page 276: ...A 4 Wireless LAN Tap Add Manually create a network profile to set ...
Page 282: ......
Page 318: ......
Page 322: ......
Page 323: ...P N 046 006959 07 1 0 ...


