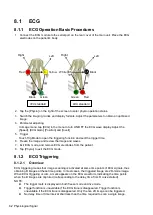
10-4 Patient Data Management
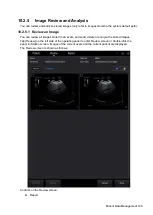
Select [Report] tab to review or edit the currently-selected patient's report.
Patient
Select [Patient] tab to review or edit the currently-selected patient information.
Image operations
[Select All]: tap to select all images in the thumbnail window.
[Deselect All]: after selecting [Select All], the button changes to [Deselect All]. Cancel all
selections by selecting [Deselect All].
[Send To]: tap to send the selected image to another location, DICOM server, printer, etc.
[Delete]: tap to delete the selected image.
: Tap to change the layout.
Tap [Done] to exit Review:
10.2.5.2 Image Analysis
In image analysis status, you can view, zoom, perform image parameter adjustment and
measurements, add comments and perform cine (multi-frame) review for a stored image. The
operation steps are the same as those for real-time scanning. See the relevant sections for details.
To enter image analysis:
In image review status, double-click the selected thumbnail to open the image.
Tap [Return] to exit image analysis:
Other operations
You can perform cine review operations in image analysis status. For details, see “6 Display &
Cine Review”.
.”
10.2.6
iVision
The iVision function is used to demonstrate the stored images. Image files are played one by one
according to file names (including system-relevant and PC-compatible format images).
To perform image demonstration:
1. Select [Setup] -> [General] -> [iVision] to enter the iVision setting screen.
2. Add the contents to be played and select demo mode.
3. Select an item in the list and tap [Start] (in the bottom-left corner of the screen) to begin the
demonstration.
4. Tap [Exit] to exit iVision status.
The iVision setting screen is shown as follows:
Summary of Contents for TE5
Page 1: ...TE7 TE5 Diagnostic Ultrasound System Operator s Manual Basic Volume ...
Page 2: ......
Page 6: ......
Page 12: ......
Page 24: ......
Page 36: ......
Page 54: ......
Page 110: ......
Page 115: ...Display Cine Review 6 5 6 Tap Return on the screen or tap Freeze to exit image compare ...
Page 120: ......
Page 124: ......
Page 156: ......
Page 174: ......
Page 192: ...12 18 Setup Select Advanced and do as follows Select MAPS and do as follows ...
Page 202: ...13 2 Probes and Biopsy C5 2s L12 4s L7 3s P4 2s L14 6s C11 3s L14 6Ns V11 3Ws P7 3Ts 7LT4s ...
Page 226: ...13 26 Probes and Biopsy NGB 034 NGB 035 ...
Page 250: ......
Page 272: ......
Page 276: ...A 4 Wireless LAN Tap Add Manually create a network profile to set ...
Page 282: ......
Page 318: ......
Page 322: ......
Page 323: ...P N 046 006959 07 1 0 ...


