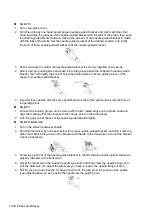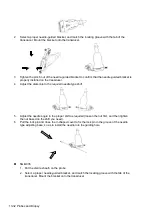
13-44 Probes and Biopsy
High-pressure steam sterilization (only applicable for metal guided brackets)
Autoclaving (moist heat) 121°C for 20 minutes.
NOTE:
Repeated sterilization may degrade the safety and performance of the needle-guided
bracket.
The metal needle guide brackets recommend preferred High-pressure steam
sterilization.
High-pressure steam/immersion sterilization does not affect a bracket's life duration. The
life duration is affected by the bracket's daily application. Please check the appearance
of the bracket before use.
13.2.9 Storage and Transportation
1. Do not use the carrying case for storing the needle-guided bracket. If the carrying case is used
for storage, it may become a source of infection.
2. Between examinations, keep the needle-guided bracket in a sterile environment.
3. If the needle-guided bracket is sent to your MINDRAY representative for repair, be sure to
disinfect or sterilize it and keep it in the carrying case to prevent infection.
4. Sterilize the carrying case as necessary.
5. Store or transport the needle-guided bracket under the following ambient conditions:
Ambient temperature: -20°C to 55°C
Relative humidity: 30% to 85% (no condensation)
13.2.10 Disposal
Be sure to sterilize the needle-guided bracket before disposing of it.
Contact your MINDRAY representative when disposing of this device.
13.3 Middle Line
Middle Line helps to locate and observe the focus point of lithotripsy wave during lithotripsy
treatment. By means of providing information for the lithotripsy machine as well as a tool for
watching the procedure of lithotripsy in real-time, you can adjust the intension and frequency of the
lithotripsy wave through lithotripsy machine.
NOTE:
This function in the ultrasound system is for lesion (stone) location and observation
only. For details, please refer to lithotripsy machine accompanying manuals.
To enter the mode: tap [Middle Line] in the iNeedle menu.
The middle line is a vertical dotted line located in the middle of the screen, the position and
direction of which cannot be changed.
There is a mark icon of “×” located on the middle line which can be moved up and down
along the line by rolling the track ball.
The depth of the mark is displayed in the image parameter area of the screen.
Summary of Contents for TE5
Page 1: ...TE7 TE5 Diagnostic Ultrasound System Operator s Manual Basic Volume ...
Page 2: ......
Page 6: ......
Page 12: ......
Page 24: ......
Page 36: ......
Page 54: ......
Page 110: ......
Page 115: ...Display Cine Review 6 5 6 Tap Return on the screen or tap Freeze to exit image compare ...
Page 120: ......
Page 124: ......
Page 156: ......
Page 174: ......
Page 192: ...12 18 Setup Select Advanced and do as follows Select MAPS and do as follows ...
Page 202: ...13 2 Probes and Biopsy C5 2s L12 4s L7 3s P4 2s L14 6s C11 3s L14 6Ns V11 3Ws P7 3Ts 7LT4s ...
Page 226: ...13 26 Probes and Biopsy NGB 034 NGB 035 ...
Page 250: ......
Page 272: ......
Page 276: ...A 4 Wireless LAN Tap Add Manually create a network profile to set ...
Page 282: ......
Page 318: ......
Page 322: ......
Page 323: ...P N 046 006959 07 1 0 ...

