background image

Playing Back Animations

237

❚❘❘


To save an existing animation file with a new name:


1.

Choose Animation

|

Save As.

The Save As dialog appears.


2.

Enter the path and filename for the animation file, 

then click OK.


Playing Back Animations 

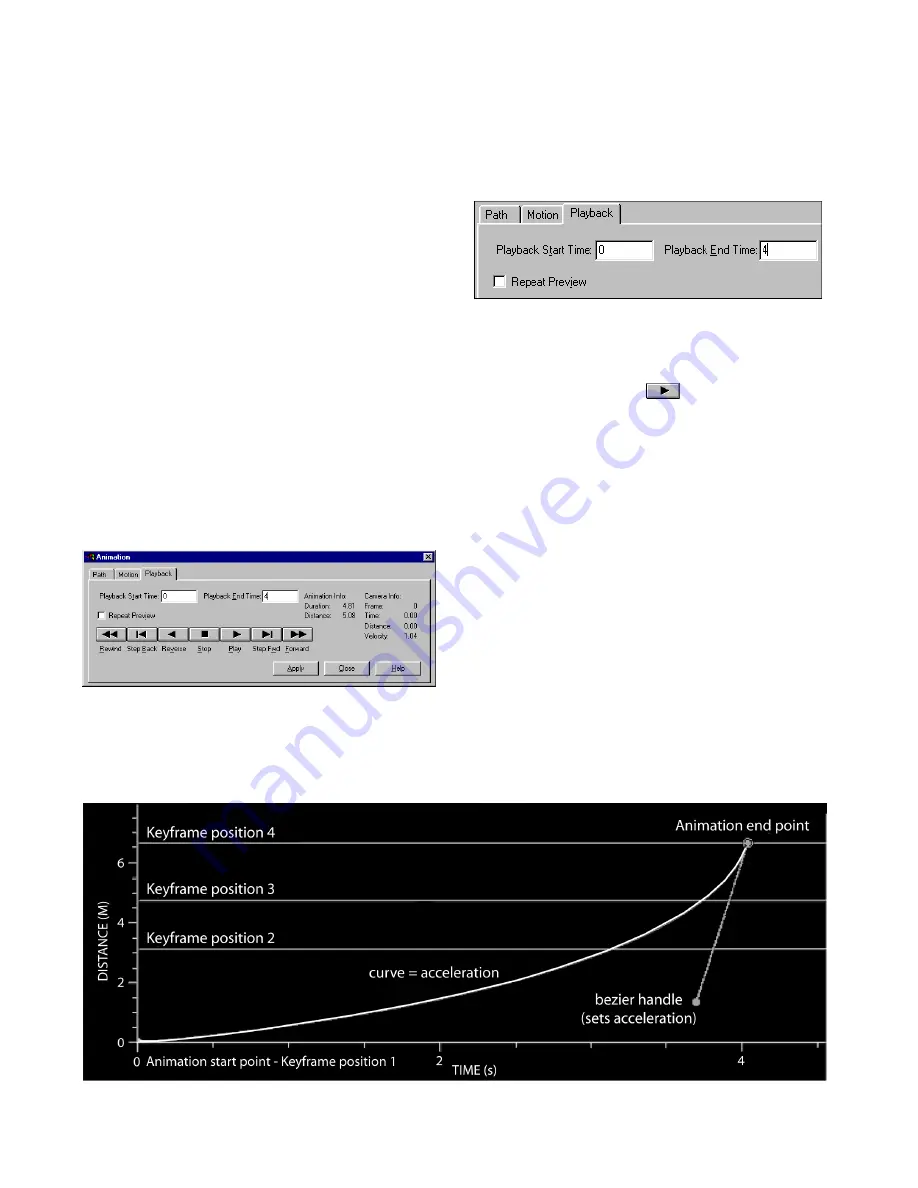
Once you have set the path and motion, you can 
preview the animation. 


To play the animation:


1.

Choose Animation | Edit.

The Animation dialog appears.


2.

Click the Playback tab.


3.

Enter a start time in the Playback Start Time box 

and an end time in the Playback End Time box. 

If you type -1 in the Playback End Time box, Light-
scape sets the end time to the length of the animation. 


4.

Click the Play button

to play through your 

animation sequence.


Note: 

The playback runs in real time. If the 

computer cannot draw frames fast enough, some 
will be skipped. This can cause the playback to 
appear disjointed or jumpy.


5.

To show more frames per second during play-

back, preview the animation in Wireframe mode. You 
can also adjust the display speed. Keep in mind the 
human eye requires a minimum of 12 frames per sec-
ond to be ‘convinced’ of motion. If your model con-
tains layers and objects that are not displayed in the 
animation, turn them off.


6.

Enable Repeat Preview to play the animation in a 

continuous loop.

Animation Example

Summary of Contents for LIGHTSCAPE

Page 1: ...SULO 4 31 93 36034333308355 LJKWVFDSH...

Page 2: ...aphisoft are registered trademarks of Graphisoft R D Rt Lumen Micro is a registered trademark of Lighting Technologies Inc ARRIS is a trademark of ARRIS LLC form Z is a trademark of auto des sys Inc P...

Page 3: ...Installing Lightscape for the First Time 12 Upgrading from a Previous Version of Lightscape 12 3 Workflow 13 Summary 13 Preparing the Model 14 Processing the Radiosity Solution 15 4 The Interface 17...

Page 4: ...Studio VIZ to Lightscape 72 6 Refining Geometry 81 Summary 81 About Refining Geometry 81 Working with Layers 82 Working with Blocks 85 Modifying Block Definitions 89 Working with Block Instances 91 Wo...

Page 5: ...Utilities 155 10 Daylight 159 Summary 159 About Sunlight 159 About Skylight 159 Using Daylight in Exterior Models 160 Interior Model Considerations 161 Illuminating Your Model with Daylight 162 Enabli...

Page 6: ...ure 203 Using Mesh to Texture 204 Mesh to Texture Examples 210 14 Rendering 213 Summary 213 About Rendering in Lightscape 213 Creating Images 214 Rendering Multiple Views 217 Ray Tracing an Area 219 R...

Page 7: ...258 Rendering Files Using LSRENDER 263 Converting Radiosity Meshes to Textures Using LSM2T 267 Converting Solution Files to VRML Files Using LS2VRML 271 Merging Lightscape Files Using LSMERGE 273 Con...

Page 8: ...l for OpenGL Display 305 Ray Tracing Reflection Models 305 E IES Standard File Format 309 F File Types 311 G Common Lamp Values 313 H Viewing Utilities 317 Viewing Utilities 317 Using LSViewer 317 Usi...

Page 9: ...interface for defining lights and materials Lightscape has many unique advantages over other rendering technologies including Realism Lighting Interactivity Progressive refinement Realism Because Ligh...

Page 10: ...rm A 3D model contains geometric data defined in rela tionship to a 3D Cartesian coordinate system This system is sometimes referred to as world space The model may also contain otherinformation about...

Page 11: ...d with flat paint is a good example of a diffuse surface Very smooth surfaces reflect the photons in one direction at anangleequaltotheangle at which they arrive at the surface angle of incidence Thes...

Page 12: ...encountered The color at the subsequent intersection point is calculated and factored into the original point 4 If the second surface is yet again a reflective or transparent surface repeat the ray t...

Page 13: ...elements The radiosity process calculates the amount of light distributed from each mesh element to every other mesh element It then stores the final radiosity values for each element of the mesh Whe...

Page 14: ...iterations required for a simulation to reach a state of convergence varies depending on the complexity of the environment Because the iter ations are sorted to calculate the surfaces with the greate...

Page 15: ...using the physically based quantities You can obtain these values directly from the manufacturers of various lamps and luminaires A table of some common lamp types is provided in Appendix G Common Lam...

Page 16: ...entation for your Lightscape software includes Lightscape 3 2 User s Guide printed manual and on line file Learning Lightscape 3 2 printed manual and online file Online Help Installing LSnet online fi...

Page 17: ...port Reader s Comments We would like to hear from you Your comments can help us improve the quality of our documentation Mail fax or e mail your comments to Discreet Documentation Department 10 Duke S...

Page 18: ...NOTES 10...

Page 19: ...inimum Requirements Recommended Requirements Intel Pentium or Pentium Pro at 200 MHz Intel Pentium II 350MHz processor Windows NT 4 0 with Service Pack 4 Windows 95 with Service Pack 1 or Windows 98 W...

Page 20: ...o a previous step by clicking on this button You can also cancel the installation process by clicking Cancel 4 If the installer prompts you to restart your com puter do so before starting Lightscape U...

Page 21: ...file extension In the Solution stage Lightscape alters the model structure to optimize it for radiosity processing The model is saved in a Lightscape Solution file with a ls file extension In this sta...

Page 22: ...istic results Templates make it easy to define properties for numerous materials including metal polished stone flat paint water and so on You can also use textures maps and procedural textures to enh...

Page 23: ...in the model both direct and indirect You can interrupt theprocessingoftheradiositysolutionatanytimeto alter or fine tune the model s appearance How radiosity works is described in detail in Chapter...

Page 24: ...try into texture maps This is important when using Lightscape to create environments for interactive games or web sites For more information see Chapter 13 Mesh to Texture A Lightscape radiosity solut...

Page 25: ...ument properties Setting system options Starting Lightscape To start Lightscape double click the Lightscape application icon By default this icon is located in the Lightscape program folder You can al...

Page 26: ...r or by using the secondary mouse button to open a context menu Graphic Window You use the Graphic window to display and edit the geometry of the current model In the Graphic window you select objects...

Page 27: ...es it is the current layer Any new objects you add to the model are added on the current layer You can right click the Layers table to display the Layers context menu which contains functions appropri...

Page 28: ...oose Preview from the context menu Changing the Sample Sphere Diameter You can change the diameter of the sample sphere to make its size consistent with the objects in your model to which you will app...

Page 29: ...mon name and an insertion point Once you have defined a block you can make repeated instances of it and place them into the model at a variety of locations sizes and orientations Note Blocks are avail...

Page 30: ...nd Luminaire Previews on page 22 Right click the Luminaires table to display a context menu of functions for manipulating luminaires in the table For more information on using luminaires see Chapter 8...

Page 31: ...r or preview context menu Changing the Display You can use the shading options to control how a block or luminaire fixture is displayed in the preview You can use the same shading as the model or set...

Page 32: ...Controls on page 30 In Special Selection mode you use special opera tions to carry out specific tasks For example you can use the Pick mode in the Transformation dialog to change the orientation of a...

Page 33: ...ars 2 Double click a toolbar to toggle its state A red check mark next to the toolbar indicates that it is currently displayed Moving Toolbars By default toolbars are docked at the top of the Graphic...

Page 34: ...toolbar to specify how the model is displayed For moreinformation see Controlling theDisplay on page 35 The Selection Toolbar Use the buttons on the Selection toolbar to specify how the mouse is used...

Page 35: ...ontrol the placement of geometry in the model For more information see Transforming Objects on page 43 The Radiosity Processing Toolbar Use the buttons on the Radiosity Processing toolbar to control t...

Page 36: ...If your model was previously saved the Save function over writes the previous file To preserve the previous file select Save As from the File menu Undelete The Undelete function offers one level of u...

Page 37: ...ng the View Projection You can choose to view your model in Perspective view or in one of several orthographic views You can use any of the following methods to access the view projection controls The...

Page 38: ...can only use view controls that apply to a specific view projection as described in the following sections Orbit Use Orbit to orbit around the model The viewer position rotates around the focus point...

Page 39: ...to move the viewer position forward or backward along the view path To use the Dolly view control 1 To move the viewer position forward drag the mouse upward in the Graphic window 2 To move the viewe...

Page 40: ...ocation on the X Y and Z axes in the corresponding input boxes These values are in the length units of the model For more information see Setting Units Properties on page 46 Note Setting the viewer po...

Page 41: ...change the focal length the field of view is adjusted automatically and the film size remains the same Using View Extents Use the View Extents option to display all the objects in the model To use Vi...

Page 42: ...he Set Viewport Size option to select a different image size When you are establishing views for your final renderings you may want to set your viewport to be proportional to the required final render...

Page 43: ...lay options to change how the model appears in the Graphic window Use the shading modes to improve system performance while working with the model or to obtain more precise feedback in the appearance...

Page 44: ...Wireframe mode To change the wireframe color see Wireframe on page 36 Note In Hidden Line mode the mesh structure generated during radiosity processing in the Solu tion stage is superimposed on the mo...

Page 45: ...f undistributed light energy in the environment during the Solution stage This helps you visualize the model during the early stages of processing For more information see Chapter 11 Radiosity Process...

Page 46: ...u ously rotate around the focus point of the current view Toggle Auto Orbit on and off by selecting it from the Display menu This option is only available in Perspective view Using Reload Textures Cho...

Page 47: ...ny Vertex to drag a marquee around an area to select objects that have at least one vertex within the selected area Area All Vertices Use Area AllVertices to drag a marquee around an area to select ob...

Page 48: ...isable this option to replace the current selection with the new selection Pick Top Block In the case of nested blocks you can use Pick Top Block to select the top block in a block hierarchy Selecting...

Page 49: ...able and choose Add to Selection Filter from the context menu Shift click to select several materials at once 2 Choose Edit Selection Filter or click the Selec tion Filter Dialog button on the toolbar...

Page 50: ...he selected material is removed from the list To use luminaire selection filters 1 Choose Edit Selection Filter The Selection Filter dialog appears 2 Click the Luminaires tab 3 Click a processing para...

Page 51: ...ively move and rotate objects select axes constraints and use the Aim tool You can perform additional trans formations scaling an object for example on the Transformation dialog For more information s...

Page 52: ...ple to move the object along the X axis only click Constrain to X Note Once you have selected an object you can also right click and choose Constrain to Axis X 4 In the Graphicwindow click anddrag th...

Page 53: ...following sections describe the property options in detail Setting Display Properties Use the Display properties to control how the model is displayed on your monitor Brightness Usethisoptionto contro...

Page 54: ...tem to use for lighting You can choose either International or American Time Use this option to specify the time units to use for an animation setup You can choose seconds minutes or hours To set the...

Page 55: ...is Disabled Density Use this option to set the density of the fog The range is 0 to 1 with 1 representing the densest fog effect Fog Color Use this option to select the color of the fog You can choos...

Page 56: ...the Browse Directory dialog which you use to select a path to add to the path lists Remove UsetheRemovebuttontodeleteaselected pathfrom the path list To set the paths properties 1 Choose File Properti...

Page 57: ...ace setting resets the value of Level of Detail to 100 Enable Preview to preview your changes without exiting the dialog Level of Detail Use this option to control the amount of detail displayed rathe...

Page 58: ...layed textures select an option from the Max Display Texture Size list 6 Click OK Setting System Options The system options are the general parameters and defaults stored with your Lightscape applicat...

Page 59: ...n For information about using the previews see Customizing Material Previews on page 20 and Customizing Block and Luminaire Previews on page 22 Setting Drag and Drop Options Use these options to contr...

Page 60: ...eLists options to set the maximum number of files listed for quick access in the Light scape menus To set the environment options 1 Choose Tools Options The Options dialog appears 2 Click the Environm...

Page 61: ...rdinate system Group objects into blocks and layers Overwrite or merge to the current project Adjust the light intensity scale Note For the best results you should build your models with Lightscape in...

Page 62: ...d have selected instead Consider the following example you import a model using inches as the unit of measurement you thenmeasureawall andfindthat it measures 10 inches instead of 10 feet It is appare...

Page 63: ...to Blocks on page 59 For information about 3DS files see Grouping En tities into Blocks on page 67 For information about 3D Studio MAX or 3D Stu dio VIZ see Grouping Objects in Blocks on page 74 Overw...

Page 64: ...e These plug ins are installed when you first install Lightscape Using Third Party Applications A number of third party CAD software manufac turers provide support for Lightscape export from their app...

Page 65: ...not overwrite the existing ones As a result the modi fied layers will contain the old and new versions of the geometry To avoid this situation either delete or rename the affected layers in Lightscape...

Page 66: ...ping to close the top and the base of objects that have thickness If the entities have no thickness enable Capping to convert them into surfaces for example enable Capping to convert a circle into a d...

Page 67: ...Segments Use the Number of Arc Segments option to control the number of straight line segments into which the system divides arcs circles and arc segments in 2D polylines Arcs are divided into a numbe...

Page 68: ...nition in Lightscape By default when you import a DXF file Lightscape assigns materials to surfaces based on the color numbers in the DXF file If an item does not have a color number Lightscape uses t...

Page 69: ...etry does not need to be prepared again in the subsequent Prepa ration stage For information on working with luminaires see Chapter 8 Artificial Lighting For information on working with blocks see Cha...

Page 70: ...ces that are part of the specific block into which the focus point is inserted Surfaces that are part of other sub blocks are not affected A focus point in a block takes precedence over a fo cus point...

Page 71: ...r meters or their values Because the effect of lighting in a model depends on the dimensions of the model it is impor tant to indicate what units were used when loading a DWG file To specify units of...

Page 72: ...thing group If facets are part of a smoothing group Lightscape can create a smooth curved appearance between these facets when they are displayed and rendered For more information see Translating Geom...

Page 73: ...n in Lightscape For moreinformationaboutcreating materialmaps see Mapping Materials on page 60 To use a material map 1 Click the Blocks Luminaires and Materials tab in the Import DWG dialog 2 Click th...

Page 74: ...o dialog appears 2 Do one of the following Type the filename in the Name box Click Browse navigate to the appropriate file in the Open dialog that appears and then click Open 3 Select one of the follo...

Page 75: ...rdinate system when importing the 3D Studio file into Lightscape For more information see Converting Coordinate Systems on page 54 Importing Materials Each 3D Studio material is converted into a Light...

Page 76: ...imported as is without using the Keyframe In most cases you should enable Import Keyframe Instances Importing Background and Fog If the background in the 3D Studio file is a solid color that color is...

Page 77: ...cape Preparation file with the incoming file or merge the incoming geometry to the open file Overwrite Select Overwrite to create a new Lightscape model with the same name as the LightWave file You sh...

Page 78: ...names for textures To leave the texture path unchanged and use absolute paths for textures disable this option Grouping Objects into Blocks Select one of the following options to organize objects into...

Page 79: ...scene The default distance is 2 5 meters approximately 8 feet which is an estimate for typical interior models If you use targeted spotlights you can enter the average distance between the lights and...

Page 80: ...posi tion during the morning or afternoon and between the summer and winter solstice Choose which date and time you want the importer to use if there is a choice 6 Click the Recalculate button A nort...

Page 81: ...ing in an area depends on the size of the area For this reason it is important to indicate the units of measurement when you export a model To specify units of measurement 1 In the Export Lightscape P...

Page 82: ...x or use the default name None No blocks are created All the meshes of all the objects are created directly in the model Grouping Objects in Layers Use layers to organize the objects you export Select...

Page 83: ...ight Intensity at Distance Enable this option to convert lights by matching the intensityata specified distance Enterthe distancein the corresponding box Average Target Distance Enable this option to...

Page 84: ...option to save only the texture filename The texture path list contains the directories in the Bitmaps panel of the Configure Paths dialog in 3D Studio MAX or 3D Studio VIZ When you enable this optio...

Page 85: ...st The light you want to use for the sun This option only displays spotlights and directional lights If you select a light and enable the Recalculate option the direction of the sun is based on the di...

Page 86: ...the sky North Enter the direction of north in degrees clockwise from the positive Y axis If your selected light places the sun too high in the sky for a direction that you enter the direction appears...

Page 87: ...owever youcan use the Views panel to export additional views Additional views are saved in the same directory as the Preparation file Each view is saved in a Light scape view file vw and is named afte...

Page 88: ...rting Preparation files for multipleframes aviewisexportedforeachcamera in each frame The frame number is appended to the end of the filename for each camera If any of the viewfiles tobe exported will...

Page 89: ...f the model changes when you start the radiosity processing the types of modeling operations you may undertake differ from the Preparation to the Solution stage Preparation Model Structure When you im...

Page 90: ...you must open the original Preparation file lp make the changes and then regenerate another Solution file ls During the Solution stage materials and layers behave in the same way as they do during th...

Page 91: ...ist You can now add objects to the layer Turning Layers On or Off Turn layers on or off to selectively display and process different portions of your model To turn layers on or off 1 In the Layers tab...

Page 92: ...yer s To select multiple layers use Ctrl click or Shift click 2 Right click the Layers table and choose Delete The selected layer is deleted 3 To restore the deleted layers choose Edit Undo immediatel...

Page 93: ...g their preparation easier and more interactive Light fixtures are represented by a special type of block called luminaires A luminaire is a block to which you assigned photometric properties With few...

Page 94: ...isolate mode Return to Full Model End Isolate mode and display the full model Query Instanc es Highlight instances of the select ed block in the Graphic window anddisplay block information on the sta...

Page 95: ...oCAD the surfaces in the block retain their layers except surfaces on layer 0 These surfaces inherit the layer on which the block instance is inserted Duplicating a Block Definition If you want to cre...

Page 96: ...s To rename a block instance 1 In the Graphic window select the block instance that you want to rename 2 Right click the Graphic window and choose New Block 3 The New Block dialog appears 4 Enter a na...

Page 97: ...nces of One Block with Instances of Another Block When you load a block from a library it overwrites any existing block of the same name already in the Blocks table All instances of the overwritten bl...

Page 98: ...able and choose Isolate The block appears alone in the Graphic window 2 Select the isolated block in the Graphic window right click then choose Transformation The block s insertion point and the Trans...

Page 99: ...elative Scale Factor X Y and Z boxes en ter a multiplier value and click Apply For example enter a value of 2 in the X boxto double the size of the block in the X direction Enter a value of 0 5 to shr...

Page 100: ...he list then click OK The selected surfaces are replaced with an instance of the selected block Duplicating a Block Instance Use the Duplicate command to create a single dupli cate of a block instance...

Page 101: ...es in the X Y and Z boxes to specify the position of the block in your model For example entering 2 in the X box moves the block to a spot 2 units to the right of the scene origin Relative enable Rela...

Page 102: ...formation dialog appears 3 Click the Rotate tab 4 Select one of the following rotation modes Absolute use Absolute to rotate the selected block at an absolute angle about an axis of rotation speci fie...

Page 103: ...to your model using the surface creation and transformation tools which are avail able during the Lightscape Preparation stage For example you can set surface orientation and smoothing For informatio...

Page 104: ...from the menu that appears 2 If Display Enhancement is on turn it off The Surface Orientation dialog appears Backfacing surfaces are no longer culled instead they appear bright green 3 To help you se...

Page 105: ...ay from or toward a focus point Lightscape determines the orientation of surfaces oblique to the focus point by extending the plane of that surface Notice how the slight difference in the placement of...

Page 106: ...e lighting of the model To make a surface double sided 1 Select the surface 2 Right click and choose Orientation 3 In the Surface Orientation dialog click Two Sided The selected surface becomes double...

Page 107: ...polygonal reso lution of the curved surface when you import the model Grouping Surfaces into Blocks You can group selected surfaces to create a new block For more information see Creating New Blocks o...

Page 108: ...f the model and they are oriented to face the camera You can only create surfaces during the Prepa ration stage To create a surface 1 Choose Tools Create Surface The Create Surface dialog appears 2 Do...

Page 109: ...ure the distance between any two selected points in your model To measure the distance between two points 1 Choose Tools Measure Distance The Measure Distance dialog appears 2 To pick a point on the e...

Page 110: ...NOTES 102...

Page 111: ...Aligning textures About Material Properties Because Lightscape is based on physically accurate simulation techniques it is important to provide accurate physically based material specifications to obt...

Page 112: ...roper radiosity solution it is very importantthatthereflectanceofa materialrepresent aphysicallyvalidrangeforthetypeofmaterialbeing modeled If you makethecolorvalueofyourmaterialtoohigh the solution l...

Page 113: ...ate rial You also get sharper highlights For more information see Chapter 14 Rendering As a material becomes less shiny reflections and highlights seen in the material become less well defined Shinine...

Page 114: ...material name to activate the Material Properties dialog which contains tools for editing the characteristics of the selected materials See Editing Material Properties on page 111 Customizing Materia...

Page 115: ...ng an image in front of the preview sphere that can be reflected in its surface Changing the Default Material The first material listed in the Materials table is the default material When you create a...

Page 116: ...oad Textures Reloadthetextureimagefiles and update the surfaces in your model This is useful if you replace or modify a tex ture image file outside of Lightscape while your Light scape project is open...

Page 117: ...al 2 Right click the Materials table then choose Re name The name of the selected material is highlighted and a blinking cursor appears at the end of the high lighted text 3 Type a new name and press...

Page 118: ...on importing materials from your modeling package see Chapter 5 Importing Geometry Loading and Saving Materials from a Library Lightscape provides a library of basic materials that you can use or modi...

Page 119: ...lution or Preparation files Creating New Materials You can create new materials to add to the Materials table To create a new material 1 Right click the Materials table then choose Cre ate A blinking...

Page 120: ...r more information see Customizing Material Previews on page 106 Setting Physical Properties Use the Physics panel to determine how a material interacts with the light in your scene The properties tha...

Page 121: ...l be set to within the recommended range of values for the specific type of material being defined Reflectance by default is set either by the brightness of a texture map if one is used or by the Valu...

Page 122: ...luminance value Luminance values are incd m2 Formoreinformationonluminanceunits see Chapter 8 Artificial Lighting To make a material self illuminating On the Physics panel of the Material Properties...

Page 123: ...select a texture file that is not in an existing path you are prompted to add the file s location to your system or document path In most cases you should accept the default that adds the selected fil...

Page 124: ...should also set the maximum reflectance within the valid range If the texture is more homogeneous for example marble or granite then the average reflectance is more significant Filtering Method Lights...

Page 125: ...rightness of the texture and the value of the color affect the diffuse reflectance However neither the brightness nor value sliders show the range indica tors If the Average Reflectance number shown o...

Page 126: ...ayed To use the texture average 1 On the Texture panel define the material s tex ture 2 On the Color panel click Texture Average The material s color properties are set to the texture average If you t...

Page 127: ...the same as the reflectance value You can howev er modify the reflectance for a given color value us ing the Reflectance Scale on the Physics panel For more information see Using Reflectance Scale on...

Page 128: ...bumps or depres sions adjust the width 4 To simulate bumps set Height to a positive val ue 5 To simulate a smooth surface with occasional bumps set Height to a positive value and set Base line to a va...

Page 129: ...ys the results Note You can right click the sample sphere to change its diameter and make its size consistent with the surfaces to which you will apply the material 4 To preview your results assign th...

Page 130: ...n to wrap a texture around a surface as if it were a cylinder The cylinder is defined by a top pole a bottom pole and a seam direction Spherical The texture is projected onto a sphere defined by a top...

Page 131: ...the current alignment or copy the alignment of one surface to another To access the Texture Alignment dialog 1 Select a surface 2 Right click and then choose Texture Align ment The Texture Alignment...

Page 132: ...of the texture image If the texture is not of a fixed size the three points also determine its tile size To apply orthographic projection 1 Select a surface or surfaces 2 Right click and then choose...

Page 133: ...le button The upper left corner moves accordingly This is useful when there is no easy way to pick three points at a 90 degree angle to each other Using Cylindrical Projection Use cylindrical projecti...

Page 134: ...aces to make it easier to see which points you are picking You can use the Display Show Axis option to help deter mine the axis of the bounding box Using Spherical Projection Use spherical projection...

Page 135: ...system For information see Chapter 5 Importing Geometry Querying and Copying Texture Alignments Use the Texture Alignment dialog to display the alignment on a surface or to copy the alignment from on...

Page 136: ...NOTES 128...

Page 137: ...in your model Editing existing luminaires Setting luminaire processing parameters About Luminaires Luminaires represent both the physical appearance andthephotometricproperties ofalightingfixture A lu...

Page 138: ...ties dialog which contains tools for editing thephotometriccharacteristics of the selected luminaire See Setting Photometric Properties on page 132 Luminaires Table Context Menu Right clicktheLuminair...

Page 139: ...When a luminaire definition is loaded it over writes any existingluminaire definitions of the same name 3 The Available Luminaires dialog appears 4 Select the luminaires you want to load from the li b...

Page 140: ...urn blocks into luminaires only in the Preparation stage To create a luminaire from a block 1 Select a block in the Blocks table right click the table and then choose Define as Luminaire Theblockis pl...

Page 141: ...res are assigned a point source type Note Source types are exclusive to luminaire defi nitions They cannot be specified for single instances of luminaires You save source types only in the Preparation...

Page 142: ...electtheLinearorAreasourcetype enable Pick Panel and click a surface in the Graphic window to define the area or length of the LID 4 In the Intensity group box select a distribution from the list For...

Page 143: ...b Rotating the LID Rotation determines the direction of the light emitted by the LID relative to the luminaire geometry For example if you position a light bulb on one side of a square fixture you cou...

Page 144: ...e the lamp color Note As discussed in Appendix A Light and Color Lightscape supports only RGB values when calculating the radiosity solution As a result subtle differences between lamp types may not a...

Page 145: ...sity value and a distance if you have selected Illuminance at a Distance as the Magni tude setting 3 Click Apply to update the luminaire intensity Defining Intensity Distribution Intensity distributio...

Page 146: ...types To define a spotlight distribution 1 In the Luminaire Properties dialog select Point from the Source Type list 2 Select Spot from the Distribution list 3 If necessary adjust the Intensity Magni...

Page 147: ...OK to close the dialog and update the luminaire definition Placing Luminaires in a Model New luminaires can be placed in the model in several different ways You add luminaires to a model only in the...

Page 148: ...n make modifica tions to a single luminaire instance without affecting the properties of the other luminaires of the same definition You can edit luminaire instances only in the Lightscape Solution st...

Page 149: ...opy luminaires only in the Preparation stage To copy a single instance of a luminaire 1 Select the luminaire you want to copy 2 Right click the Graphic window then choose Du plicate A copy of the sele...

Page 150: ...solute then enter coordinates in the X Y and Z boxes to specify the position of the lu minaire in your model For example entering 2 in the X box moves the luminaire to a spot 2 units to the right of t...

Page 151: ...te tab 4 Select one of the following rotation modes Absolute use Absolute to rotate the selected lumi naire at an absolute angle about an axis of rotation specified by X Y and Z For example enter 90 i...

Page 152: ...ue of 0 5 to shrink the luminaire to half its size 5 Click Apply to scale the luminaire without closing thedialog or clickOKtoscaletheluminaireand close the Transformation dialog Aiming a Luminaire In...

Page 153: ...formation The Transformation dialog appears 3 Click the Insertion Point tab 4 Selectoneoftheoptions in theValues list to adjust the position of the insertion point Moving the insertion point as illust...

Page 154: ...size to any value between 0 05 and 100 00 3 Click OK The luminaire icons are resized Note A luminaire icon is visible only when the lumi naire is selected Querying Luminaire Instances Use the Query I...

Page 155: ...hat the surfaces of the luminaire do not shadow the emitted light For more information on adjusting the LID see Positioning LIDs on page 134 If this is not possible you can also define surfaces of the...

Page 156: ...ion from a selected luminaire during a ray tracing oper ation When the Ray Trace Direct Illumination option is enabled the direct light contribution that was calculated during the radiosity processing...

Page 157: ...iles provided by various manu facturers into the photometric definition You can also create your own using the Photometric Web editor About Photometric Webs Photometric webs are used to represent gene...

Page 158: ...the luminous intensity on both the vertical and hori zontal angles can be examined simultaneously The center of the photometric web represents the center of the luminaire The luminous intensity in any...

Page 159: ...You can create photo metric webs or modify existing ones Using the Photometric Web Editor You can use the Photometric Web editor to create a photometric web by adding andthen editing control points an...

Page 160: ...any positive real number Saving Photometric Webs You can save customized photometric webs as IES files which can then be assigned to a luminaire To save a photometric web as an IES file 1 Create a pho...

Page 161: ...ou can use in your model The following example illustrates how to create a photometric web To create a customized photometric web 1 Choose Light Photometric Web The Photometric Web editor appears 2 In...

Page 162: ...resemble the following 11 Adjusttheviewpointtoatopview and thendrag the outermost points about halfway toward the axis while maintaining the web s circular shape 12 Return to the previous view The ph...

Page 163: ...following example lid2cibse options input_file output_file LID2CIBSE accepts the following file formats as input Only the LID data photometric web is converted All other fields and comments such as t...

Page 164: ...mmand line type the following or your path to the Lightscape application files and then press Enter CD PROGRAM FILES LIGHTSCAPE BIN 3 Using the following syntax type a command at the command line then...

Page 165: ...ghtscape application files and then press Enter CD PROGRAM FILES LIGHTSCAPE BIN 3 Using the following syntax type a command at the command line then press Enter lid2ltli options input_file output_file...

Page 166: ...NOTES 158...

Page 167: ...ng daylight for radiosity processing About Sunlight The sun is modeled as a parallel light source which makes the incident direction of sunlight constant over all surfaces in the scene You can specify...

Page 168: ...surface in its path as if there were no other surface blocking it However when you disable shadow calculations skyilluminationlevels atasurfacearedeterminedby the surface orientation For example all f...

Page 169: ...u tions from all directions around this center Most of the time the sky is occluded by the walls and ceiling of the model Typically only a few of the sky dome sectors considered during this computatio...

Page 170: ...e in your model 2 If you are defining it as a window make sure you have applied a transparent material to the selected surface Note If you have modeled a window with two surfaces only the surface faci...

Page 171: ...to place the current color in the Sky color box 9 Set other options as needed 10 Click OK or Apply to accept the daylight set tings Setting Sky Conditions Use the Sky Condition settings to approximat...

Page 172: ...n and orientation of your modelon theEarth and then set the time and date Setting the Location and Orientation You can specify the orientation of your model in space by indicating which direction is N...

Page 173: ...values on thePlace pageexplicitly enter a Time Zone value This value must accurately reflect the position of the model on the Earth 6 Enter a Month Day and Time in the corre sponding fields You can sp...

Page 174: ...it calculated during the radiosity processing unless theStore Direct Illumination option is disabled and recalculates it with the ray tracer Although this adds time to the ray tracing procedure it al...

Page 175: ...Sky Light Accuracy slider controls the amount of sampling used for the sky dome 4 If you are modeling an interior scene where day light only enters through windows or openings then you should enable...

Page 176: ...NOTES 168...

Page 177: ...naires Meshing examples Reducing meshing artifacts Testing for artifacts Modeling guidelines About Radiosity Processing This chapter discusses the radiosity solution process essentially the simulation...

Page 178: ...ible location on a surface Lightscape computes and stores the illumination only at selected sample points the mesh vertices It then computes the illu mination across any given mesh element by interpol...

Page 179: ...an ambient approximation during display the lighting of the scene initially appears very flat and uniform but at each iteration the system replaces this coarse approximation with a more accurate solut...

Page 180: ...process a radiosity solution 1 Set the processing parameters For information see Setting the Processing Parameters on page 172 2 Set the surface processing parameters if re quired For information see...

Page 181: ...Mesh Spacing parameter to limit the number of mesh elements that can be created The subdivision process cannot create new mesh elements smaller than the specified value of the Minimum Mesh Spacing no...

Page 182: ...eiving surfaces thus removing light from the illumination of the scene During this step it is important that the mesh subdi vision be exactly the same as that resulting from the original positive ligh...

Page 183: ...ith the Direct Source Subdivision Accuracy parameter The value of this parameter determines the likelihood that Lightscape will subdivide the source When you set the parameter to 0 the system never su...

Page 184: ...he system casts rays toward a regular grid of points that are spread over the source This grid size is equal to the control param eter in each direction In other words the number of rays cast is equal...

Page 185: ...e sky dome for exterior solutions The iterations corresponding to sunlight windows or openings and luminaires are unaffected The smaller the value of the skylight accuracy the faster the computation b...

Page 186: ...rameter to limit the number of initial mesh elements This prevents the initiation process from subdividing mesh elements with an area smaller than the speci fied value For more information see Elongat...

Page 187: ...inghas begun theyare consideredonly for the iterations run after the change To affect the complete radiosity solution you must reset the solution and start again To set the surface processing paramete...

Page 188: ...cting so that energy is not emitted twice Window Use Window to control whether a surface is consid eredawindow andtreated as asourceduringnatural lighting computations You must give the window a trans...

Page 189: ...he original Preparation model andreinitiatethe model Consequently you should always save your Preparation model before initiating it Note For large models the initiation process may becompletedmorequi...

Page 190: ...system creates an initial radiosity mesh that has an illumination value of 0 for each resulting surface It connects the vertices of the input surfaces to form triangular and convex quadrilateral mesh...

Page 191: ...ace that is reflecting light back into the environment To view the current light source Enable Highlight Source on the Process menu The current source will be outlined in green during radiosity proces...

Page 192: ...ng or if you have made significant changes to materials Changing Light Values In addition to changing surface materials you can also redefine the characteristics of photometric luminaires However you...

Page 193: ...division Contrast Threshold or the Minimum Mesh Spacing value is reached This process should produce mesh elements that are small enough to accurately reproduce the illumina tion on the surface of int...

Page 194: ...ng is not small enough to sufficiently capture the shape of the light beam Notice the adap tive subdivision around the light Mesh Spacing Example 3 Refined illumination Receiver Mesh Sample Spacing Mi...

Page 195: ...shadow boundaries that look jagged or stepped The following illustration shows the radiosity solu tion of a sharp spotlight on a wall Notice that the edges of the spotlight are jagged The image on th...

Page 196: ...dges For spotlights it is easier to get a good radiosity result with a sparse mesh if the edges are soft a floodlight for example The following examples were generated from the same mesh parameters an...

Page 197: ...g as explicit as possible about edges during the modeling process leads to a better solution in Light scape This does not mean you need to worry about every point of intersection For example you do no...

Page 198: ...deling the floor in two separate pieces or you can reduce the leaks by increasing the mesh subdivision of the floor during radiosity processing Floating Objects In the following example the initial sa...

Page 199: ...for interactive manipulation you can create the original surfaces from more regularly shaped components during the modeling stage Note You can also do this during the Preparation stage in Lightscape u...

Page 200: ...illumination from some or all of the lights to eliminate the artifacts completely After you make the necessary adjustments you can reset the solution and run it again Resetting the solution does not a...

Page 201: ...ng thin triangular surfaces Rectangular polygonsand equilateral triangles produce the best effects Avoid Overlapping Coplanar Surfaces Overlapping coplanar surfaces may display artifacts or noise when...

Page 202: ...NOTES 194...

Page 203: ...run the radiosity process use lighting analysis to visualize the distribution of light over the surfaces of your model You can query either lumi nance or illuminance and visualize the distribution of...

Page 204: ...lues using a Linear scale Bottom Pseudo color display of luminance values using a Logarithmic scale Select To Normal Turn off pseudo color or gray scale visualization Color Display the lighting distri...

Page 205: ...heir accompanying scale 7 If necessary adjust the range of light energy val ues by entering minimum and maximum range val ues in the appropriate boxes This adjusts the amount of lighting differentiati...

Page 206: ...to that point and the surface is displayed on the Statistics panel 6 To view information for a different point on a surface click that point on the surface of the model Analyzing Light Energy Statist...

Page 207: ...lect an item from the Quantity list 4 Click the Statistics tab 5 Click a point on a surface in your model Yellow crosshairs mark the selected point and the selected surface is highlighted in green 6 E...

Page 208: ...te light energy values on an arbitrary plane located anywhere in your model Workplanes are surfaces that typically do not appear in the final rendering of your scene For example you could place a work...

Page 209: ...pace where you are interested in measuring the photo metric performance To define a surface as a workplane 1 Choose Edit Selection Surface then select the surface 2 Right click your model then choose...

Page 210: ...NOTES 202...

Page 211: ...use Mesh to Texture to select surfaces with a complex mesh and create a texture that represents the lighting on that surface Then you can eliminate the mesh and apply the texture to the original surfa...

Page 212: ...iosity mesh is converted into a texture map you cannot update or change the lighting and material properties of the model To convert radiosity meshes to textures 1 Choose Tools Mesh To Texture The Mes...

Page 213: ...texture image is applied to more thanonesurface Lightscapecreatesaseriesoffiles using the texture map s original filename for each successive file combined with an incremental three digit number Sing...

Page 214: ...zardappears You usethis page to choose the projection method coordinates and related options for the generated texture Use the Projection list to specify the type of projec tion you want to use The fo...

Page 215: ...on When looking down at a spherical object like a ball enable this option Use Existing Texture Filenames The settings on this page are of particular impor tance if you selected the Relight existing te...

Page 216: ...hout an extension Format Type Use the Format Type list to select the file format of the image The default is the native Windows image format bmp The following file format options are available Note Wi...

Page 217: ...ages differ in image quality from OpenGL display this option is important if you intend to combine mesh to texture surfaces with non mesh to texture surfaces in a real time display application Generat...

Page 218: ...lution returning the selected surfaces to their original geometry Delete the Projected Geometry from the Model Enable this option to further reduce the model s complexity by deleting any surfaces you...

Page 219: ...image that has been applied as a texture map You may wish to add the lighting effects from the model to this existing texture image To relight an existing texture map 1 Choose Tools Mesh To Texture 2...

Page 220: ...Select Orthographic from the Projection list and align the texture to the wall on the Select Projection Method page 6 Choose a name and set a size for the texture on the Texture Output Information pa...

Page 221: ...since OpenGL is used as the interactive display engine of Lightscape Thesecondwaytocreatean imageinLightscapeisto use ray tracing This technique produces a better quality image of a radiosity solutio...

Page 222: ...rated OpenGL display capabilities the image must fit within the bounds of the Graphic window Images that have a higher reso lutionthanthe window s dimensions arebrokeninto tiles Each tile is the maxim...

Page 223: ...aires marked for ray tracing Use this option to correct shadow aliasing problems and provide additional enhanced lighting effects such as highlights on nondiffuse surfaces For more information see Cha...

Page 224: ...trol how many levels of reflection or transmis sion are calculated during ray tracing specify the number of ray bounces tracked in this box For example if you want to see through two windows set this...

Page 225: ...ng theview and the number of images it creates Current View List of Views and Animation File These options are available when rendering with either OpenGL or ray tracing Rendering a List of Views You...

Page 226: ...esulting images anim0000 tga anim0001 tga anim0002 tga and so on Note If you need to maintain the DOS 8 3 naming conventions you must specify an output filename no more than four characters long You c...

Page 227: ...ected area before ray tracing your entire model or to test the effects of material prop erty changes in the current model For more information see Chapter 11 Radiosity Processing You must adjust the R...

Page 228: ...about creating views see Viewing the Model on page 29 For information about animations see Chapter 15 Animation Rendering Across a Network LSnet is a batch processing utility you can use to split the...

Page 229: ...along its path andwhere the camera looks as it moves Once you create the camera path you can display animations on the screen in the Graphic window or you can render and save the individual frames of...

Page 230: ...section describes animation views and various steps you can use for defining the camera path Creating and editing a camera path Selecting moving and deleting keyframes Changing the slope of a camera...

Page 231: ...the straight lines to a curved path Note You can define and edit the path only in the orthographic views not in the Director view To create the camera path 1 Choose Animation Edit The Animation dialog...

Page 232: ...ate a closed loop Selecting Keyframes You can select and edit any number of keyframes at one time The color of a keyframe indicates its state of selection Red keyframes are selected and white keyframe...

Page 233: ...selected set of keyframes To add or remove keyframes from the current set of selected keyframes 1 Make sure you are in Select mode by clicking the Select button 2 Hold the Ctrl key then click a keyfr...

Page 234: ...s curvature Moving a handle away from its keyframe makes the curve stretch toward the handle Creating a Discontinous Camera Path You can create a discontinuous camera path by breaking a keyframe s han...

Page 235: ...n the appropriate Keyframe Position boxes Deleting Keyframes Select the keyframe s you want to delete then click Delete Selected on the Path panel of the Animation dialog The selected keyframes are de...

Page 236: ...irection of motion A green arrow shows the view direction Along Path is the default view setting In Direction The camera looks in a specific direction and tilt angle for all the selected keyframes A g...

Page 237: ...Path panel of the Animation dialog select At Path from the Look list The DT box appears 3 Enter an offset in the DT box Note If you select a negative offset the camera looks backward along the path At...

Page 238: ...htscape tries to smoothly interpolate the camera orientation based on the camera orientation you provide at each keyframe If the camera orientation is verydifferent between sequentialkeyframes the vie...

Page 239: ...through the camera path by adjusting the shape of the speed curve in the Motion Editor The Motion Editor is made up of three views The graph at the bottom of the Graphic window dis plays the camera mo...

Page 240: ...ines represent the location of each frame Note Because of the large number of frames the vertical lines of the graph only appear when you zoom in close enough so that grid lines do not overlap on the...

Page 241: ...the camera speed curve 1 Choose Animation Edit The Animation dialog appears 2 After setting up the path keyframes click the Mo tion tab The Motion Editor appears For information on creating a camera...

Page 242: ...control points on a speed curve by clicking and dragging them to new locations You can also move control points by specifying values for the time anddistance in the Time and Distance boxes and then c...

Page 243: ...he graph repre sent various types of motion Tochangetheslopeofthespeedcurveforaselected control point 1 Select a control point 2 Do one of the following Click and drag the selected control point so yo...

Page 244: ...ion dialog click the Motion tab 2 Enable Separate Splines 3 Select Focus Point Motion Spline A green curve appears in the speed graph This is the focus point motion spline 4 Select Insert from the Mod...

Page 245: ...ck End Time box Light scape sets the end time to the length of the animation 4 Click the Play button to play through your animation sequence Note The playback runs in real time If the computer cannot...

Page 246: ...vidual Frames Once you have defined an animation file you need to output the individual frames to disk so that you can transfer them to video or film You can do this process either interactively in Li...

Page 247: ...rame at which that model comes into view For greater efficiency you can also determine the frame where the current model goes out of view Finally during the frame creation process you load the require...

Page 248: ...NOTES 240...

Page 249: ...echnique for interac tive exploration of 3D worlds In Lightscape you can easily generate panoramic images in a variety of formats from your Solution file To export a panoramic image 1 Open the Lightsc...

Page 250: ...herical cylindrical and cubic projections VRML 2 0 Background Use this option to export a VRML wrl panoramic file This file format supports cubic projections only IBM PanoramIX Use this option to expo...

Page 251: ...Changing the Current View You can set the Perspective view of the model to be used when creating the panoramic image To change the current view 1 Click Position in the Export Panoramic Image dialog Th...

Page 252: ...also adds specular reflections but does not render them to as high a qualityas is possible when thisoptionis not enabled For more information see Appendix D Reflection Models Antialiasing Samples Use...

Page 253: ...e Locator URL to set the pathname or location of references to other VRML files also called inline nodes from within the created file An inline node can be a 2D or 3D graphic texture audio or video fi...

Page 254: ...ou can see the trunks and leaves Lightscape creates the coarsest LOD from the orig inal surface and each subsequent LOD takes the next finer level of mesh subdivision into account You can set the numb...

Page 255: ...divisions recursive subdivisions byaddingasecondvalue separatedby a comma Note Using branching factors can cause your file to become larger and slower To be effective you must cull out enough polygon...

Page 256: ...r Coordinates Enable an axis to mirror the geometry in the file about that axis A minus sign appears before the selected axes in the Coordinate Transformation list The Z axis is enabled by default Coo...

Page 257: ...ght The Physical World The radiosity and ray tracing methods used by Lightscape attempt to model the physical properties of light its propagation through the environment and its interactions with mate...

Page 258: ...he type of material and is described by a reflectance spectrum Materials reflect and absorb some of the light that strikes them at each wavelength That means that at each wavelength the reflectance of...

Page 259: ...ns computer graphics applications usually approximate spectra using three wave lengths of light one each of red green and blue These three wavelengths are often based on the red green and blue values...

Page 260: ...e and yield identical results The problem with all color spaces defined by combi nations of three lights is that each color space has ranges of color that can only be described by nega tive lights ran...

Page 261: ...heated to the specified tempera ture Most white points lie between 5000 K an orangish white and 9300 K a bluish white Most televisions are set to 6500 K a white that is near the color of daylight Thi...

Page 262: ...these lights is white White on a monitor in a dark room looks white even though the white on two different monitors may look very different if you see them side by side When viewing a monitor in a li...

Page 263: ...2lp Converting 3DS files into Preparation files using 3ds2lp Ray tracing Solution files using lsrayf Deleting files using lspurge Creating batch files For information on using the luminous intensity d...

Page 264: ...up a Windows NT Task List and end the lsrad process However again no files are saved It is possible to stop the process by specifying in advance the number of iterations processing time or percentage...

Page 265: ...s Default overwrite existing files without confirmation lf filename Load specified Layer State file o filename Output the solution to the filename specified instead of overwriting the original Solutio...

Page 266: ...t is possible to ray trace images directly in Lightscape it is faster and sometimes more convenient to produce the images using this batch ray tracer In addition more advanced ray tracing options are...

Page 267: ...The ray tracing utility creates an image file from the specified Lightscape Solution file Note You can also use a batch file to create a sequence of commands For instance you could create ray traced i...

Page 268: ...e output image bg r g b Background color range from 0 to 255 Default as specified in the Solution file bri n Brightness range from 0 to 200 Default as specified in the Solution file contr n Contrast l...

Page 269: ...ed by the lower left and up per right corners sf n First frame of animation desired af option must be used Default as specified in the animation file sh Recompute shadows from sun and other light sour...

Page 270: ...in n n rays used in step 4 above and r is the radius of the sampling region used in step 4 above Note Specifying t 0 forces all pixels to be computed as specified in step 4 Steps 1 3 are ignored Spec...

Page 271: ...accurate transparency effects The lsrender utility syntax is shown in the following example lsrender options lvs_file image_file Although itis possible to generate images in Lightscape it is moreconv...

Page 272: ...m stops when image computation is completed and saved To render Lightscape Solution files using the lsrender utility 1 Choose Start Programs MS DOS Prompt A DOS window appears 2 At the command line ty...

Page 273: ...and tif files only Choose 24 bit or 48 bit color for the out put image bg r g b Background color range from 0 to 255 Default as specified in the Solution file blend Set blending on bri n Brightness r...

Page 274: ...rame of animation desired af option must be used Default as speci fied in the animation file step n For animations interval for frame output af option must be used Default is 1 svf filename evf List o...

Page 275: ...e lsm2t utility syntax is shown in the following example lsm2t options solution_file texture_base_name wp xpos ypos Same as above but place theGraphicwindow inthespecifiedlocation onthe monitor Defaul...

Page 276: ...syntax type a command at the command line then press Enter lsm2t options solution_file texture_base_name Texture files are created to represent the lighting LSM2T Options The following table describes...

Page 277: ...ure fill color range from 0 to 1 frame p0x p0y p0z p1x p1y p1z p2x p2y p2z Reference frame for project method gl Use OpenGL shading model h Print a help message i Interactively confirm overwrite of ex...

Page 278: ...method Default orthographic rb n Number of reflection bounces to trace Default is 10 replace Replace textures on target geometry reset Reset mesh on target geometry sh Recompute shadows from lights a...

Page 279: ...a sequence of commands For instance you could create ray traced image files from multiple Lightscape Solution files LS2VRML Options The following table describes the options available for this utilit...

Page 280: ...Do not use WWW Inline nodes By default the program writes out many sub files that are inlined by the main file Inlining can improve the perceived perfor mance when downloading your model Subfiles are...

Page 281: ...merged with the first file Keep in mind that block and material definitions overwrite existing definitions and that data on layers with the same names is merged The following file types are supported...

Page 282: ...nside ls Converting DXF Files to Preparation Files Using DXF2LP Use this utility to convert a DXF file created in AutoCAD and other modeling packages that output the DXF file format to a Lightscape Pr...

Page 283: ...each circle Default is 30 ang n Angle for smoothing groups The smooth option must be used for this to take effect Default is 60 bc Block creation asis As in DXF file This is the default single Single...

Page 284: ...ghtscape application files differs from above enter it instead 3 Using the following syntax type a command at the command line then press Enter 3ds2lp options input_file The conversion utility reads i...

Page 285: ...er Default the input filename without its suffix and directory path h Print a help message ie Ignore internal errors when reading the 3D Studio file k Do not import instances from the keyframe lc sing...

Page 286: ...ng the following syntax type a command at the command line then press Enter lsrayf options solution_file image_file Note You can also use a batch file to create a sequence of commands For instance you...

Page 287: ...beginning and end coordinates of each ray six num bers per line If this option is specified the x y af vf and svf options are ignored rgb Output per channel roi x1 y1 x2 y2 Ray trace only the rectangu...

Page 288: ...ting point numbers representing the brightness of each pixel The PIXELS are written as an array of Width times Height times three floating point numbers in a row major order The LUMINANCE is written a...

Page 289: ...s differs from above enter it instead 3 Using the following syntax type a command at the command line then press Enter lspurge options file The utility reads in a Preparation or Solution file and dele...

Page 290: ...file that you create in a text editor such as Notepad and save with a bat file extension These files contain a series of executable commands and if necessary command options When running a batch file...

Page 291: ...you want to make multiple images from a single Solution file and the parameters of the image will not change you can use the svf option to specify a list of views as demonstrated in the last line of...

Page 292: ...ile to render animation frames of a complex model that has been split into smaller models so they can be processed more efficiently For more information on rendering animation frames see Chapter 14 Re...

Page 293: ...Batch Files 285 lsmerge o segment4 ls model2 ls model3 ls lsrender aa 6 af path la blend sf 456 ef 693 x 640 y 486 segment4 ls frames jpg lsrender aa 6 af path la blend sf 694 x 640 y 486 model3 ls fr...

Page 294: ...NOTES 286...

Page 295: ...y to the number of CPUs available You can perform radiosity processing of different Lightscape files simultaneously or you can perform simultaneous ray tracing and OpenGL rendering of multiple views o...

Page 296: ...ou can also access the following commands by right clicking in the LSnet window and choosing anoptionfromthecontextmenu EditJob LoadFile Clone Job Reset Delete Job Clear All Reset All and Abort Job Ne...

Page 297: ...rendering will take place Security Lock Use this option to display the Security Lock panel which you can use to control access to LSnet Render Log Use this option to display the Render Log panel whic...

Page 298: ...f LSnet rendering on a node This option does not affect rendering performance CPU Timeout Use this option to specify how much time in seconds LSnet will search for nodes on your network The default is...

Page 299: ...set in the box and click Save Preset The preset values are saved and you can apply them at any time Load Preset Use this option to load preset options into the Job Setup panel Select the name of the p...

Page 300: ...enter a value in the box You can choose to terminate processing after a certain number of itera tions or minutes or after the solution transfers the specified percentage of energy Checkpoint Use this...

Page 301: ...our job Select Clear All to remove all view files from the list Antialiasing Level Use antialiasing to smooth out jagged edges You can select an option from the Antialiasing List or select Advanced to...

Page 302: ...ion to use an animation file when rendering your job Frames per Second Use this option set the number of frames per second in the animation The valid range is from 12 to 30 First Frame Use this option...

Page 303: ...rendered frames You must output images to either the tga or rgb format to preserve alpha channels Blending Use this option to blend surfaces with transparent materials with those behind them giving a...

Page 304: ...output file Format Use this option to choose an image format for the output file You can also choose 24 or 48 bit resolu tion for the applicable image formats Resolution Usethisoptiontospecifytheoutp...

Page 305: ...n to schedule job processing on a weekly basis Day to Day Use this option to schedule job processing on a daily basis Current Time If the time displayed is incorrect you can use this option to set the...

Page 306: ...ccur during processing You set the following options for each node on your network Node Name This option displays the name assigned to a node CPU Status This option displays the current status for eac...

Page 307: ...ne specified in the LSnet Options panel Load Job Use this option to load a Lightscape Preparation or Solution file to create a job for processing Edit Job Use this option to display the Job Setup pane...

Page 308: ...NOTES 300...

Page 309: ...rithm to determine how much light is reflected from the surfaces in the environment Radiosity and OpenGL use similar lighting models and have similar restrictions With the ray tracer you use two diffe...

Page 310: ...on is the incident light at that point The final illumination of a space is determined byhe interaction between the surfaces in thespaceand inci dent light in the space When you turn on a light in a r...

Page 311: ...light reflected at the interface is reflected in the specular direction Lightscape uses the shininess of the material the angle of the incident light hitting it and the index of refraction to determin...

Page 312: ...te rial most of the light is reflected off the interface As light passes through the material some wave lengthsareabsorbedmorethanothers Asithitssmall particles inside the material the light is scatte...

Page 313: ...isplayedasdiffuseandanythingseen through a transparent surface is attenuated by the color of the surface This reflection model has the following limitations No refraction of transmitted light No specu...

Page 314: ...model is crucial to achieving good results with a physically based reflection model Objects should not have holes that allow light inside Transparent objects should have both a front and a back This i...

Page 315: ...accurate Indirect Diffuse Illumination No Yes Yes Yes Yes Specular Transmission Transparency Yes Yes Yes most accurate Yes most accurate Yes most accurate Refraction of Transmitted Light No No No Yes...

Page 316: ...NOTES 308...

Page 317: ...ectronic Transfer of PhotometricDataand RelatedInformation prepared by the IES Computer Committee The photometric data is stored in an ASCII file Each line in the file must be less than 132 characters...

Page 318: ...s the degree of lateralsymmetry displayed bythe intensity distribution If it is 0 the distribution is ax ially symmetric If it is 90 the distribution is sym metric in each quadrant If it is 180 the di...

Page 319: ...port these materials into any Lightscape model Preparation and Solution files Material Map File mm Stores a mapping correspondence between the 256 colors supported by DXF and Lightscape materials You...

Page 320: ...the model in binary format This Solution file contains the geometric information together with the photometric sample points mesh for each surface View File vw Stores the camera parameters for a speci...

Page 321: ...file You can approximate the intensity for a fluorescent luminaire with a diffusing panel by multiplying the number of lamps by the intensity of each lamp For example a 2 x 4 luminaire may contain 4 4...

Page 322: ...oltage Candelas Narrow Beam 300 Spot 68000 9 15 Narrow Beam 500 Spot 95000 9 15 Medium Beam 300 Spot 24000 18 36 Medium Beam 500 Spot 47500 18 36 Wide Beam 300 Spot 10000 30 60 Wide Beam 500 Spot 1800...

Page 323: ...Common Lamp Values 315 Fluorescent Tube 4H Lumens 32 40 Area 2000 3000 Lamps Classification Watts Type Intensity Beam Field...

Page 324: ...NOTES 316...

Page 325: ...er on page 317 LVu displays image and texture files and provides a drag and drop interface for moving files from the LVu display into your Lightscape model For more infor mation about LVu see Using LV...

Page 326: ...on ls file into the LSViewer application for viewing To load a Solution file 1 Choose File Open or click the Open button on the toolbar The Open dialog appears 2 Navigate to the appropriate directory...

Page 327: ...e Use this option to disable navigation through the model Auto Orbit Use this option to cause the model to continuously rotate around the focus point of the current view Auto Flip Use this option to c...

Page 328: ...ont Viewing Geometry Statistics In addition to displaying a model LSViewer provides statistical information on the geometry of the model To view geometry statistics Choose Settings Geometry Stats The...

Page 329: ...button on the toolbar The Open dialog appears 2 Navigate to the appropriate directory select an image or multiple images and then click Open A thumbnail of the selected image is displayed in the LVu w...

Page 330: ...it to the size of the window by double clicking it Double click the enlarged image to return it to thumbnail size Customizing the Display You can toggle the toolbar and status bar on or off to customi...

Page 331: ...copied to the clipboard Note You can also right click and choose Copy ImageorCopyFilenamefromthecontextmenuthat appears Using the Context Menu You can right click an image thumbnail or maxi mized to...

Page 332: ...information about defining materials see Chapter 7 Using Materials To import using drag and drop 1 Select an image in LVu 2 Drag the selected image from the LVu window to a surface in the Lightscape...

Page 333: ...ass Addison Wesley Publishing 1990 Glassner Andrew S ed An Introduction to Ray Tracing San Diego Academic Press Inc 1989 Hall Roy Illumination and Color in Computer Gener ated Imagery New York Springe...

Page 334: ...6 Lightscape Rea Mark S ed Lighting Handbook Reference and Application 8th ed New York IESNA 1993 Sillion Fran ois X and Claude Puech Radiosity Global Illumination San Francisco Morgan Kauf mann Publi...

Page 335: ...image The elimi nation of jaggies area light A polygonal light source of finite area AS units American System of Photometric Units beam angle The angle of the spotlight aim axis at which the lumi nous...

Page 336: ...lected by a surface so that the reflected luminance is the same in all directions direct illumination Illumination resulting from light reaching a surface directly from a direct light source direct so...

Page 337: ...olor can be used to determine the radiometric quantities needed for the simulation intensity mapping A type of procedural texture mapping used to vary the intensity over a surface to make it appear le...

Page 338: ...h niques to determine the color of an area that covers less than one pixel in image texture space material The set of parameters assigned to a surface that are used by the reflection model to determin...

Page 339: ...ed off a surface to the luminous flux incident on it reflection Light incident on one side of a surface leaving it from the same side reflection model A description of how light interacts with a surfa...

Page 340: ...nsity along its axis and whose intensity drops smoothly away from this axis The angle off the axis at which the luminous intensity drops to 50 percent of its maxi mum is called the beam angle The angl...

Page 341: ...omputation visibility The process of determining if there are any objects between two points in an environment Used by the radiosity system to determine how much light gets from one surface to another...

Page 342: ...Glossary 334 Lightscape...

Page 343: ...28 alpha channels 209 ambient approximation 171 Ambient button 37 ambient light defined 5 Ambient option 45 Angle Between Normals option 59 animation camera orientation setting 227 camera path creatin...

Page 344: ...creating arrays 92 deleting 87 moving 93 rotating 94 scaling 95 selecting 91 using 91 Block Library files blk 311 block preview 22 Block selection button 40 blocks changing geometry 90 defined 85 defi...

Page 345: ...onvert each surface to a texture per surface 205 Convert Textures option for VRML files 245 converting 3DS files to Preparation files using 3DS2LP 276 DXF files to Preparation files using DXF2LP 274 L...

Page 346: ...06 diffuse distribution luminaires 137 diffuse reflection 3 302 Direct Control panel 163 direct illumination 302 Direct Only option 177 182 Direct Source Minimum Size option 175 Direct Source Subdivis...

Page 347: ...mic images 243 for importing 56 for texture maps 114 image output 214 LSM2T 268 LSRAY 259 LSRENDER 264 File menu 27 File Units option for VRML files 248 files Animation la 311 Block Library blk 311 La...

Page 348: ...ires 137 illumination maps 209 image formats for exporting panoramic images 243 image output formats 214 images antialiasing 214 controlling the view 217 ray tracing 215 rendering 249 viewing 320 Impo...

Page 349: ...nto a model 83 loading states 84 moving objects to 83 renaming 84 saving states 84 turning on off 83 uses for 82 using for design alternatives 82 Layers table 19 82 layouts testing multiple designs wi...

Page 350: ...ion algorithms defined 2 Lock Mesh option 174 LOD for VRML files 246 LP files 181 311 LS files 181 312 LS2VRML 271 LSM2T 267 LSMERGE 273 LSnet installing 288 Job Setup Panel 290 JobQ Sender 298 Jump S...

Page 351: ...ing 184 color hue 104 color saturation 104 color value 104 creating 111 deleting 109 duplicating 108 interactions with light 302 previewing 110 reflectance 104 250 renaming 109 rough 105 303 selection...

Page 352: ...mmand 88 New button 28 New Directory Name option 207 New Textures Base Name option 208 No Mesh option 181 non occluding surfaces 180 normals surface 95 North setting direction 164 NTSC 218 O object UV...

Page 353: ...review material option 20 Preview option 22 86 108 131 previewing animations 237 Print button 28 printing files 28 Procedural Texture panel 119 procedural textures using 119 Process group box 176 Proc...

Page 354: ...on Luminaire Processing 148 Ray Trace Direct Illumination option 166 209 for panoramic images 244 ray tracing an area 219 and lighting models 301 and luminaires 217 and radiosity 6 and reflection maps...

Page 355: ...n 43 Rotate panel 143 Rotate view button 30 rotating blocks 94 LIDs 135 luminaires 143 running batch files 283 S sample sphere diameter changing 20 saturation definition 104 Save All option 110 Save b...

Page 356: ...ng images 214 surfaces 58 98 smoothing angle setting 98 Smoothing dialog 99 Snap to Nearest Vertex option 207 Soft Shadows from Sun option 209 216 for panoramic images 244 Solid button 36 Solution fil...

Page 357: ...6 identifying materials on 109 mesh elements 5 modeling guidelines 192 moving 100 normal 95 orientation 14 orienting 95 preparing for processing 82 processing parameters 179 projecting 205 reversing o...

Page 358: ...urbulence in intensity mapping 121 Two Sided button 98 typographical conventions 8 U Undelete button 28 Undo Zoom Window button 31 uniform fog 47 uniformity measuring 199 units of measurement setting...

Page 359: ...r 196 VRML export option for panoramic images 242 VRML files export options 245 exporting 245 level of detail 246 setting scale and transformation 248 specifying URLs for 245 VW files 312 W walk throu...

Page 360: ...Index ix 352 Lightscape...

Page 361: ...ng the Peerless Lighting line www peerless lighting com Additional luminaires are available at www professional erco com Materials Appalachian Millwork Lumber Co 8230 Expansion Way Huber Heights OH 45...

Page 362: ......

Reviews: