Rostock MAX v2 Assembly Guide
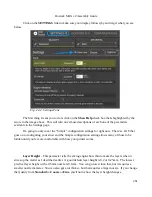
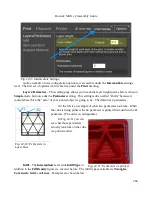
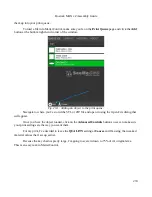
Click on the
SETTINGS
link to make sure your display follows (by and large) what you see
below.
The first thing I want you to do is click on the
Show Help
check box that's highlighted by the
arrow in the image above. This will turn on verbose descriptions of each one of the parameters
available in the Settings page.
I'm going to only cover the “Simple” configuration settings for right now. There's a LOT that
goes on to configuring your slicer and the Simple configuration setting allows many of those to be
hidden until you're more comfortable with how your printer works.
Layer Height
– This parameter tells the slicing engine how thin to make the layers when it
slices up the model as I described earlier. A good default layer height is 0.2 or 0.25mm. The lowest
practical layer height with a 0.5mm nozzle is 0.1mm. You can go lower than that, but it requires a
smaller nozzle diameter. You can also got a lot thicker, but that requires a larger nozzle. If you change
the Quality from
Standard
to
Coarse
or
Fine
, you'll notice how the layer height changes.
261
Fig. 22-2: Settings Pane.
Содержание Rostock MAX v2
Страница 25: ...Rostock MAX v2 Assembly Guide Melamine Parts Sheet 1 25 ...
Страница 26: ...Rostock MAX v2 Assembly Guide Melamine Parts Sheet 2 Melamine Parts Sheet 3 26 ...
Страница 27: ...Rostock MAX v2 Assembly Guide Melamine Parts Sheet 4 27 ...
Страница 171: ...Rostock MAX v2 Assembly Guide 171 Fig 14 8 Spool holder support installed ...


