14. USING A DIRECT DRIVE MOTOR
14 - 5
(2) Power supply cable wiring diagrams
Fabricate a cable as shown below.
Refer to section 14.3.2 (1) for the wires used for the cable.
U
V
W
U
V
W
Direct drive motor
Servo amplifier
30m or less
M
14.3 Signals and wiring
WARNING
Any person who is involved in wiring should be fully competent to do the work.
Before wiring, turn off the power and wait for 15 minutes or more until the charge
lamp turns off. Then, confirm that the voltage between P and N is safe with a
voltage tester and others. Otherwise, an electric shock may occur. In addition, when
confirming whether the charge lamp is off or not, always confirm it from the front of
the servo amplifier.
Ground the servo amplifier and the direct drive motor securely.
Do not attempt to wire the servo amplifier and direct drive motor until they have been
installed. Otherwise, it may cause an electric shock.
The cables should not be damaged, stressed, loaded, or pinched. Otherwise, it may
cause an electric shock.
CAUTION
Wire the equipment correctly and securely. Otherwise, the direct drive motor may
operate unexpectedly, resulting in injury.
Connect cables to the correct terminals. Otherwise, a burst, damage, etc. may occur.
Ensure that polarity ( / ) is correct. Otherwise, a burst, damage, etc. may occur.
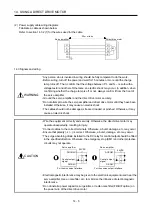
The surge absorbing diode installed to the DC relay for control output should be fitted
in the specified direction. Otherwise, the emergency stop (EM1) and other protective
circuits may not operate.
DOCOM
Control output
signal
DICOM
24VDC
Servo amplifier
RA
For the sink output interface
DOCOM
Control output
signal
DICOM
24VDC
Servo amplifier
RA
For the source output interface
Electromagnetic interference may be given to the electronic equipment used near the
servo amplifier. Use a noise filter, etc. to minimize the influence of electromagnetic
interference.
Do not install a power capacitor, surge killer, or radio noise filter (FR-BIF option) on
the power wire of the direct drive motor.
Summary of Contents for MELSERVO-J3W Series
Page 17: ...8 MEMO ...
Page 27: ...1 FUNCTIONS AND CONFIGURATION 1 10 MEMO ...
Page 87: ...4 STARTUP 4 14 MEMO ...
Page 117: ...5 PARAMETERS 5 30 MEMO ...
Page 129: ...6 GENERAL GAIN ADJUSTMENT 6 12 MEMO ...
Page 185: ...10 CHARACTERISTICS 10 8 MEMO ...
Page 241: ...11 OPTIONS AND AUXILIARY EQUIPMENT 11 56 MEMO ...
Page 274: ...13 USING A LINEAR SERVO MOTOR 13 25 1 2 3 4 ...


