HYDRAULIC AND PARK BRAKE SYSTEMS
Hydraulic Line Replacement
2007 Carryall 295/295 SE & XRT 1550/1550 SE Gasoline, Diesel and IntelliTach M & S Manual
Page 6-17
6
10. Raise the vehicle, remove the jack stands, and lower the vehicle.
11. Tighten the axle
nut to 80 ft-lb (108 N·m). Position the locking cap and attach a new cotter pin.
12. Tighten the lug nuts to 85 ft-lb (115 N·m).
13. Repeat steps 1 through 12 for the opposite rear wheel if necessary.
HYDRAULIC LINE REPLACEMENT
See General Warning, Section 1, Page 1-1.
ý
WARNING
• To perform any of the following procedures, the hydraulic system must be opened. As a
result, the brakes must be bled after the correct reinstallation of the brake components.
Failure to bleed the brakes could result in decreased braking performance due to air being
trapped in the hydraulic system. Use only DOT 5 brake fluid. See Bleeding the Hydraulic
Brake System on page 6-22.
• Prior to servicing hydraulic brakes, thoroughly clean the vehicle, paying particular attention
to areas immediately surrounding hydraulic connections, to prevent dirt or debris from
entering system.
NOTE:
The brake lines are provided as assemblies without separating unions other than those at the
wheels and master cylinder.
FRONT BRAKE LINE REMOVAL
1. Chock the rear wheels and set the park brake.
2. Raise hood.
3. Use a flare-nut wrench to remove the front brake line at the master cylinder.
See following NOTE.
NOTE:
Place a plastic bag around the master cylinder to catch brake fluid before the brake line is
removed. Wrap the bag around the master cylinder to prevent debris from entering the brake line
port.
4. Remove the front brake lines, banjo bolts and copper washers at each front wheel caliper assembly.
NOTE:
Place a pan under each caliper assembly to collect brake fluid.
Place a plastic bag around each caliper to prevent debris from entering the brake line ports. Do not
allow brake fluid to contact the brake pads and disc.
5. Remove the two brake line support brackets, T-bracket and P-clamp from the frame.
6. Slide the front brake lines toward the front of the vehicle, away from the master cylinder.
FRONT BRAKE LINE INSTALLATION
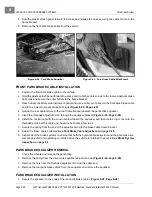
1. Feed the new front brake line under the front of the vehicle and up to the master cylinder.
2. Carefully insert the flared end of the brake line end into the master cylinder and tighten the hardware to
132 in-lb (15 N·m).
Summary of Contents for IntelliTach XRT 1550
Page 2: ......
Page 22: ...1...
Page 54: ...4...
Page 60: ...5...
Page 90: ...6...
Page 114: ...8...
Page 118: ...9...
Page 196: ...11A...
Page 290: ...11C...
Page 468: ...13C...
Page 490: ...14...
Page 498: ...15...
Page 548: ...16...
Page 560: ...Club Car R NOTES...
Page 561: ...Club Car R NOTES...
Page 562: ...Club Car R NOTES...
Page 563: ......

