HYDRAULIC ATTACHMENT SYSTEM
Electrical
Page 16-12
2007 Carryall 295/295 SE & XRT 1550/1550 SE Gasoline, Diesel and IntelliTach M & S Manual
16
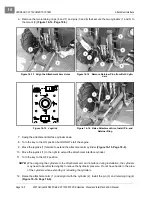
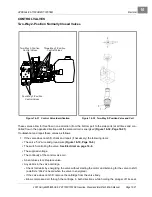
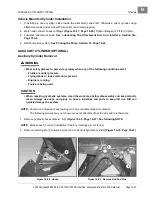
5. Remove four screws securing control box cover/joystick assembly and pull assembly out enough to
access the underside of joystick
(Figure 16-21, Page 16-11)
.
6. Ensure the wires are connected correctly and are tight. If they are not, rewire or tighten as necessary.
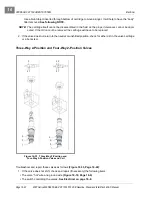
7. Unplug harness from the eight switches under joystick
(Figure 16-22, Page 16-11)
.
8. Remove four nuts and screws securing joystick to control box cover.
Joystick Installation
1. Insert joystick into control box cover and secure with the four nuts and screws previously removed.
Tighten nuts to 54 in-lb (6 N·m).
2. Connect joystick harness wires to the eight switches
(Figure 16-20, Page 16-10)
.
3. Install control box cover/joystick assembly and secure with the four screws.
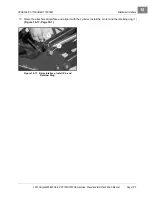
4. Secure joystick harness to chassis with new wire tie
(Figure 16-22, Page 16-11)
.
5. Connect the battery cables, positive (+) cable first, and tighten the terminals to 144 in-lb (16 N·m). Coat
terminals with Battery Terminal Protector Spray (CCI P/N 1014305).
JOYSTICK ON/OFF SWITCH
See General Warning, Section 1, Page 1-1.
Testing the Joystick ON/OFF Switch
NOTE:
The control circuit is protected by a 20-amp fuse. Check the fuse before this procedure is per-
formed.
See Test Procedure 2 – Fuse on page 11c-16.
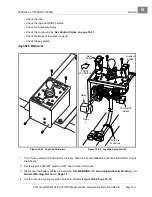
1. Remove the ON/OFF switch.
See Joystick ON/OFF Switch Removal on page 16-13.
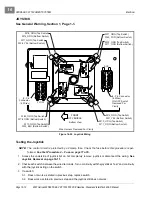
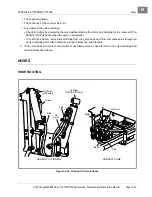
2. Check for no continuity with switch in the OFF position and continuity with switch in the ON position
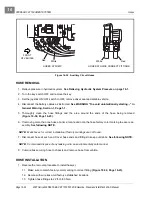
(Figure 16-23, Page 16-12)
:
2.1. Between terminal 3 (orange/black wire w10) and terminal 2 (orange wire w81)
2.2. Between terminal 6 (red wire w16) and terminal 5 (red/white wire w82)
3. If switch does not work as stated in previous step, replace switch.
4. If switch does work as stated in previous step and the joystick still does not have power:
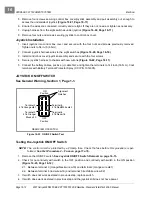
Figure 16-23 ON/OFF Switch Test
ON
Position
OFF
Position
REAR VIEW OF SWITCH
Terminal 5
#18 Red/White w82
Terminal 6
#18 Red w16
Terminal 2
#16 Orange w81
Terminal 3
#16 Orange/
Black w10
Alignment
Notches
Summary of Contents for IntelliTach XRT 1550
Page 2: ......
Page 22: ...1...
Page 54: ...4...
Page 60: ...5...
Page 90: ...6...
Page 114: ...8...
Page 118: ...9...
Page 196: ...11A...
Page 290: ...11C...
Page 468: ...13C...
Page 490: ...14...
Page 498: ...15...
Page 548: ...16...
Page 560: ...Club Car R NOTES...
Page 561: ...Club Car R NOTES...
Page 562: ...Club Car R NOTES...
Page 563: ......

