KAWASAKI GASOLINE ENGINE, MUFFLER, FUEL SYSTEM, AND CLUTCHES
Gasoline Engine
2007 Carryall 295/295 SE & XRT 1550/1550 SE Gasoline, Diesel and IntelliTach M & S Manual
Page 13a-3
13A
11. Remove the choke cable.
See Choke Cable Removal on page 13a-20.
12. Remove the engine air inlet hose (4).
See Air Filter Outlet Hose Removal on page 13a-26.
13. Remove the accelerator cable.
See Accelerator Cable Removal on page 13a-18.
14. Remove the muffler.
See Muffler Removal on page 13a-6.
15. Remove the intermediate exhaust pipe.
See Intermediate Pipe Removal on page 13a-7.
16. Remove the clutch outer cover.
See Clutch Outer Cover Removal on page 13a-37.
17. Remove the clutches (5).
See Drive Clutch Removal on page 13a-29. Also See Driven Clutch
Removal on page 13a-34.
18. Remove the clutch inner cover (6).
See Clutch Inner Cover Removal on page 13a-37.
19. Remove the exhaust manifold (7).
20. Remove the electrical connectors:
20.1. Disconnect the engine harness from the chassis harness.
20.2. Disconnect all wires attached to the starter solenoid.
See following NOTE.
NOTE:
Mark or tape together, for identification, the connectors on the starter solenoid posts.
21. Drain the engine oil.
See Engine Oil and Filter Change, Section 10b, Page 10b-8.
22. Remove engine oil inlet and outlet hoses from the engine.
See Oil Filter Hose Removal on page 13a-5.
See also following NOTE.
NOTE:
Plug each line as it is removed from the engine. Without plugs, oil will leak from the lines.
23. Remove the engine mounting hardware (8)
(Figure 13a-1, Page 13a-2)
.
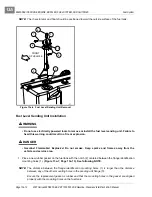
24. Lift the engine out by its lift tabs (9).
25. If a new engine will be installed, remove and retain the following:
•
Oil Filter Adapter (1)
(Figure 13a-2, Page 13a-4)
•
Engine Lift Tabs
•
Choke Cable Return Spring
ENGINE INSTALLATION
See General Warning, Section 1, Page 1-1.
1. Before a new engine is installed, the following components must be installed:
•
Oil Filter Adapter (1) (new o-rings (2) required)
(Figure 13a-2, Page 13a-4)
– Tighten the hardware to
33 ft-lb (44 N·m)
•
Engine Lift Tabs – Tighten the hardware to 21 ft-lb (28 N·m)
•
Choke Cable Return Spring
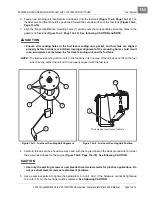
2. Lower the engine into the engine compartment and closely align the engine block mounting holes with
the holes in the engine plate (10)
(Figure 13a-1, Page 13a-2)
.
Summary of Contents for IntelliTach XRT 1550
Page 2: ......
Page 22: ...1...
Page 54: ...4...
Page 60: ...5...
Page 90: ...6...
Page 114: ...8...
Page 118: ...9...
Page 196: ...11A...
Page 290: ...11C...
Page 468: ...13C...
Page 490: ...14...
Page 498: ...15...
Page 548: ...16...
Page 560: ...Club Car R NOTES...
Page 561: ...Club Car R NOTES...
Page 562: ...Club Car R NOTES...
Page 563: ......


