HONDA GASOLINE ENGINE, MUFFLER, FUEL SYSTEM, AND CLUTCHES
Engine Control Linkages
2007 Carryall 295/295 SE & XRT 1550/1550 SE Gasoline, Diesel and IntelliTach M & S Manual
Page 13b-21
13B
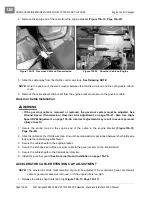
2. Push the carburetor throttle shaft toward the closed direction until it contacts the throttle stop.
3. Adjust the accelerator cable at the transmission until there is a washer-width space between the washer
and the governor wire form as shown
(Figure 13b-20, Page 13b-21)
.
4. Press the retention clip to hold accelerator cable in correct adjustment position.
5. Start the engine and verify correct idle speed. Also, verify that the governor cable is not putting pressure
on the governor wire form while the engine is idling.
GROUND SPEED (TRANSMISSION) GOVERNOR ARM ADJUSTMENT
ý
WARNING
• The (transmission) governor arm (4) must be adjusted every time the governor cable (5) is
replaced or removed and every time the governor wire (9) is removed (Figure 13b-21,
Page 13b-22). Incorrect adjustment may result in severe personal injury or death.
NOTE:
This procedure may require the aid of an assistant.
1. Remove the governor guard.
See Governor Guard Removal on page 13b-19.
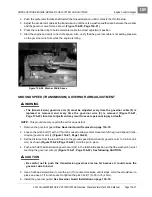
2. Loosen the pinch bolt (7) with a 7/16-inch socket to allow vertical movement of the ground speed (trans-
mission) governor arm (4)
(Figure 13b-21, Page 13b-22)
.
3. Set the distance from the top of the pin to the ground speed (transmission) governor arm to 1/4-inch (6.4
mm) as shown
(Figure 13b-22, Page 13b-22)
. Hold the pin in place.
4. Push and hold the transmission governor arm (4) in the full-throttle position so that the washer (8) is just
touching the governor wire (9)
(Figure 13b-21, Page 13b-22)
.
See following CAUTION.
ý
CAUTION
• Be careful not to push the transmission governor arm too far because it could cause the
governor wire to bend.
5. Use a flat-head screwdriver to turn the pin (10) counter-clockwise until it stops. Hold the screwdriver in
place and use a 7/16-inch socket to tighten the pinch bolt (7) to 35 in-lb (4 N·m).
6. Install the governor guard.
See Governor Guard Installation on page 13b-19.
Figure 13b-20 Washer Width Space
Summary of Contents for IntelliTach XRT 1550
Page 2: ......
Page 22: ...1...
Page 54: ...4...
Page 60: ...5...
Page 90: ...6...
Page 114: ...8...
Page 118: ...9...
Page 196: ...11A...
Page 290: ...11C...
Page 468: ...13C...
Page 490: ...14...
Page 498: ...15...
Page 548: ...16...
Page 560: ...Club Car R NOTES...
Page 561: ...Club Car R NOTES...
Page 562: ...Club Car R NOTES...
Page 563: ......


