88
Save Data
5.2.3
Save Data Selectively (SAVE Key)
To use the
SAVE
key for quick saving, you first need to set the saving conditions.
The following types of data can be saved: setting data, waveform data, display screens,
waveform screen,
and numerical calculation results.
Procedure
Press the
SYSTEM
key to open the System screen, and then select the
[File Save]
sheet.
1
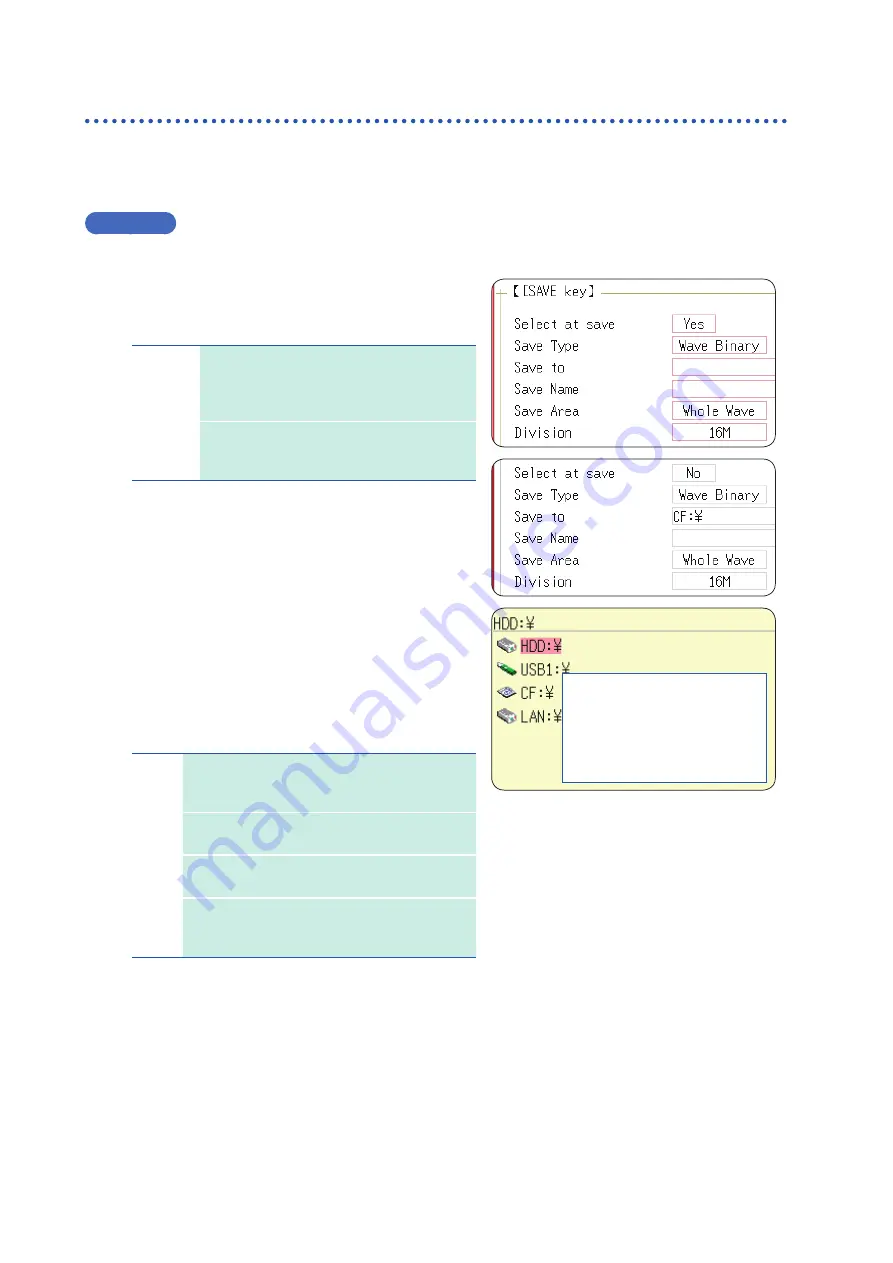
Set the save method for when the
SAVE
key is pressed.
Move the cursor to the
[Select at save]
item, and
select
[No]
.
Yes
After pressing the
SAVE
key, a dialog box
will appear to select data before saving.
(Default setting)
Refer to “Selection Save” (p. 81).
No
The preset data is saved when you press
the
SAVE
key.
Refer to “Quick Save” (p. 81).
When
[Yes]
is selected, the following setting determines
which dialog box appears when you press the
SAVE
key.
(Middle screen at right)
This does not apply when other dialogs such as the
“Folder Reference Dialog” are being displayed.
1
2
3
Select
media:
Up/down
CURSOR
Open next
lower folder
level:
Right CURSOR
2
Set the save destination.
Move the cursor to
[Save To]
, and select
[Edit]
.
The Browse folders dialog box appears (at bottom right).
Move the cursor to the storage media you want to save
the data to and confirm the setting with
[Confirm]
.
HDD
Automatically save the waveform data on the
built-in drive.
(When Model U8330 SSD Unit is installed)
CF
Automatically save the waveform data on a CF
card.
USB
Automatically save the waveform data on a
USB memory stick.
LAN
Automatically save the waveform data on a PC
connected via LAN.
Model 9333 LAN Communicator required.
When the root directory (topmost folder on the storage
media) is selected, a folder named “HIOKI_MR8827” will
be created automatically. (If the media was formatted by
the instrument, the folder will already have been created.)
This folder is then used as the save location.
To create a new folder to use as the save target,
select
[New Folder]
. When
[LAN]
is set as the
save destination,
[New Folder]
is ignored and a
folder named with the current date will be created.
Summary of Contents for MR8827
Page 19: ...14 Operation Precautions ...
Page 81: ...76 Start and Stop Measurement ...
Page 111: ...106 Manage Files ...
Page 125: ...120 Miscellaneous Printing Functions ...
Page 143: ...138 View Block Waveforms ...
Page 191: ...186 Setting Output Waveform Parameters ...
Page 291: ...286 FFT Analysis Modes Measurable Ranges With Octave Analysis 1 1 OCT 1 3 OCT ...
Page 292: ...287 FFT Analysis Modes 1 1 OCT 1 3 OCT 13 FFT Function ...
Page 293: ...288 FFT Analysis Modes 1 1 OCT 1 3 OCT ...
Page 295: ...290 FFT Analysis Modes ...
Page 309: ...304 Editor Command Details ...
Page 387: ...382 Module Specifications ...
Page 405: ...400 Dispose of the Instrument Lithium Battery Removal ...
Page 431: ...A26 FFT Definitions ...
Page 436: ......


