Hotline: +49 5251 688865-99
Hotline: +49 5251 688865-99
Hotline: +49 5251 688865-99
Hotline: +49 5251 688865-99
Hotline: +49 5251 688865-99
. Operating Manual grandMA Version 5.4
23
23
23
23
23
Delete Line: The selected group is deleted. All fixtures with all settings in this group are deleted..
Moves Lines:
The selected group can be moved to another position in the table. If the “Moves Lines“
button was used, this will be displayed in red. By selecting a new position in the table, the group will be moved..
2.2.5 Adjusting individual fixture groups
2.2.5 Adjusting individual fixture groups
2.2.5 Adjusting individual fixture groups
2.2.5 Adjusting individual fixture groups
2.2.5 Adjusting individual fixture groups
Select a group in the “Fixture Layer“; this will now be displayed below:
Adding identical fixtures
Adding identical fixtures
Adding identical fixtures
Adding identical fixtures
Adding identical fixtures
Select “New“ (dark blue) and shortly press the Encoder (right to the Display). The “Create New Fixtures or
Channels“ window will open. In this window, all types of fixtures are displayed that are already present in this
show.
Select the type of fixture by turning the Encoder. Proceed like indicated, 3 pages earlier: Creating, patching
and positioning groups with Scanners/Dimmers.
Adding new fixtures
Adding new fixtures
Adding new fixtures
Adding new fixtures
Adding new fixtures
Select “New“ (dark blue) and shortly press the Encoder (right to the Display).
The “Create New Fixtures or Channels“ window will open.
Now, choose “From Library“. Proceed as indicated 3 pages earlier: Creating, patching and positioning groups
with Scanners/Dimmers.
Exchanging fixtures
Exchanging fixtures
Exchanging fixtures
Exchanging fixtures
Exchanging fixtures
Select the fixtures to be exchanged in the “Type“ column (dark blue). You can also select several or all
fixtures..
Shortly press the Encoder (right to the Display). The “Choose Fixturetype“ window will open.
Select a fixture that was already present in the show by turning the Encoder, and accept it by shortly
pressing on the Encoder. The fixture still has to be patched.
o r :
o r :
o r :
o r :
o r :
Select “From Library“ for a new fixture, and shortly press on the Encoder. Proceed as indicated 3 pages
earlier: Creating, patching and positioning groups with Scanners/Dimmers.
Multipatch (assigning one DMX channel for multiple fixtures/dimmers)
Multipatch (assigning one DMX channel for multiple fixtures/dimmers)
Multipatch (assigning one DMX channel for multiple fixtures/dimmers)
Multipatch (assigning one DMX channel for multiple fixtures/dimmers)
Multipatch (assigning one DMX channel for multiple fixtures/dimmers)
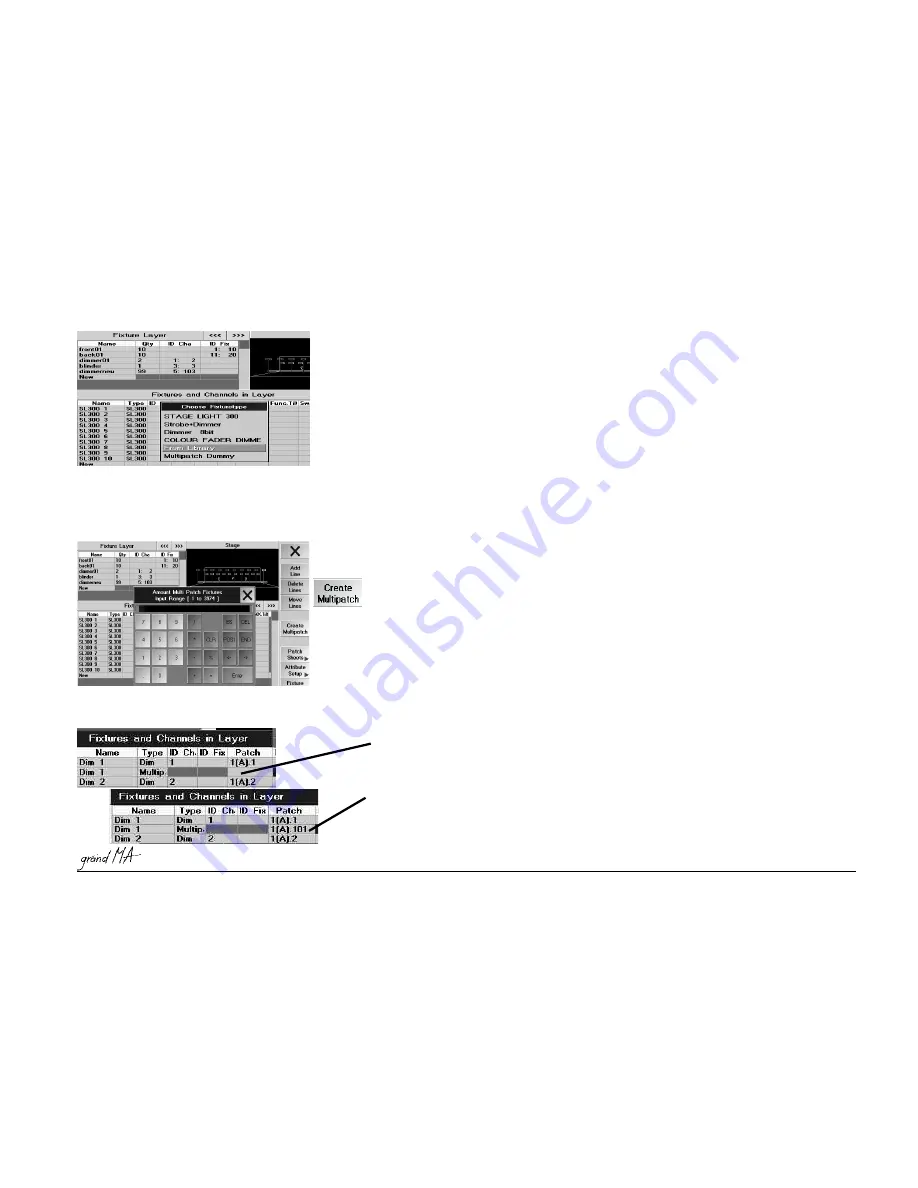
Makes sense, if several fixtures are always to be triggered at the same time (but cannot be dimmed individually).
To do so, you make a arbitrary number of „copies“ of a fixture.
select the fixture that you want to „copy“
press
Create Multipatch
i
n the entry window, enter the number of fixtures to be triggered by the same DMX channel
In the fixtures list, you will now find the copies below the fixture. In the TYPE column, you will find „Multipatch
Dummies“ for the copies. And you can position the fixtures, to use them in the Stage window or on the grandMA
3D.
Note: After a Multipatch, you’ll find no DMX addresses for the dummies, as these will automatically be given the
same DMX address, name and ID as the original fixture.
It is not possible, to enter the same address for different fixtures in the Layer Sheet. In the fixtures’ Settings
menu, the same addresses have also to be entered (see manual of the fixture manufacturer).
TIP: If you want to multipatch fixtures with different addresses (set on the fixture itself), you can enter these
after the Multipatch in the Layer Sheet (of course only, if not used by other fixtures).


