


Chapter 8: Using the Command Line Interface
453
config:#
role create <name> <privilege1>:<argument1>,<argument2>...;
<privilege2>:<argument1>,<argument2>...;
<privilege3>:<argument1>,<argument2>...;
...
Variables:
<name> is a string comprising up to 32 ASCII printable characters.
<privilege1>, <privilege2>, <privilege3> and the like are names of
the privileges assigned to the role. Separate each privilege with a
semi-colon. See
All Privileges
(on page 453).
<argument1>, <argument2> and the like are arguments set for a
particular privilege. Separate a privilege and its argument(s) with a
colon, and separate arguments with a comma if there are more than
one argument for a privilege.
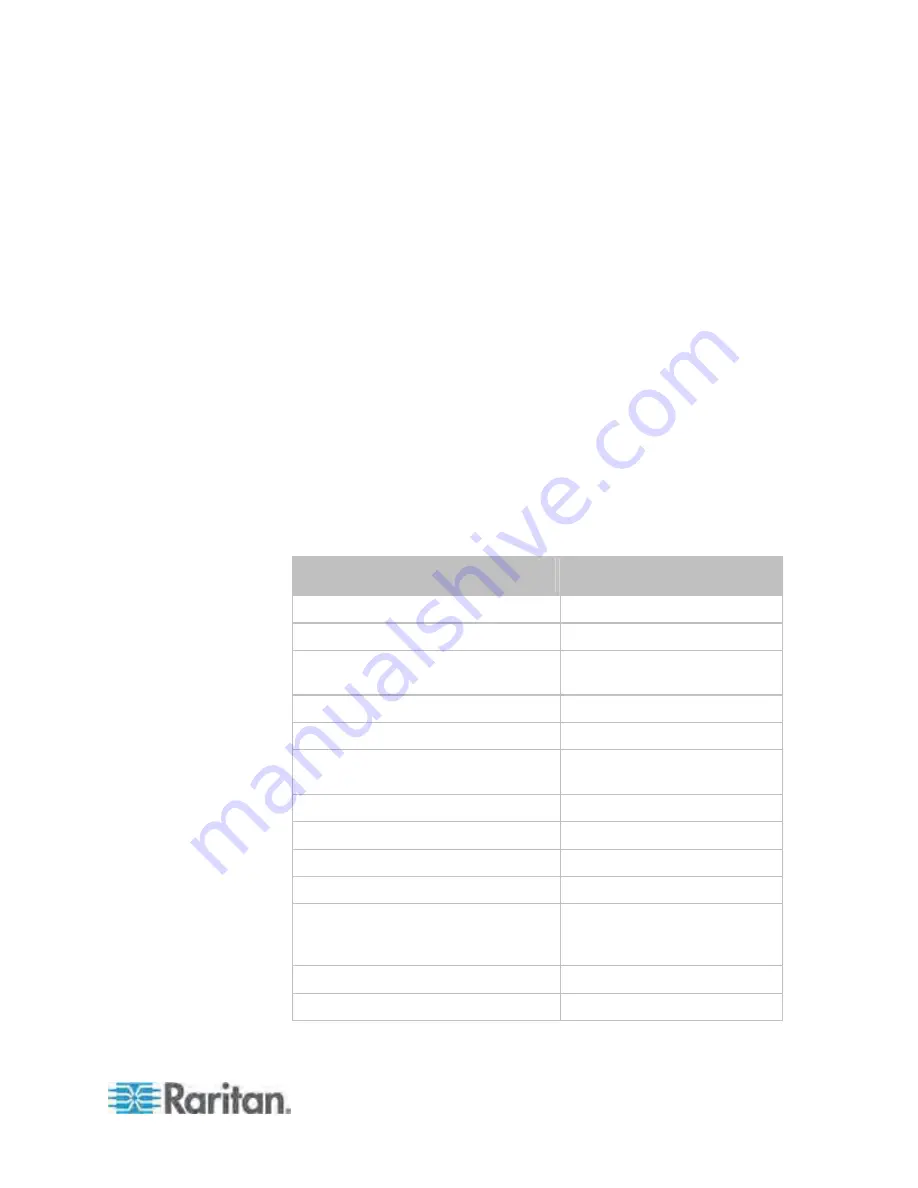
All Privileges
This table lists all privileges. Note that available privileges vary according
to the model you purchased. For example, a PDU without the outlet
switching function does not have the privilege "switchOutlet."
Privilege
Description
acknowledgeAlarms
Acknowledge Alarms
adminPrivilege
Administrator Privileges
changeAssetStripConfiguration
Change Asset Strip
Configuration
changeAuthSettings
Change Authentication Settings
changeDataTimeSettings
Change Date/Time Settings
changeExternalSensorsConfiguration Change Peripheral Device
Configuration
changeLhxConfiguration
Change LHX Configuration
changeModemConfiguration
Change Modem Configuration
changeNetworkSettings
Change Network Settings
changePassword
Change Own Password
changePduConfiguration
Change Pdu, Inlet, Outlet &
Overcurrent Protector
Configuration
changeStsConfiguration
Change STS Configuration
changeSecuritySettings
Change Security Settings
Содержание PX3-4000 series
Страница 5: ......
Страница 350: ...Chapter 6 Using the Web Interface 329 10 To print the currently selected topic click the Print this page icon...
Страница 615: ...Appendix H LDAP Configuration Illustration 594 5 Click OK The PX_Admin role is created 6 Click Close to quit the dialog...
Страница 627: ...Appendix I RADIUS Configuration Illustration 606 Note If your PX uses PAP then select PAP...
Страница 628: ...Appendix I RADIUS Configuration Illustration 607 10 Select Standard to the left of the dialog and then click Add...
Страница 629: ...Appendix I RADIUS Configuration Illustration 608 11 Select Filter Id from the list of attributes and click Add...
Страница 632: ...Appendix I RADIUS Configuration Illustration 611 14 The new attribute is added Click OK...
Страница 633: ...Appendix I RADIUS Configuration Illustration 612 15 Click Next to continue...
Страница 648: ...Appendix J Integration 627 3 Click OK...
Страница 661: ...Appendix J Integration 640 2 Launch dcTrack to import the spreadsheet file...


