


Chapter 6: Using the Web Interface
224
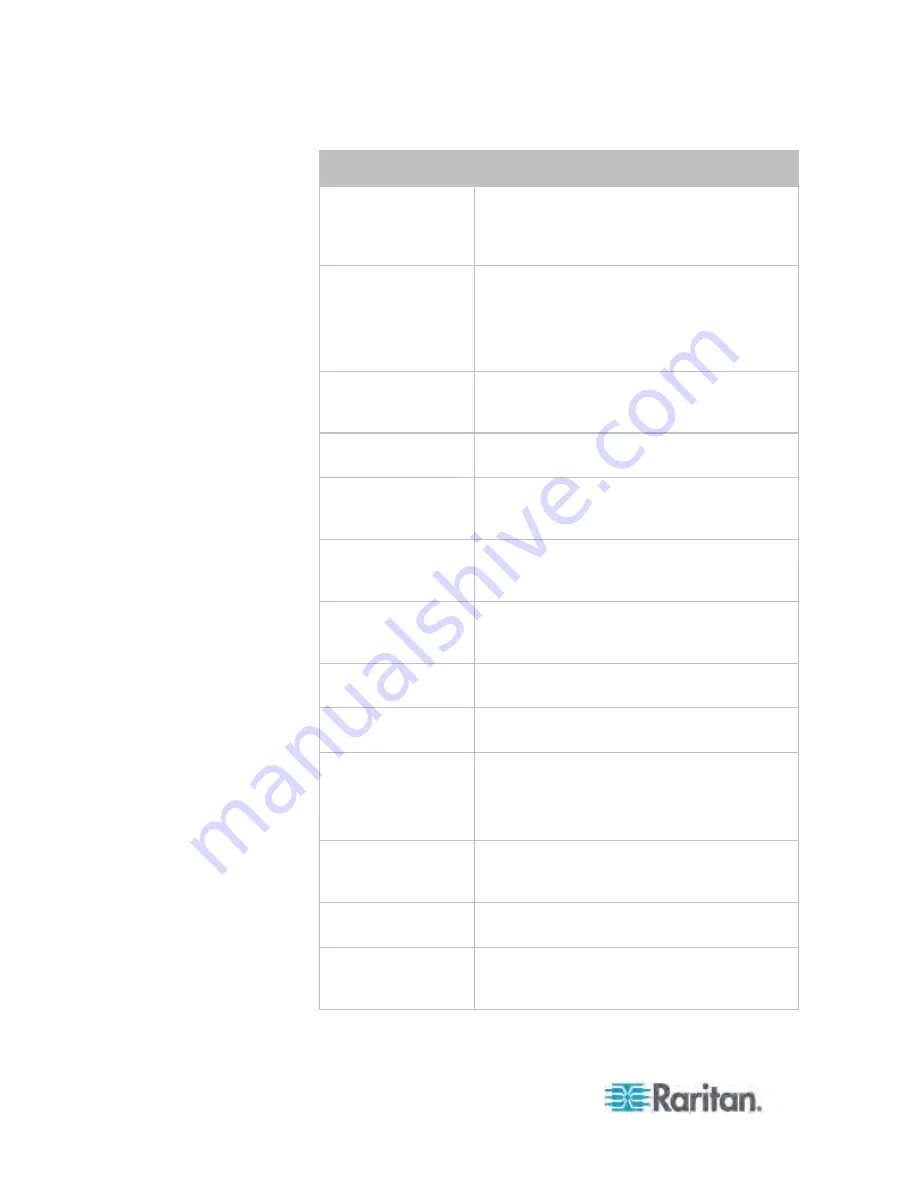
Action
Function
Push out sensor
readings
Sends asset management sensor data to a
remote server using HTTP POST requests.
See
Push Out Sensor Readings
(on page
229).
Request LHX/SHX
maximum cooling
Applies the maximum cooling to the LHX/SHX
device. See
Request LHX/SHX Maximum
Cooling
(on page 229).
This option is available only when the Schroff
LHX/SHX support has been enabled.
Send snapshots via
Emails the snapshots captured by a connected
Logitech
®
webcam (if available). See
Send a
Snapshot via Email
(on page 230).
Send email
Emails a textual message. See
Send EMail
(on page 231).
Send SNMP
notification
Sends SNMP traps or informs to one or
multiple SNMP destinations. See
Send an
SNMP Notification
(on page 232).
Syslog message
Makes the PX automatically forward event
messages to the specified syslog server. See
Syslog Message
(on page 234).
Send sensor report
Reports the readings or status of the selected
sensors, including internal or external sensors.
See
Send Sensor Report
(on page 236).
Send SMS message Sends a message to a mobile phone. See
Send SMS Message
(on page 238).
Internal beeper
Turns on or off the internal beeper. See
Internal Beeper
(on page 239).
Switch LHX/SHX
Switches on or off the LHX/SHX device. See
Switch LHX/SHX
(on page 239).
This option is available only when the Schroff
LHX/SHX support has been enabled.
Record snapshots to
webcam storage
Makes a connected webcam start or stop
taking snapshots. See
Record Snapshots to
Webcam Storage
(on page 241).
Change load
shedding state
Enters or quits the load shedding mode. See
Change Load Shedding State
(on page 237).
Switch outlets
Switches on, off or cycles the power to the
specified outlet(s). See
Switch Outlets
(on
page 240).
Содержание PX3-4000 series
Страница 5: ......
Страница 350: ...Chapter 6 Using the Web Interface 329 10 To print the currently selected topic click the Print this page icon...
Страница 615: ...Appendix H LDAP Configuration Illustration 594 5 Click OK The PX_Admin role is created 6 Click Close to quit the dialog...
Страница 627: ...Appendix I RADIUS Configuration Illustration 606 Note If your PX uses PAP then select PAP...
Страница 628: ...Appendix I RADIUS Configuration Illustration 607 10 Select Standard to the left of the dialog and then click Add...
Страница 629: ...Appendix I RADIUS Configuration Illustration 608 11 Select Filter Id from the list of attributes and click Add...
Страница 632: ...Appendix I RADIUS Configuration Illustration 611 14 The new attribute is added Click OK...
Страница 633: ...Appendix I RADIUS Configuration Illustration 612 15 Click Next to continue...
Страница 648: ...Appendix J Integration 627 3 Click OK...
Страница 661: ...Appendix J Integration 640 2 Launch dcTrack to import the spreadsheet file...


