


Chapter 6: Using the Web Interface
163
Changing the Role List View
You may re-sort the list for better viewing the data. See
Changing the
View of a List
(on page 106).
Access Security Control
The PX provides tools to control access. You can enable the internal
firewall, create firewall rules, and create login limitations.
Tip: You can also create and install the certificate or set up external
authentication servers to control any access. See
Setting Up a TLS
Certificate
(on page 178) and
Setting Up External Authentication
(on
page 184).
Forcing HTTPS Encryption
You can force all accesses to the PX via HTTP to be redirected to
HTTPS. See
Changing HTTP(S) Settings
(on page 127).
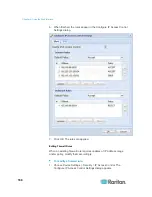
Configuring the Firewall
The PX has a firewall that you can configure to prevent specific IP
addresses and ranges of IP addresses from accessing the PX device or
to prevent them from receiving any data from the PX.
The PX allows you to configure the firewall rules for inbound and
outbound traffic respectively. Inbound rules control the data sent to the
PX, and outbound rules control the data sent from the PX.
By default the firewall is disabled.
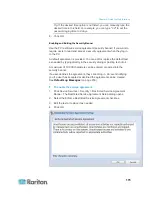
To configure the firewall:
1. Enable the firewall. See
Enabling the Firewall
(on page 164).
2. Set the default policy. See
Changing the Default Policy
(on page
164).
3. Create firewall rules specifying which addresses to accept and which
ones to discard. See
Creating Firewall Rules
(on page 165).
Changes made to firewall rules take effect immediately. Any
unauthorized IP activities cease instantly.
Note: The purpose of disabling the firewall by default is to prevent users
from accidentally locking themselves out of the device.
Содержание PX3-4000 series
Страница 5: ......
Страница 350: ...Chapter 6 Using the Web Interface 329 10 To print the currently selected topic click the Print this page icon...
Страница 615: ...Appendix H LDAP Configuration Illustration 594 5 Click OK The PX_Admin role is created 6 Click Close to quit the dialog...
Страница 627: ...Appendix I RADIUS Configuration Illustration 606 Note If your PX uses PAP then select PAP...
Страница 628: ...Appendix I RADIUS Configuration Illustration 607 10 Select Standard to the left of the dialog and then click Add...
Страница 629: ...Appendix I RADIUS Configuration Illustration 608 11 Select Filter Id from the list of attributes and click Add...
Страница 632: ...Appendix I RADIUS Configuration Illustration 611 14 The new attribute is added Click OK...
Страница 633: ...Appendix I RADIUS Configuration Illustration 612 15 Click Next to continue...
Страница 648: ...Appendix J Integration 627 3 Click OK...
Страница 661: ...Appendix J Integration 640 2 Launch dcTrack to import the spreadsheet file...


