


Chapter 6: Using the Web Interface
323
Requesting Maximum Cooling for an SHX-30
PX allows you to remotely activate the Schroff SHX-30's maximum
cooling feature. The LHX-20 and LHX-40 do not support remote
activation of maximum cooling.
Note: The maximum cooling mode is a feature of the SHX-30, not the
PX.
When you click Request Maximum Cooling on the PX remote interface,
the SHX-30 enters into emergency cooling mode and runs at its
maximum cooling level of 100% in order to cool the device.
When maximum cooling is requested for an SHX-30, the message
"Maximum cooling requested" is displayed in the Alerts section of the
page.
When you click the Acknowledge Alert Status button, the alert message
disappears even if the actual cooling action on the device is still
underway.
For additional information on the maximum cooling function, see the
SHX-30 documentation.
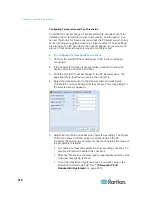
To request maximum cooling for an SHX-30:
1. If the Feature Port folder is not expanded, expand it to show the
device under the Feature Port folder.
2. Click the LHX/SHX heat exchanger in the PX Explorer pane. The
page specific to that device opens in the right pane.
3. Click on the desired SHX heat exchanger in the navigation tree. The
page specific to that heat exchanger opens in the right pane.
4. In the Information section of the page, click Request Maximum
Cooling to cool the device. The maximum cooling process begins.
5. Click Cancel Maximum Cooling to stop the process (if needed).
Firmware Upgrade
You may upgrade your PX device to benefit from the latest
enhancements, improvements and features.
Firmware files are available on Raritan website's
Support page
(
http://www.raritan.com/support/
).
Содержание PX3-4000 series
Страница 5: ......
Страница 350: ...Chapter 6 Using the Web Interface 329 10 To print the currently selected topic click the Print this page icon...
Страница 615: ...Appendix H LDAP Configuration Illustration 594 5 Click OK The PX_Admin role is created 6 Click Close to quit the dialog...
Страница 627: ...Appendix I RADIUS Configuration Illustration 606 Note If your PX uses PAP then select PAP...
Страница 628: ...Appendix I RADIUS Configuration Illustration 607 10 Select Standard to the left of the dialog and then click Add...
Страница 629: ...Appendix I RADIUS Configuration Illustration 608 11 Select Filter Id from the list of attributes and click Add...
Страница 632: ...Appendix I RADIUS Configuration Illustration 611 14 The new attribute is added Click OK...
Страница 633: ...Appendix I RADIUS Configuration Illustration 612 15 Click Next to continue...
Страница 648: ...Appendix J Integration 627 3 Click OK...
Страница 661: ...Appendix J Integration 640 2 Launch dcTrack to import the spreadsheet file...


