IO-390-D Series Engine Maintenance Manual
© 2020 Avco Corporation. All Rights Reserved
12-10
March 2020
Page 73
IO-390-D Series Engine Maintenance Manual
12.
Oil Filter Replacement
After the initial 25-hour oil filter replacement
and oil change, if oil consumption is stabilized,
replace the oil filter after every 50 hours of
engine operation during an oil change, unless
otherwise directed.
A.
Drain the oil from the oil sump per “Oil
Change Procedure” in this chapter.
B.
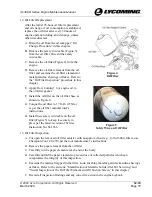
Remove the safety wire/cable (Figure 5)
from the oil filter. Discard the safety
wire/cable.
C.
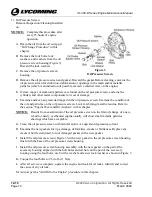
Remove the oil filter (Figure 4) from the
engine.
D.
Remove the oil filter element from the oil
filter and examine the oil filter element for
metal particles, shavings or flakes. Refer to
the “Oil Filter Inspection” procedure in this
chapter.
Figure 4
Oil Filter
E.
Apply Dow Corning
®
4 or engine oil to
the oil filter gasket.
F.
Install the oil filter on the oil filter base as
shown in Figure 4.
G.
Torque the oil filter to 17 ft.-lb (23 Nm)
or per the oil filter manufacturer's
instructions.
H.
Install new safety wire/cable on the oil
filter (Figure 5) to keep it securely in
place per the latest revision of Service
Instruction No. SI-1566.
Figure 5
Safety Wire on Oil Filter
13.
Oil Filter Inspection
A.
Cut open the removed oil filter canister with an approved tool (e.g., for full-flow filters, use
Champion Tool CT-470) per the tool manufacturer’s instructions.
B.
Remove the paper element from the oil filter.
C.
Carefully cut the paper element at each end of the body.
D.
Carefully unfold the paper element to prevent loss of collected particles which can
compromise the integrity of this inspection.
E.
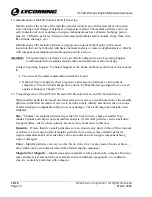
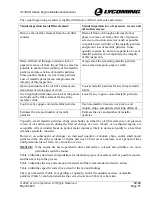
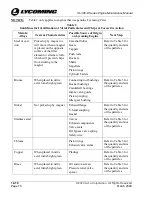
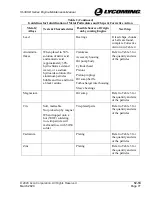
Examine the material trapped in the filter. Look for shiny metallic particles/residue, shavings
or flakes. Refer to the sections: “Identification of Metallic Solids After Oil Servicing” and
“Visual Inspection of the Oil Filter Element and Oil Suction Screen” in this chapter.
F.
Record all inspection findings and any corrective action in the engine logbook.

