IO-390-D Series Engine Maintenance Manual
© 2020 Avco Corporation. All Rights Reserved
74-30
March 2020
Page 283
IO-390-D Series Engine Maintenance Manual
(b)
Ground the EIS to the negative (-) lead of the temporary power source. Do not
attempt to ground through painted or anodized surfaces – ground through the
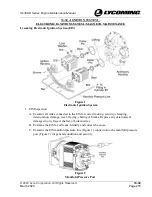
machined mount face, p-lead shield terminal (Figure 7) or case bolt heads.
(c)
The EIS LED (Figure 7) should illuminate green. If not, wiggle the drive gear, re-
ground the EIS and ensure the EIS p-lead terminal (Figure 7) is not grounded.
NOTICE:
The EIS LED will not turn on if the p-lead terminal is grounded.
(d)
Slowly rotate the EIS drive gear to find the point where the LED goes off.
(e)
TURN SLOWLY – the LED alignment point has a ½° window and is difficult
to see if turning fast!
(f)
The point at which the LED goes off is the EIS’s internal TDC alignment.
(g)
Once this point is found, care should be taken to avoid any rotation of the
EIS drive gear during further steps of engine installation.
(3)
Mount the EIS on the Engine:
CAUTION
LYCOMING EIS UNITS ARE PROPRIETARY TO
LYCOMING. USE ONLY APPROVED DOCUMENTATION
SUPPLIED BY LYCOMING FOR THE INSTALLATION AND
CONTINUED AIRWORTHINESS OF LYCOMING EIS UNITS.
NOTE:
UNLIKE A MAGNETO, THE LYCOMING EIS IS TIMED
(SYNCED) TO #1 CYLINDER COMPRESSION STROKE TDC (0°).
NOTICE:
The EIS operates by syncing its internal TDC alignment point to #1-cylinder
compression stroke (TDC – 0°).
(a)
Confirm the engine is at top dead center (TDC - 0°) of #1 cylinder on the
compression stoke.
(b)
Ensure the O-ring is present, free of debris and seated in the EIS face groove.
(c)
Apply Lubrico
®
M-6 grease or equivalent to the mating surface of the EIS flange
and the O-ring.
(d)
Ensure the EIS is still internally timed as described in the “Internally Time the
EIS” section.
(e)
Without allowing the EIS drive gear to rotate,
align the EIS mounting ear slots
with the engine studs and slide the EIS into the magneto cavity.
(f)
Hold the EIS flush to the engine, clock the EIS to ensure the point when the LED
goes off is within the rotational sweep limits of the mounting ear slots.
(g)
Repeat steps (d) through (f) above if unable to find the point when the LED goes
off as the EIS drive gear may have skipped a tooth over the engine gear when
pushed in.
(h)
If
still unable
to find the point when the LED goes off, reinstall the drive gear to
the alternate drive gear orientation as described in the “Install the Drive Gear
(Magneto Gear)” section in this chapter.

