IO-390-D Series Engine Maintenance Manual
72-20
© 2020 Avco Corporation. All Rights Reserved
Page 174
March 2020
IO-390-D Series Engine Maintenance Manual
(4)
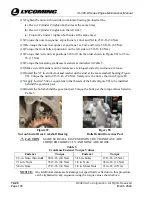
With the crankshaft assembly in the crankcase, align the dowel holes in the front bearing
halves with the dowels in the crankcase.
(5)
Make sure the front bearings are seated squarely over the locating dowels on the
crankcase.
C.
Measure the Thrust Face Clearances Between the Crankshaft and Crankcase
(1)
With the crankshaft installed in the crankcase, move the crankshaft as far forward as
possible.
(2)
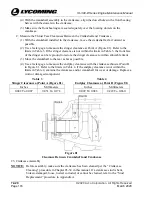
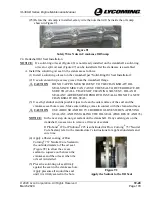
Use a feeler gage to measure the slinger clearance at Point A (Figure 81). Refer to the
limits in Table 3. If the slinger clearance is not within the limits in Table 3, the front face
of the slinger can be reground to restore the slinger clearance to within allowable limits.
(3)
Move the crankshaft to the rear as far as possible.
(4)
Use a feeler gage to measure the end play clearance with the crankcase thrust at Point B
in Figure 81. Refer to the limits in Table 4. If the endplay clearance is not within the
limits in Table 4, examine the crankcase and/or crankshaft for wear or damage. Replace a
worn or damaged component.
Table 3
Slinger Clearance at Point A (Figure 81)
Table 4
Endplay Clearance at Point B (Figure 81)
Inches
Millimeters
Inches
Millimeters
0.002 To 0.007
0.051 To 0.178
0.009 To 0.026
0.229 To 0.660
Figure 81
Clearance Between Crankshaft and Crankcase
23.
Crankcase Assembly
NOTICE:
Before assembly, make sure the crankcase has been cleaned per the “Crankcase
Cleaning” procedure in Chapter 05-30 in this manual. If a crankcase stud is bent,
broken, damaged, loose, rusted, corroded, or cannot be cleaned, refer to the “Stud
Replacement” procedure in Appendix A.

