IO-390-D Series Engine Maintenance Manual
74-30
© 2020 Avco Corporation. All Rights Reserved
Page 288
March 2020
IO-390-D Series Engine Maintenance Manual
4.
Magneto Replacement Procedure
WARNING
BEFORE THIS PROCEDURE, MAKE SURE ALL POWER IS DISABLED
TO THE ENGINE TO PREVENT ELECTRICAL SHOCK AND INJUIRY.
A.
Magneto Removal
(1)
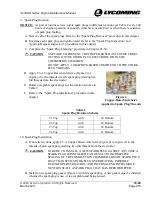
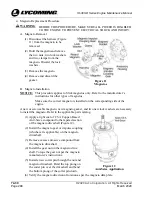
Disconnect the harness (Figure
11) from the magneto to be
removed.
(2)
Hold the magneto and remove
the two nuts, two lock washers
and two clamps from the
magneto. Discard the lock
washers.
(3)
Remove the magneto.
(4)
Remove and discard the
gasket.
Figure 11
Magnetos
B.
Magneto Installation
NOTICE:
This procedure applies to Slick magnetos only. Refer to the manufacturer’s
instructions for other types of magnetos.
Make sure the correct magneto is installed on the corresponding side of the
engine.
A new or serviceable magneto, new magneto gasket, and two new lock washers are necessary
to install the magneto. Refer to the applicable parts catalog.
(1)
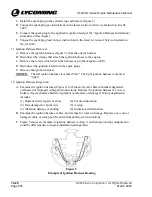
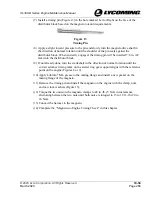
Apply a light coat of C5-A Copper-Based
Anti-Seize compound to the tapered section
of the magneto driveshaft (Figure 12).
(2)
Install the magneto gear or impulse coupling
(whichever is applicable) on the magneto
driveshaft.
(3)
Remove excess anti-seize compound from
the magneto driveshaft.
(4)
Install the gear nut on the magneto drive
shaft. Torque the gear nut per the magneto
manufacturer’s instructions.
(5)
Install a new cotter pin through the nut and
magneto driveshaft. Bend the top prong on
the cotter pin over the driveshaft and bend
the bottom prong of the cotter pin down.
Figure 12
Anti-Seize Application
(6)
Verify the magneto direction of rotation as per the magneto data plate.


