IO-390-D Series Engine Maintenance Manual
72-30
© 2020 Avco Corporation. All Rights Reserved
Page 214
March 2020
IO-390-D Series Engine Maintenance Manual
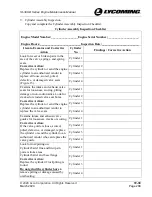
Piston Inspection Checklist (Cont.)
NOTICE:
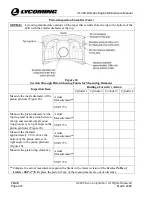
Lycoming manufactures pistons with a taper that extends from the top to the bottom of the
skirt with the smaller diameter at the top.
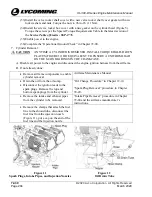
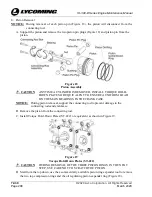
Figure 20
Section Through Piston Showing Points for Measuring Diameter
Inspection Item
Findings/Corrective Action
Cylinder 1 Cylinder 2 Cylinder 3 Cylinder 4
Measure the inside diameter of the
piston pin hole (Figure 20).
Actual
Measurement**
SSP-1776
Measure the piston diameter at the
top ring land of the piston between
the top and second compression
ring grooves (at a right angle to the
piston pin hole) (Figure 20).
Actual
Measurement**
SSP-1776
Measure the diameter
approximately 1/8 in. above the
bottom of the piston skirt. (at a
right angle to the piston pin hole)
(Figure 20).
Actual
Measurement**
SSP-1776
Measure the piston ring clearance.
Actual
Measurement**
SSP-1776
**Compare the actual measurement against the limits in the latest revision of the
Service Table of
Limits - SSP-1776
. Replace the piston if any of the measurements are out of tolerance.


