IO-390-D Series Engine Maintenance Manual
12-10
© 2020 Avco Corporation. All Rights Reserved
Page 72
March 2020
IO-390-D Series Engine Maintenance Manual
11.
Oil Pressure Screen
Removal/Inspection/Cleaning/Installati
on
NOTICE:
Complete this procedure after
every 25 hours of engine
operation.
A.
Drain the oil from the oil sump per
“Oil Change Procedure” in this
chapter.
B.
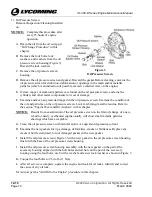
Remove the four bolts, lock
washers, and washers from the oil
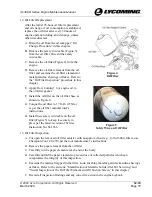
pressure screen housing (Figure 3).
Discard the lock washers.
C.
Remove the oil pressure screen
housing.
Figure 3
Oil Pressure Screen
D.
Remove the oil pressure screen and gasket. Discard the gasket.Before cleaning, examine the
oil pressure screen for distortion, deformation or openings in the mesh and/or metallic
particles (which is an indication of possible excessive internal wear on the engine).
E.
If steel, copper or aluminum particles are found on the oil pressure screen, examine the
cylinders and other metal components for wear or damage.
F.
Examine and keep any material trapped in the oil pressure screen. Examine the condition of
the oil and particles on the oil pressure screen. Look for shining, metallic residue. Refer to
the section “Engine Wear and Oil Analysis” in this chapter.
NOTICE:
Results from examination of the oil pressure screen on the first oil change of a new,
rebuilt or newly overhauled engine usually will show small metallic particles
shavings which are acceptable.
G.
Clean the oil pressure screen with mineral spirits or equivalent degreasing solvent.
H.
Examine the new gaskets for rips, damage, deformities, cracks or brittleness. Replace any
cracked, brittle, deformed, torn or damaged gasket with a new gasket.
I.
Install the oil pressure screen (Figure 3) with a new gasket in the oil pressure screen housing
flush with the base of the oil pressure screen housing.
J.
Install the oil pressure screen housing assembly with the new gasket on the pad of the
accessory housing aligned with the bolt holes and oil hole on the pad of the accessory
housing using the four bolts, each with a washer and a new lock washer as shown in Figure 3.
K.
Torque the four bolts to 96 in.-lb (11 Nm).
L.
After all service is complete, operate the engine and look for oil leaks. Identify and correct
the cause of any oil leak.
M.
Add oil per the "Add Oil to the Engine" procedure in this chapter.

