IO-390-D Series Engine Maintenance Manual
72-30
© 2020 Avco Corporation. All Rights Reserved
Page 220
March 2020
IO-390-D Series Engine Maintenance Manual
(2)
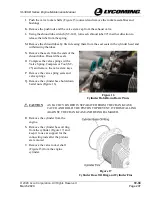
Install a serviceable intake valve in the valve guide (Figure 23), through the cylinder
barrel.
(3)
Install the valve spring seats and valve springs.
(4)
Compress the intake valve springs with a Valve Spring Compressor Tool (ST-25) and
install the valve stem keys.
(5)
Install the cylinder on the engine per the “Cylinder Installation” procedure in this chapter.
14.
Exhaust Valve Replacement
A.
Exhaust Valve Removal
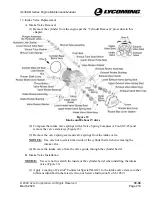
Figure 24
Exhaust Valve Stem Cap
(1)
Remove the cylinder from the engine per the
“Cylinder Removal” procedure in this chapter.
(2)
Remove the exhaust valve stem cap (Figure
24).
(3)
Compress the exhaust valve springs with a
Valve Spring Compressor Tool (ST-25) and
remove the valve stem keys (Figure 24).
(4)
Remove the valve spring seats, and valve
springs from the exhaust valve.
NOTICE:
Use care not to scratch the inside of the cylinder barrel when removing the
exhaust valve.
(5)
Remove the exhaust valve from the valve guide, through the cylinder barrel.
B.
Exhaust Valve Installation
NOTICE:
Use care not to scratch the inside of the cylinder barrel when installing the exhaust
valve.
(1)
Apply a coating of Castrol
®
Contractor Special NLGI#1 to the exhaust valve stem (or
other lubricant identified in the latest revision of Service Instruction No. SI-1059.)
(2)
Install a serviceable exhaust valve in the valve guide, through the cylinder barrel.
(3)
Install the valve spring seats and valve springs,
(4)
Use a Valve Spring Compressor Tool (ST-25) to compress the exhaust valve springs and
install the valve stem key.
(5)
Install the valve stem cap (Figure 24) on the exhaust valve.
(6)
Install the cylinder on the engine per the “Cylinder Installation” procedure in this chapter.


