GE M
EDICAL
S
YSTEMS
D
IRECTION
FK091075, R
EVISION
04
V
IVID
3N P
RO
/E
XPERT
S
ERVICE
M
ANUAL
8-108
Section 8-6 - Lower Section Components Replacement
8-6-8
Front Wheel Replacement Procedure
NOTE:
This section describes the installation and removal procedures for the earlier-type of front wheel
and the newer improved type. The installation procedure is slightly different for each type of front wheel,
as described in the procedures below.
When replacing the earlier type of front wheel with the
same
type of wheel, refer to the following
instructions:
•
Front Wheel Removal - Procedure 1
(see below)
•
Front Wheel Installation - Procedure 1
on page 8 - 112.
When replacing the earlier type of front wheel with newer improved type make sure you replace
BOTH
front wheels. When ordering the new-type Front wheels, you will receive a new transverse arm which
should also be replaced (between the two wheels). Refer to these instructions:
•
Front Wheel Removal - Procedure 1
on page 8 - 108
•
Front Wheel Installation - Procedure 2
on page 8 - 112.
If replacing the newer improved type with the
same
type of wheels, refer to the following instructions:
•
Front Wheel Removal - Procedure 2
on page 8 - 110
•
Front Wheel Installation - Procedure 2
on page 8 - 112.
8-6-8-1
Tools
Use the appropriate flat and Phillips-type screw drivers, a wire cutter, the appropriate Hex wrenches
and the appropriate Allen keys as indicated in the front wheel replacement procedure.
8-6-8-2
Preparation
Shut down the Vivid 3N Pro/Expert ultrasound unit, as described in
Chapter 3 -
Installation
.
8-6-8-3
Front Wheel Removal - Procedure 1
Note:
Before you begin, make sure you are working on a flat surface with the wheels facing the
front
and the brake in the left (
locked
) position, preventing movement.
The machine will remain stable, even after one wheel has been removed. However, for a safer
working environment, it is recommended to support the unit with wooden blocks or a jack.
WARNING: Do not lean on the machine, or leave it unattended without support, if a wheel has
been removed.
1)
Remove the Vivid 3N front cover, as described in
8-2-3-3 "Front Cover Removal Procedure" on page
8-5
.
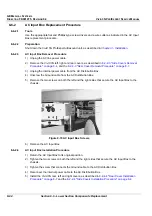
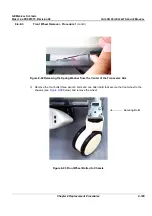
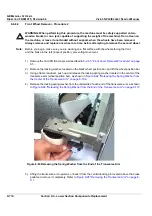
2) Using a flat screwdriver, push up and release the locking spring washer located in the center of the
transverse arm (wheel position bar), as shown in
Figure 8-92 "Releasing the Spring Washer from
the Center of the Transverse Arm" on page 8-109
. Lift the wheel position bar upwards (without
completely removing it).
Содержание Vivid 3N Pro Series
Страница 2: ......
Страница 5: ...GE MEDICAL SYSTEMS DIRECTION FK091075 REVISION 04 VIVID 3N PRO EXPERT SERVICE MANUAL ii iii...
Страница 24: ...GE MEDICAL SYSTEMS DIRECTION FK091075 REVISION 04 VIVID 3N PRO EXPERT SERVICE MANUAL xxii...
Страница 597: ......

