background image

GE M

EDICAL

 S

YSTEMS


D

IRECTION

 FK091075, R

EVISION

 04

V

IVID

 3N P

RO

/E

XPERT

 S

ERVICE

 M

ANUAL


7-130

Section 7-6 - Automatic Error Log

7-6-3

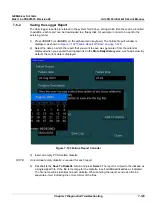
Sending the Logger Report

Send the zipped file as an attachment to an e-mail message. In the e-mail message, briefly describe 
the problem and indicate approximately what time of day it occurred.

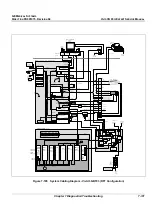
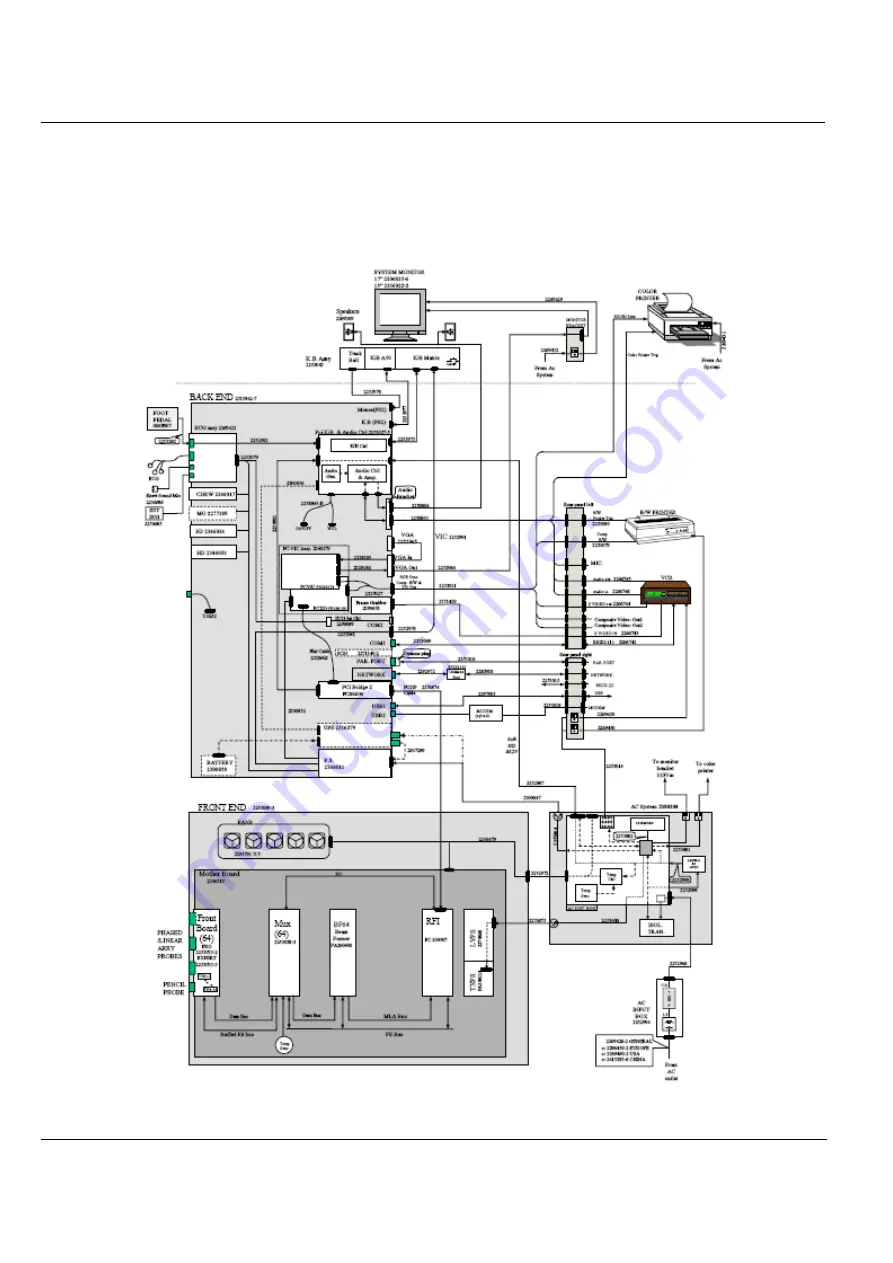
Figure 7-104 System Cabling Diagram - Vivid™ 3 BT03 (RFI Configuration)

Содержание Vivid 3N Pro Series

Страница 1: ...cation Direction FK091075 Revision 04 GE Medical Systems Vivid 3N Pro Expert Service Manual Copyright 2003 2004 and 2006 by General Electric Company Inc All Rights Reserved OPERATING DOCUMENTATION GE...

Страница 2: ......

Страница 3: ...NGUE QUE L ANGLAIS C EST AU CLIENT QU IL INCOMBE DE LE FAIRE TRADUIRE NE PAS TENTER D INTERVENTION SUR LES QUIPEMENTS TANT QUE LE MANUEL SERVICE N A PAS T CONSULT ET COMPRIS LE NON RESPECT DE CET AVER...

Страница 4: ...TES MANUAIS NOUTRO IDIOMA DA RESPONSABILIDADE DO CLIENTE FORNECER OS SERVI OS DE TRADU O N O TENTE REPARAR O EQUIPAMENTO SEM TER CONSULTADO E COMPREENDIDO ESTE MANUAL DE ASSIST NCIA T CNICA O N O CUMP...

Страница 5: ...GE MEDICAL SYSTEMS DIRECTION FK091075 REVISION 04 VIVID 3N PRO EXPERT SERVICE MANUAL ii iii...

Страница 6: ...tors Other connections between pieces of electrical equipment calibrations and testing shall be performed by qualified GE Vingmed Ultrasound personnel In performing all electrical work on these produc...

Страница 7: ...ed in any form in whole or in part without prior written permission of GE Vingmed Ultrasound GE Vingmed Ultrasound may revise this publication from time to time without written notice TRADEMARKS All p...

Страница 8: ...vice Manual pr BT 03 release 03 22 MAR 04 Updated Service Manual pr RFI card release Corrected a few errors Added the Post Delivery Checklist with instructions 04 30 Oct 06 Updated all pages PAGES REV...

Страница 9: ...Important Conventions 1 4 Conventions Used in this Manual 1 4 Safety Considerations 1 6 Introduction 1 6 Human Safety 1 6 Mechanical Safety 1 6 Electrical Safety 1 7 Dangerous Procedure Warnings 1 8 P...

Страница 10: ...ments 2 2 Cooling Requirements 2 2 Lighting Requirements 2 2 Time and Manpower Requirements 2 2 Electrical Requirements 2 3 EMI Limitations 2 5 Probe Environmental Requirements 2 6 Facility Needs 2 7...

Страница 11: ...ng Vivid 3N Pro Expert 3 8 Accessory Box Contents 3 10 Preparing for Installation 3 11 Confirming Customer Order 3 11 Verifying the Shipping Crate Contents 3 11 Component Inspection 3 13 System Voltag...

Страница 12: ...9 Setting Up for Connectivity 3 51 Setting Up the Network Connection 3 54 Setting Up for Communication with a Prosolv Workstation 3 56 Connecting Directly to EchoPAC PC 3 62 Image Vault Server 3 64 Va...

Страница 13: ...unctional Check 4 3 Basic Controls 4 3 Peripherals 4 4 Mechanical Functions 4 6 Back End Processor Tests 4 7 Image Testing 2D M CFM Doppler 4 11 3S Probe Image Quality Tests 4 11 7S Probe Image Qualit...

Страница 14: ...r Board BF 5 19 Radio Frequency Interface RFI Board 5 20 Front End Controller Board FEC RFT 5 22 RF and Tissue Processor Board RFT 5 23 Image Port Board IMP 5 24 Radio Frequency Interface Board RFI 5...

Страница 15: ...tribution 5 40 Electrical Power 5 40 AC System 5 41 AC Distribution Box 5 43 Front End DC Power Distribution 5 44 Front End Cooling System 5 46 General Description 5 46 Location in the Unit 5 46 Commo...

Страница 16: ...r BF 6 7 Channels Multiplexer MUX 6 7 Front Board Assembly FB 6 8 Back End Power Supply Voltages 6 9 VIC Video Signal Setting 6 9 Video Format Confirmation 6 9 Monitor Operation 6 10 Vivid 3N Pro Expe...

Страница 17: ...End Controller FEC Diagnostic Tests RFT Configuration 7 19 Beamformer BF Diagnostic Tests 7 22 Front Board Assembly FB Diagnostic Tests 7 26 MUX Diagnostic Tests 7 50 H W Report 7 69 Current Report 7...

Страница 18: ...ERT SERVICE MANUAL xvi Calibration Page 7 112 Configuration Page 7 113 Utilities Page 7 114 Replacement Page 7 127 PM Page 7 127 Automatic Error Log 7 128 Adding Comments to the Daily Logger Report 7...

Страница 19: ...ement Procedure Upper Section 8 20 Right and Left Probe Holders Replacement Procedure 8 23 Front Handle Replacement Procedure 8 24 Rear Handle Replacement Procedure 8 26 Control Console Components Rep...

Страница 20: ...ibution Box Replacement Procedure 8 92 AC Input Box Replacement Procedure 8 94 Keyboard or Monitor Cable Replacement Procedure 8 95 AC BEP or FE Cable Replacement Procedure 8 96 Gas Spring Cable Repla...

Страница 21: ...ce Parts Kits delivered with Unit 9 3 AC Power overview 9 4 Control Panel Parts 9 5 Front End Parts 9 7 Global Modem 9 8 Mechanical Hardware 9 9 Back End Parts 9 10 Cables 9 13 ECG 9 27 Manuals 9 28 S...

Страница 22: ...ional Checks 10 8 Input Power Checks 10 9 Cleaning 10 10 Physical Inspection 10 11 Diagnostic Checks Optional 10 12 Probe Maintenance 10 13 Probe Checks 10 13 Probe Handling 10 13 Basic Probe Care 10...

Страница 23: ...AL SYSTEMS DIRECTION FK091075 REVISION 04 VIVID 3N PRO EXPERT SERVICE MANUAL xxi Excessive Current Leakage 10 30 Possible Causes of Excessive Current Leakage 10 30 PM and Safety Inspection Certificate...

Страница 24: ...GE MEDICAL SYSTEMS DIRECTION FK091075 REVISION 04 VIVID 3N PRO EXPERT SERVICE MANUAL xxii...

Страница 25: ...rtant issues related to safely servicing the Vivid 3N scanner The service provider must read and understand all the information presented here before installing or servicing a unit Table 1 1 Contents...

Страница 26: ...ments Contains instructions for performing service adjustments to the Vivid 3N ultrasound unit Chapter 7 Diagnostics Troubleshooting Provides instructions for setting up and running diagnostic trouble...

Страница 27: ...THE BT01 EXPERT IS BACKWARD COMPATIBLE TO ITS PARALLEL PRODUCT THE BT01 PRO CONTACT YOUR DISTRIBUTOR FOR MORE INFORMATION ABOUT UPGRADES AND BACKWARD COMPATIBILITY FK000060 VIVID 3 PRO N NEW GENERATIO...

Страница 28: ...different levels of concern are identified by a flag word that precedes the precautionary message Known or potential hazards are labeled in one of following ways NOTE Notes provide important informat...

Страница 29: ...ral different graphical icons symbols may be used to make you aware of specific types of hazards that could cause harm Other hazard icons make you aware of specific procedures that should be followed...

Страница 30: ...S ARE HIGHLY SENSITIVE MEDICAL INSTRUMENTS THAT CAN EASILY BE DAMAGED BY IMPROPER HANDLING USE CARE WHEN HANDLING AND PROTECT FROM DAMAGE WHEN NOT IN USE DO NOT USE A DAMAGED OR DEFECTIVE PROBE FAILUR...

Страница 31: ...outlet with safety grounding The power outlet used for this equipment should not be shared with other types of equipment Both the system power cable and the power connector must meet international ele...

Страница 32: ...e followed DANGEROUS VOLTAGES CAPABLE OF CAUSING DEATH ARE PRESENT IN THIS EQUIPMENT USE EXTREME CAUTION WHEN HANDLING TESTING AND ADJUSTING EXPLOSION WARNING DO NOT OPERATE THE EQUIPMENT IN AN EXPLOS...

Страница 33: ...formation regarding the operation of the ultrasound unit 1 4 1 Product Label Locations The following two diagrams indicate the location of some of the labels and icons found on the Vivid 3N Pro Expert...

Страница 34: ...75 REVISION 04 VIVID 3N PRO EXPERT SERVICE MANUAL 1 10 Section 1 4 Product Labels and Icons 1 4 1 Product Label Locations cont d Figure 1 2 Product Label and Icon Locations Rear 1 Main Label 2 AC Volt...

Страница 35: ...metal parts cannot become live in the event of a failure of the basic insulation Rear of the unit and probe connectors Device Listing Certification Labels Laboratory logos or labels that denote confo...

Страница 36: ...he label Rear of the unit CAUTION Dangerous voltage the lightning flash with arrowhead in equilateral triangle is used to indicate electric shock hazards Rear of the unit Protective Earth Indicates th...

Страница 37: ...e rear of the ultrasound unit as shown in Figure 1 5 Main Label on page 1 13 Figure 1 5 Main Label C G E V i n g m e d U l t r a s o u n d M o d e l S e r i a l N o I m a x V n o m P m a x F r e q 5 A...

Страница 38: ...which locks the front castors and prevents the ultrasound unit from moving The parking label shown below is located on the brake pedal at the front of the unit as shown in Figure 1 1 Product Label an...

Страница 39: ...ion Box 1 8 1 1 Vivid 3N Vivid 3N Pro Transportation Box Label The Vivid 3N Vivid 3N Pro Transportation Box Label is loxaded at the front of the transportation box Figure 1 9 Vivid 3N Transportation B...

Страница 40: ...evice produces unacceptable levels of emission This interference is often referred to as radio frequency or electromagnetic interference RFI EMI and can be radiated through space or conducted over int...

Страница 41: ...w or stress Proper installation following all comments noted in this service manual is required in order to achieve full EMC performance Table 1 6 Standards Used Standard Directive Scope 89 336 EEC EM...

Страница 42: ...iate support resource as listed below Prepare the following information before you call System ID and or serial number Software version Table 1 7 GE Contact Information Location Phone Number Europe GE...

Страница 43: ...luded are descriptions of the electrical and facility requirements that must be met by the purchaser A worksheet is provided at the end of this chapter see Figure 2 4 Connectivity Installation Workshe...

Страница 44: ...mized if the room lighting is subdued and indirect when a scan is being performed Therefore a combination lighting system dim bright is recommended Keep in mind that lighting controls and dimmers can...

Страница 45: ...image artifacts can occur if at any time within the facility the Ground from the main facility s incoming power source to the Ultrasound unit is only a conduit 2 2 5 1 Vivid 3N Pro Expert Power Requir...

Страница 46: ...all current local state and national electrical codes 2 2 5 5 Mains Power Plug If the unit arrives without a power plug or with the wrong plug contact your GE dealer When necessary the installation e...

Страница 47: ...eliminate interference problems caused by high frequency high powered radio or video broadcast signals Replace and or reassemble all screws RF gaskets covers and cores After you finish repairing or up...

Страница 48: ...em and electronic probes are designed for storage temperatures of 20o to 50o C When exposed to large temperature variations the probes should be kept at room temperature for a minimum of 10 hours befo...

Страница 49: ...cal equipment and calibration and testing must also be performed by qualified personnel The products involved and the accompanying electrical installations are highly sophisticated and special enginee...

Страница 50: ...s In the case of a network option An active network outlet in the vicinity of the ultrasound unit A network cable of appropriate length regular Pin to Pin network cable An IT administrator who will as...

Страница 51: ...rator with clinically useful features for moving images and patient information over a hospital network Examples of DICOM services include the transfer of images to workstations for viewing or transfe...

Страница 52: ...network administrator must provide the required information which should include the following Vivid 3N Details DICOM network details for the Vivid 3N Pro Expert unit including the host name local po...

Страница 53: ...ces Destination Devices TCP IP Settings Device Type Manufacturer Name IP Address Port AE Title 1 2 3 4 5 6 7 8 9 10 11 12 Dept Vivid 3N SN Type Floor Room REV Comments CONTACT INFORMATION Name Title P...

Страница 54: ...nce of any variances from the basic installation Make sure system and probes have been subject to acclimation period Environmental cooling is sufficient Lighting is adjustable to adapt to varying oper...

Страница 55: ...as described in Chapter 2 Pre Installation Once the site has been prepared installation can proceed as described in this chapter Table 3 1 Contents in Chapter 3 Section Description Page Number 3 1 Ov...

Страница 56: ...and troubleshooting 3 2 2 1 System Acclimation Time Following transport the Vivid 3N system may be very cold or hot Allow time for the system to acclimate before being switched ON Acclimation requires...

Страница 57: ...nnect the unit to a properly grounded power outlet Do NOT use a three prong to two prong adapter as this defeats safety grounding CAUTION Do NOT wear the ESD wrist strap when you work on live circuits...

Страница 58: ...the Post Delivery Checklist is included at the end of this chapter CAUTION Two people are needed to unpack the unit because of its weight Attempts to move the unit considerable distances or on an inc...

Страница 59: ...if the package itself is undamaged To make it easier to detection if the handling during transportation has been improper a set of Tilt Shock indicators have been attached to the transportation box 3...

Страница 60: ...no continue with step 2 2 Is the Shock Indicator red colored inside the middle of the indicator If yes The Shock Indicator has been activated Make a remark on the Post Delivery Checklist about the ac...

Страница 61: ...or signed for by a GE representative or hospital receiving agent 2 Report the damage to the carrier Whether noted or concealed damage MUST be reported to the carrier immediately upon discovery or in...

Страница 62: ...the doors are used as ramp out off and into the transportation box On the first version of the Transportation Box only the front door is meant to be used as a ramp It has bevel cut in one end 2 Place...

Страница 63: ...o release the brakes Keep direction lock activated The direction lock keeps the front wheels from swiveling and blocking the system inside the narrow transportation box 5 Carefully move the instrument...

Страница 64: ...FK092001 1 VIVID 3N USER GUIDE ENGLISH FK092193 1 VIVID 3N REFERENCE MANUAL ENGLISH FK092002 1 VIVID 3N RELEASE NOTES ENGLISH FK040193 1 VIVID 3 N SERVICE MANUAL ENGLISH FK091075 THIS MANUAL 1 STARTUP...

Страница 65: ...ms sales representative 3 5 2 Verifying the Shipping Crate Contents The following sections list the contents of the shipping crate or shipping carton Ensure that all components are present before comp...

Страница 66: ...3 5 Preparing for Installation 3 5 2 2 Accessories Table 3 10 Vivid 3N Pro Expert Accessories Item Number P N Description Quantity 1 2378183 CD WITH SW VIVID3 SYSTEM 1 2 2277423 DISKETTE 3 5 1 44MB 1...

Страница 67: ...in the connector socket on the unit Verify that the EMI fingers around the probe connector socket housing are intact Check the probe locking mechanism and probe switch 5 Monitor Clean the CRT with a...

Страница 68: ...eakers for Doppler sound 3 Probe Holders and Probes Situated on either side of the front panel 4 Control Panel Contains the alphanumeric keyboard and the buttons used to operate the ultrasound unit 5...

Страница 69: ...GE MEDICAL SYSTEMS DIRECTION FK091075 REVISION 04 VIVID 3N PRO EXPERT SERVICE MANUAL Chapter 3 Installation 3 15 Four active probe connectors one for a pencil probe Figure 3 8 Figure 3 9...

Страница 70: ...igurable footswitch connected to the patient I O module that enables keyboard commands to be operated by foot 11 Gel Holders Situated on either side of the control console and on the top surface on ei...

Страница 71: ...following figure shows the Vivid 3N Pro Expert ultrasound unit components that are visible from the rear of the ultrasound unit 1 Monitor 2 Gel Wells 3 Monitor Connection Panel 4 Left Rear Panel 5 Rig...

Страница 72: ...he dialog box see Figure 3 28 Technical Support Tab on page 3 46 5 Click OK NOTE If the voltage is not set correctly contact an authorized GE Service Representative Figure 3 11 Rating Plate Example C...

Страница 73: ...AL or NTSC video systems as required 3 5 5 1 Video Format Confirmation 1 Turn ON the system 2 Press Config 3 From the System Configuration dialog box select the VCR ECG tab and make sure either PAL or...

Страница 74: ...ve noisy images Check the grounding of the power cord and power outlet Be aware of RF sources Keep the unit at least 5m 16 4 ft away from other EMI sources Special shielding may be required to elimina...

Страница 75: ...ro Expert weighs 160 kg 353 lbs or more depending on installed peripherals when ready for use Care must be used when moving it or replacing its parts Failure to follow the precautions listed could res...

Страница 76: ...l For information for each peripheral device refer to the manufacturer s manual On board peripherals must be connected to one of the two available auxiliary power supplies on the right rear panel The...

Страница 77: ...local country voltage 2 AUXILIARY AC OUTLET For use with external peripherals Voltages are set according to local country voltage If additional auxiliary outlets are required use the special cable pro...

Страница 78: ...IDEO OUT Y C Video Out 4 pin connector for output to an S VHS VCR 3 S VIDEO IN Y C Video In 4 pin connector for input from an S VHS VCR 4 VIDEO OUT B W BNC connector for composite B W video output to...

Страница 79: ...ray and connect the following cables as shown in Table 3 17 2 Install the printer according to the printer s installation schematics see Figure 8 123 Belt Buckles Securing Printer on page 8 139 3 Afte...

Страница 80: ...re than 1m 3 3 ft from the power connection to the Vivid 3N unit WARNING Whenever moving the Vivid 3N scanner the DeskJet Color Printer must be disconnected from the scanner DO NOT attempt to move the...

Страница 81: ...on the right side of the unit which is used for parking OR Four active probe connectors one for a pencil probe Probes can be connected or changed any time as described below 1 Inspect the probe socket...

Страница 82: ...trasound unit Table 3 20 Available Probes P N Description 2232337 3S SECTOR new design 2259135 7L 546L 2259145 10L 739L LINEAR 2259153 C358 PROBE H400602LM C721 2259206 i739L LINEAR 2295377 12L 226366...

Страница 83: ...ble parts The main part trunk is a single cable connecting to the unit at one end and providing a cable splitter device at the other end The splitter contains five receptacles only three of which are...

Страница 84: ...ion 3 6 4 Connecting the ECG cont d Note For optimal ECG operation use only electrodes that meet universal standards Figure 3 16 ECG Cable and Electrode Placement Table 3 21 ECG Cable and Electrode Pl...

Страница 85: ...wall outlet plug should be connected to the fixed power socket that has a protective grounding conductor Never use an adapter or converter to connect with a power source plug for example a three prong...

Страница 86: ...the unit 3 Plug the power cord connector into the AC input socket and secure it in place using the attached clip see Figure 3 17 4 Plug the other end of the power cord to the AC wall outlet Allow suf...

Страница 87: ...the power supply and that the circuit breaker is ON as described in 3 6 5 2 Connecting the Ultrasound Unit to the Electrical Outlet on page 3 32 2 Hold down the On Off button on the control panel for...

Страница 88: ...e unit will perform an automatic shutdown sequence that protects the hard disk and switches into an energy saving standby mode By holding down the On Off button for more than 3 seconds the unit will d...

Страница 89: ...d Result 1 Press the CD drive Eject button and remove any media if present The CD drive tray ejects 2 Insert the CD provided with the software kit and press the Eject button again The CD drive tray wi...

Страница 90: ...due to changes in ambient light They can be adjusted using the Contrast and Brightness buttons on the front part of the display monitor All display monitor controls other than the contrast and bright...

Страница 91: ...Time area set the date and time as follows Trackball to the Set button and press Select Use the alphanumeric keyboard to select the current date Select the format of the date and time display for exam...

Страница 92: ...ow Figure 3 22 Archive Tab NOTE The Archive tab will display even if the Archive Package option is not installed 3 Select Display patients gender on screen to display the patient s gender in the patie...

Страница 93: ...e of media to which data is stored during backup from the Backup Device Is dropdown list 10 Select Eject MO Disk on Shutdown to have the system automatically eject the backup media when the unit is sh...

Страница 94: ...font name is highlighted Trackball to the Change button and press Select The Font dialog box is displayed Trackball to the required font color style and size and press Select for each choice Trackbal...

Страница 95: ...tered if the option has already been correctly installed in the system it will be removed NOTE Please note that all passwords should be visible underneath the control console or and on the green passw...

Страница 96: ...ems will not guarantee their correct operation on this system 3 In the Currently Installed Printers area trackball to the required printer and press Select The printer is highlighted 4 Trackball to th...

Страница 97: ...e required printer and press Select In this example Color Printer is selected 7 Trackball to the OK button and press Select NOTE To test that printer configuration is satisfactory verify that paper ha...

Страница 98: ...ed as shown below Figure 3 27 VCR ECG Tab 3 In the VCR Options area complete the following as required Select the video system from the Video Mode dropdown list for example PAL or NTSC Select the Smar...

Страница 99: ...chronization In the Store time without ECG msec field define the default length of a cineloop when there is no ECG trace Select the Analyze only Systole checkbox to place markers only on the systole p...

Страница 100: ...l parameters to ensure safe operation of the system Watchdog normally should not be enabled When enabled if there is a system lock up caused by the Back End this will turn OFF power at the Front End M...

Страница 101: ...ls Table 3 23 Recommended Vivid 3N Hardware Configurations Item BT03 Vivid 3N BT03 Pro ECG Second Revision Second Revision Image Port Revision E8 F8 Revision E8 F8 Front Board V7 3 TR V4 or V7 2 TR V4...

Страница 102: ...ection 3 8 System Configuration 3 8 11 Technical Support History Tab The Technical Support History is where you would record any historical technical support information that may be relevant to a prob...

Страница 103: ...e work station or a DICOM service using a TCP IP connection 3 9 2 Physical Connection 3 9 2 1 Ethernet Switch Connections An Ethernet Switch is used to connect the Vivid 3N Pro Expert system to an Ech...

Страница 104: ...choPAC PC Workstation Figure 3 32 Hospital Network Connections See the EchoPAC PC Service Manual Part Number EP091298 for details about the EchoPAC PC and the required set up procedures EchoPAC PC Viv...

Страница 105: ...2 Trackball to the System Options tab and press Select The System Options tab is displayed as shown below Figure 3 33 System Options Tab 3 Verify that the following options are installed as required...

Страница 106: ...ISION 04 VIVID 3N PRO EXPERT SERVICE MANUAL 3 52 Section 3 9 Connectivity Setup 3 9 3 Setting Up for Connectivity cont d 5 Enable any other remote server as required for example Services My Computer s...

Страница 107: ...SERVICE MANUAL Chapter 3 Installation 3 53 3 9 3 Setting Up for Connectivity cont d 6 When done trackball to the OK button and press Select MPEGvueCDR as shown in Figure 3 35 7 Trackball to the OK but...

Страница 108: ...displayed 2 Trackball to the Connectivity tab and press Select The Connectivity tab is displayed with the Views subsidiary tab selected by default as shown below Figure 3 36 Connectivity Tab 3 Trackb...

Страница 109: ...ngs Tab NOTE The Computer Name field shows the serial number of your Vivid 3N Pro Expert system 6 Enter the network information in the appropriate fields Leave the User Name as vivid3 NOTE The Default...

Страница 110: ...ackball to the Connectivity tab and press Select The Connectivity tab is displayed with the Views subsidiary tab selected by default as shown in Figure 3 36 Connectivity Tab on page 3 54 4 Trackball t...

Страница 111: ...field 9 Trackball to the Dicom Storage Server line in the Services table The Services tab is expanded as shown below Figure 3 41 Connectivity Tab Services for DICOM Server Expanded 10 Enter the AE Ti...

Страница 112: ...ion such as Int HD MOD 525 DICOM images are stored both on the internal hard drive and on media MOD The name DICOM is shown in parenthesis signifying that on the MOD the images are in DICOM format No...

Страница 113: ...If the connection cannot be established a red cross is displayed The properties of the DICOM storage server configuration are displayed on the right side of the tab for reference 6 If the connection...

Страница 114: ...Local Archive Int HD DICOM Server option from the drop down list at the bottom of the window If the system will not accept the dataflow or displays an error message there is an error in dataflow comm...

Страница 115: ...r as shown below Figure 3 44 Job Spooler The Status column can contain the following options Hold Images are in the spooler buffer but transmission has not begun as the exam is active Active Images ar...

Страница 116: ...ews subsidiary tab selected by default as shown in Figure 3 36 Connectivity Tab on page 3 54 3 Trackball to the Dataflow button and press Select The full list of data flows is displayed as shown in Fi...

Страница 117: ...igure 3 46 Services Tab EchoPAC Expanded 10 If EchoPAC Network is required make sure that the EchoPAC Network checkbox is selected as shown in Figure 3 46 above then proceed as follows a Enter ECHOPAC...

Страница 118: ...d as follows a Enter ECHOPAC7 OOOXXX DB in the Database Name field b Under Store Info make sure that the Hard Drive checkbox is selected c Enter ECHOPAC7 000XXX Archive in the Placement of Image Files...

Страница 119: ...4 Expand the Remote Servers branch A service called Remote Archive Remote Storage is displayed 5 Trackball to Remote Servers and press Select then trackball to the Check button and press Select If th...

Страница 120: ...rce for use in emergencies CAUTION DO NOT change the name of an existing dataflow or attempt to add new services to a dataflow In the event that any changes or additions are required contact the On li...

Страница 121: ...before full system shutdown may cause system boot up failure This may require system recovery by booting up the system using the software CD Before storing the unit or moving it to another site disco...

Страница 122: ...r or elevator thresholds Grasp the front handle grips or the back handle bar and then push or pull DO NOT attempt to move the unit by pulling its cables or probe connectors 2 Ensure that the unit does...

Страница 123: ...allation details see Table 3 25 below and Product Locator Installation details see Figure 3 49 Product Locator Installation Card ICD on page 3 70 for future reference 3 11 1 System Installation Detail...

Страница 124: ...been entered in the System Installation Details form as described in 3 11 1 System Installation Details on page 3 69 If this form has not been completed enter the details now 2 Locate the Product Loc...

Страница 125: ...ation Specific language versions of the Vivid 3N Pro Expert User Manual may also be available Check with your GE Sales Representative for availability During and after installation supplementary docum...

Страница 126: ...iscovered at the reception of the package or when unpacking and installing the product the Post Delivery Checklist has been introduced Please complete the form on the back of this reminder the Post De...

Страница 127: ...____________________________________ POST DELIVERY CHECK LIST FOR VIVID______________ SERIAL NO _____________________ SUBJECT OK FAILURE COMMENTS PACKING LOOSE SCREWS LOOSE HARDWARE OVERALL APPEARANCE...

Страница 128: ...GE MEDICAL SYSTEMS DIRECTION FK091075 REVISION 04 VIVID 3N PRO EXPERT SERVICE MANUAL 3 74 Section 3 11 Completing the Installation Paperwork This page was intentionally left blank...

Страница 129: ...the installation procedure or as required during servicing and periodic maintenance of the Vivid 3N ultrasound scanner NOTE Refer to Chapter 7 Diagnostics Troubleshooting for detailed descriptions of...

Страница 130: ...rking and clean Listen to fan spinning sound check filter go to monitoring and verify that all fans are working 2 Connect each of the probes available for the system Verify that the system properly re...

Страница 131: ...ct slider is moving on the Diagnostic panel 8 Perform an automatic lights test as described in 7 4 4 2 Automatic Lights Test on page 7 78 Verify that all the key LEDs are illuminated one by one 9 Sele...

Страница 132: ...age is stable and has similar grey levels to that of the reference image Table 4 7 VCR Test Step Task Expected Result s 1 Connect a Sony 9600 VCR to the system restart the system and load an SVHS cass...

Страница 133: ...the image See B W Printer Tests below The image is displayed correctly 5 Connect the monitor to the Color Printer RGB connectors and check the image See Color Printer Tests below The image is display...

Страница 134: ...at you do not apply too much force to move the console and that the console movement is smooth Table 4 12 Brakes Function Test Step Task Expected Result s 1 Push the brake pedal to its center position...

Страница 135: ...t and electrode pads 2 Perform the ECG diagnostic test as described in 7 4 3 ECG Phono Diagnostic Test on page 7 74 Verify that a single clear QRS signal is displayed Table 4 14 Phono Test Step Task E...

Страница 136: ...cessfully is displayed 8 Select the GetVolInfo button The message Media in drive G has following properties Media Label MY_LABEL Media File System Name FAT is displayed 9 Select the Get BTPsector butt...

Страница 137: ...dia Label Media File System Name CDUDF is displayed 8 Press the Get BTPsector button and respond OK to the message The message The Bytes Per Sector value of Media in Drive H is 2048 is displayed 9 Pre...

Страница 138: ...ker The system remains in Standby mode indicated by the blinking On Off button LED 3 Turn ON the system s circuit breaker Press the On Off Button The system returns quickly to the Power ON state less...

Страница 139: ...issue effects 4 4 1 3S Probe Image Quality Tests 4 4 1 1 2D Noise Uniformity Test 4 4 1 2 2D Performance Test Table 4 18 2D Noise Uniformity Test 3S Step Task Expected Result s 1 With a 3S probe in th...

Страница 140: ...scan the phantom at position 3 Gain 37 Power 0 dB Depth 20cm Focus Max depth Dynamic Range 65dB 4 Record the maximum depth at which tissue can be differentiated from the noise The depth should be grea...

Страница 141: ...in the Electronic Flow Phantom RMI1425A 2 Place the 3S probe above the vertical nails line position 1 3 Select a Cardiac preset and activate CFM 4 Set the following CFM parameters Gain Max possible w...

Страница 142: ...preset and set the 2D Gain to 40 2 Activate CFM and set the following CFM parameters Gain Max possible without color noise Frame Rate 2 LVR MIN setting CFM Artifacts Test 3 Place the 3S probe on the R...

Страница 143: ...set the following 2D parameters 2D Gain 50 2D Dynamic Range 60 2D Reject 10 2 Activate CFM and set the CFM Gain to the maximum possible without color noise 3 Activate M Mode Color M Mode CMM is activ...

Страница 144: ...noise area is dark and that there are no flash strikes or other artifacts 5 Move the sample volume to different locations along the vessel Ensure that the flow looks clear the noise area is dark and t...

Страница 145: ...the noise area is dark and that there are no flash strikes or other artifacts 5 Move the CW cursor to different locations along the vessel Ensure that the flow looks clear the noise area is dark and t...

Страница 146: ...eck that the Doppler audio and display noise are homogenous and constant 3 Move the cursor angle multiple times from one half of the screen to the other Check that the noise level does not increase af...

Страница 147: ...owing parameters Depth 22cm Frame Rate 2 single focus Focus Location 12cm 3 Look for artifacts in the image Table 4 31 CFM Artifacts Test C358 Step Task Expected Result s 1 Use the Electronic Flow Pha...

Страница 148: ...e flow looks clear the noise area is dark and that there are no flash strikes or other artifacts 5 Move the sample volume to different locations along the vessel Ensure that the flow looks clear the n...

Страница 149: ...eset options 2 Set the following parameters 2D Gain Max Depth 2cm Gain Sliders Max Up to 5mm of white carpet noise should be displayed as shown in the left figure above Ensure that there are no white...

Страница 150: ...ea in the Electronic Flow Phantom RMI1425A 2 Place the 739L probe above the vertical nails line position 1 3 Select a Cardiac preset and activate CFM 4 Set the following CFM parameters Gain Max possib...

Страница 151: ...FM Operation Tests 739L Step Task Expected Result s 1 Select a Cardiac preset and set the 2D Gain to 40 2 Activate CFM and set the following CFM parameters Gain Max possible without color noise Frame...

Страница 152: ...e flow looks clear the noise area is dark and that there are no flash strikes or other artifacts 5 Move the sample volume to different locations along the vessel Ensure that the flow looks clear the n...

Страница 153: ...he center of the screen as shown opposite and write down the Gain value 4 Increase the Gain until background noise is displayed and write down the Gain value Ensure that the Gain difference is not hig...

Страница 154: ...igure 4 6 show example configurations and should be used for reference only as each site has its own specific settings 4 5 1 Software Configuration Checks Table 4 42 Software Configuration Checklist S...

Страница 155: ...MEDICAL SYSTEMS DIRECTION FK091075 REVISION 04 VIVID 3N PRO EXPERT SERVICE MANUAL Chapter 4 Functional Checks 4 27 Section 4 5 System Turnover Checklist cont d Figure 4 1 System Tab Configuration Exam...

Страница 156: ...YSTEMS DIRECTION FK091075 REVISION 04 VIVID 3N PRO EXPERT SERVICE MANUAL 4 28 Section 4 5 System Turnover Checklist Section 4 5 System Turnover Checklist cont d Figure 4 2 System Options Tab Configura...

Страница 157: ...CAL SYSTEMS DIRECTION FK091075 REVISION 04 VIVID 3N PRO EXPERT SERVICE MANUAL Chapter 4 Functional Checks 4 29 Section 4 5 System Turnover Checklist cont d Figure 4 3 Hospital Info Tab Configuration E...

Страница 158: ...L SYSTEMS DIRECTION FK091075 REVISION 04 VIVID 3N PRO EXPERT SERVICE MANUAL 4 30 Section 4 5 System Turnover Checklist Section 4 5 System Turnover Checklist cont d Figure 4 4 VCR ECG Tab Configuration...

Страница 159: ...EDICAL SYSTEMS DIRECTION FK091075 REVISION 04 VIVID 3N PRO EXPERT SERVICE MANUAL Chapter 4 Functional Checks 4 31 Section 4 5 System Turnover Checklist cont d Figure 4 5 Archive Tab Configuration Exam...

Страница 160: ...DIRECTION FK091075 REVISION 04 VIVID 3N PRO EXPERT SERVICE MANUAL 4 32 Section 4 5 System Turnover Checklist Section 4 5 System Turnover Checklist cont d Figure 4 6 Connectivity Local Settings Tab Con...

Страница 161: ...MEDICAL SYSTEMS DIRECTION FK091075 REVISION 04 VIVID 3N PRO EXPERT SERVICE MANUAL Chapter 4 Functional Checks 4 33 Section 4 6 Site Log Table 4 1 Vivid 3N Site Log Date Service Person Problem Comment...

Страница 162: ...GE MEDICAL SYSTEMS DIRECTION FK091075 REVISION 04 VIVID 3N PRO EXPERT SERVICE MANUAL 4 34 Section 4 6 Site Log Table 4 1 Vivid 3N Site Log Cont d Date Service Person Problem Comments...

Страница 163: ...5 This chapter contains block diagrams and functional explanations of the Vivid 3N electronic circuits Table 5 1 Contents in Chapter 5 Section Description Page Number 5 1 Overview 5 1 5 2 General Inf...

Страница 164: ...l beam forming system which can handle up to 192 element linear probes by use of multiplexing Signal flow travels from the Probe Connector Panel to the Front End FE Electronics to the BEP and finally...

Страница 165: ...this section Figure 5 7 System Block Diagram Vivid 3N Pro Expert BT03 RFI Configuration on page 5 3 see below Figure 5 1 System Block Diagram Vivid 3N Pro Expert RFT Configuration on page 5 4 Figure...

Страница 166: ...3N PRO EXPERT SERVICE MANUAL 5 4 Section 5 3 Block Diagrams NOTE The RF Interface card RFI was introduced first half of 2004 It replaces the FEC the RFT and the Image Port cards Figure 5 1 System Blo...

Страница 167: ...DIRECTION FK091075 REVISION 04 VIVID 3N PRO EXPERT SERVICE MANUAL Chapter 5 Components and Function Theory 5 5 5 3 1 System Block Diagrams cont d Figure 5 2 System Cabling Diagram Vivid 3N Pro Expert...

Страница 168: ...ble R G B Sync 2252979 2252978 2253016 2252977 2252975 2252982 2258801 2252964 2253011 2252976 2252981 2253009 2253015 2292972 2276874 2300847 2253014 2276875 2269429 2253080 2253079 RS232 1 2266742 2...

Страница 169: ...Front Board Assembly FB on page 5 16 MUX Board on page 5 18 Beamformer Board BF on page 5 19 Front End Controller Board FEC RFT on page 5 22 RF and Tissue Processor Board RFT on page 5 23 Image Port...

Страница 170: ...DICAL SYSTEMS DIRECTION FK091075 REVISION 04 VIVID 3N PRO EXPERT SERVICE MANUAL 5 8 Section 5 4 Front End 5 4 2 Front End Crate Block Diagram RFI Figure 5 4 Front End Crate Block Diagram RFI Configura...

Страница 171: ...lows 1 The Front End subsystem which includes Front Board MUX Board BF64 Beamformer Board FEC Front End Controller Board 2 The Mid Processors subsystem which includes RFT Radio Frequency Tissue Board...

Страница 172: ...Transmit Pulse Generators TPG on the TX board each generating 16 transmit pulses with different delays The transmit pulses are then routed to separate transmit amplifiers fed with voltage HV1 and HV2...

Страница 173: ...equate signal conditioning for the different data types Tissue Doppler and Flow The current Mid Processors are the RF Tissue Processor board RFT 5 4 3 4 1 Pipelink Bus The Mid Processors are interconn...

Страница 174: ...Once the signal is transmitted it is received by the transmit pulsor TP which is a switching device that will propagate the signal between different elements of the probe The propagation of that sign...

Страница 175: ...ls are received from all 64 channels if a probe has more than 64 elements the MUX of the probe is used to create the additional missing channels The signals are transmitted at a prescribed delay betwe...

Страница 176: ...GE MEDICAL SYSTEMS DIRECTION FK091075 REVISION 04 VIVID 3N PRO EXPERT SERVICE MANUAL 5 14 Section 5 4 Front End 5 4 3 6 Received Signal Path cont d Figure 5 7 Received Signal Path Block Diagram RFI...

Страница 177: ...GE MEDICAL SYSTEMS DIRECTION FK091075 REVISION 04 VIVID 3N PRO EXPERT SERVICE MANUAL Chapter 5 Components and Function Theory 5 15 Figure 5 8 Received Signal Path Block Diagram RFT...

Страница 178: ...4 1 General Description The FB Board has 64 identical receive channels The signal in each channel is fed via a Transmit Receive T R switch to a preamplifier The next step is a Time Controlled Gain TGC...

Страница 179: ...channels Each channel has two pulsars for different transmitted Tx voltages and a low signal receiver amplifier Both are connected to the same input output line The receiver is buffered from the tran...

Страница 180: ...ng them to the BF Boards Expanding the low high channels in CW mode TEE motion control Monitoring temperature and voltage measurements via the I C FE Bus switch To reduce the noise in the FE cards the...

Страница 181: ...riate delay to give optimal receive focusing and beam steering as a function of time All focusing and steering parameters for a scan are stored in VRAM on the BF Board The output of the BF Board is a...

Страница 182: ...ignal Generator High Voltage Control and supervision Probe Sensing Control of MUX board Front Board and Beam Former Temperature Sensing for TEE probes Step Motor Control for TEE probes 5 4 7 3 Signal...

Страница 183: ...s returned from wall motion valves and leaflets and then sent to the BEP and to Audio Circuitry on the KB Control Board 5 4 7 9 System Temperature Surveillance The RFI board monitors the temperature i...

Страница 184: ...ransmitter control ATCG control Receive focusing control Analog test signal control Probe sensing Transmit voltage control Control of Front Board switching Temperature sensing for the TEE probes Memor...

Страница 185: ...End Bus 5 4 9 1 Control The RFT Board has a local DSP with an external EPROM The DSP performs the following control tasks Handles communication with the BE over the VME Bus and the PCI Bus Updates fi...

Страница 186: ...the Front End Crate are sent via the IMP and all the outgoing data is transferred to the BEP via the IMP through the PCI Bus 5 4 11 Radio Frequency Interface Board RFI The RFI board replaces the FEC...

Страница 187: ...ntral Processing Unit CPU on page 5 29 Keyboard Controller on page 5 32 PC2IP on page 5 33 Plug and Scan Card and Battery on page 5 33 Network Onboard on page 5 33 SCSI Card on page 5 33 Floppy Drive...

Страница 188: ...TEMS DIRECTION FK091075 REVISION 04 VIVID 3N PRO EXPERT SERVICE MANUAL 5 26 Section 5 5 Back End Processor Section 5 5 Back End Processor cont d Figure 5 15 Back End Component Locations BT02 BT03 RFI...

Страница 189: ...ard SCSI Card Audio Bracket PCI2IP Card Multifunction I O Card Key Board Control Card MO Driver ECG Module CD R Driver Floppy Driver HD Driver Mother Board P S Battery Slot 1 Slot 2 Slot 3 Slot 4 Slot...

Страница 190: ...SYSTEMS DIRECTION FK091075 REVISION 04 VIVID 3N PRO EXPERT SERVICE MANUAL 5 28 Section 5 5 Back End Processor Section 5 5 Back End Processor cont d Figure 5 17 Back End Block Diagram BT02 BT03 RFI Con...

Страница 191: ...units Pentium III the CPU is I GHz Figure 5 18 Back End Block Diagram BT02 BT03 RFT Configuration VIC Monitor Extended Keyboard A N Keyboard Audio Doppler Audio Bracket Plug Scan Card SCSI Card Networ...

Страница 192: ...EMS DIRECTION FK091075 REVISION 04 VIVID 3N PRO EXPERT SERVICE MANUAL 5 30 Section 5 5 Back End Processor 5 5 2 Central Processing Unit CPU cont d Figure 5 19 BEP Motherboard Layout BT02 BT03 Note Not...

Страница 193: ...is Fan Header COM1 COM2 COM1 COM2 Serial Port Connector Header CPU Fan CPU Fan Header DIMM1 2 Memory DIMM Slots Ethernet LAN Ethernet Port Game Port Game Port J1a a P4SGA only 4xAGP J5 Floppy Disk Dri...

Страница 194: ...10 seconds This is for emergencies only and should not be used under regular circumstances Standby Mode which enables system boot up in 30 seconds this option is enabled if the Plug Scan option is ins...

Страница 195: ...m the IP to the PCI Bus of the CPU The PCI2IP is sometimes referred to as the PCI Bridge 5 5 7 Plug and Scan Card and Battery The Plug Scan enables the Standby Mode during Plug and Scan operations and...

Страница 196: ...e 3 5 in 5 5 11 Hard Disk The Hard Disk is the main storage device of the Vivid 3N ultrasound unit The Hard Disk is controlled by the CPU via signals from the IDE Bus The Hard Disk is partitioned into...

Страница 197: ...The CDRW is used to back up images and reports in the similar way as the MOD In addition the CD is used as the main source of software upgrades and other service utility operations The CDRW can write...

Страница 198: ...controlled by the CPU via the Multifunction I O Controller The modem is used for iLinq InSite remote servicing This is a standard MultiTech modem that connects to an analog phone line Figure 5 23 Mod...

Страница 199: ...the transmitted image is captured and transmitted in RGB format to the S Video C Video Converter circuit and to the RGB to Color Printer Converter circuit The PC2IP board controls the PC VIC Power on...

Страница 200: ...Timing Interlaced Vertical Start VS 53 Lines field Active Lines VA Lines frame PAL standard Total Lines VT 625 Lines frame PAL standard Frame Rate 25Hz PAL standard Table 5 4 NTSC Video Specification...

Страница 201: ...he VCR which receives and transmits Y C video signals is used for recording and re playing exams The appropriate type of VCR should be used for the local video signal PAL or NTSC 5 6 1 2 Black White V...

Страница 202: ...o different system components and converted into DC voltages in the BEP and the Front End to support their operation Table 5 5 below shows which voltages are used in the various system components both...

Страница 203: ...ponents AC Isolation Transformer AC Distribution Box as described in AC Distribution Box on page 5 43 AC Input Box see AC Input Box on page 5 43 Thermal Fuses see Thermal Fuses on page 5 43 Refer to F...

Страница 204: ...GE MEDICAL SYSTEMS DIRECTION FK091075 REVISION 04 VIVID 3N PRO EXPERT SERVICE MANUAL 5 42 Section 5 7 Vivid 3N Power Distribution Figure 5 26 rAC System Block Diagram RFT Configuration Monitor Monitor...

Страница 205: ...s a playback video signal from the VCR to the Image Port 5 7 3 1 AC Input Box The AC Voltage Input cord is connected to the AC Input Box It contains the Dual Rating Circuit Breaker 6A 200 240V or 12A...

Страница 206: ...ar the AC input connector The AC transformer s primary and secondary voltages are set up by using the appropriate plugs connected in Jumper1 and Jumper2 on the AC Distribution Box according to the fol...

Страница 207: ...A 80 80 40 40 PMX85P PMX85N 80 80 40 40 5 10 PMX85P PMX85N DOLPHIN Front Bd MUX Bd BF2 BF1 FEC RFT Image Port J11 J21 J22 J14 J24 J25 J15 J16 J26 J33 J32 J31 J41 J42 J43 J53 J63 J73 J62 J52 J51 J61 J7...

Страница 208: ...Front End itself Air is sucked from the inside of the system through the Filter Cover and the Filter It passes the Fan Assembly directly into the upper part of the Front End where it forms a cooling a...

Страница 209: ...ration with iLinq The following sections contain a brief introduction of iLinq s features 5 9 2 1 Web Server Browser The Service platform and other Service software use the iLinq web server and browse...

Страница 210: ...or service software across all GEMS products 5 9 3 1 Internationalization The user interfaces provided by the service platform are designed for GE personnel and as such are in English only At this tim...

Страница 211: ...ful or not will be logged into a service access log that is viewable to authorized users See Diagnostics Troubleshooting for more info about InSite and the Global Service User Interface 5 9 4 Restart...

Страница 212: ...GE MEDICAL SYSTEMS DIRECTION FK091075 REVISION 04 VIVID 3N PRO EXPERT SERVICE MANUAL 5 50 Section 5 9 Common Service Platform This page was intentionally left blank...

Страница 213: ...Overview 6 1 1 Purpose of Chapter 6 Table 6 1 Contents in Chapter 6 Section Description Page Number 6 1 Overview 6 1 6 2 Input AC Voltage Configuration 6 2 6 3 Front End Voltages and Signal Indicator...

Страница 214: ...o specific requirements as indicated on the label near the AC input connector The AC transformer s primary and secondary voltages are set up by using the appropriate plugs connected in Jumper1 and Jum...

Страница 215: ...ds in the Front End Crate have red green and yellow LEDs which indicate the board s status as follows Red LED Lit An error has occurred on the board unless otherwise specified Yellow LED Lit Software...

Страница 216: ...Signal Indicators cont d Figure 6 1 Front End Crate LEDs RFT Configuration The LEDs for each of the boards in the Front End Crate are summarized in the following subsections The LEDs are listed as vie...

Страница 217: ...iption Normal State LD505 Red Demod Error LD504 Green Lit in Scanning Mode Slow tick in idle LD503 Yellow Transmit data to BEP During Processing LD502 Red Not Used LD501 Yellow Not Used LD500 Green No...

Страница 218: ...OFF Table 6 5 Front End Controller LEDs LED Indicates When Lit Comments Red Board Failure Normally OFF Green Board OK Normally lit Yellow Scan Lit during scanning Yellow Probe Change Lit during probe...

Страница 219: ...LEDs LED Indicates When Lit Comments Red Board Failure Normally OFF Green Board OK Normally lit Yellow Bus Protocol Error Normally OFF Yellow Scan Normally OFF Yellow Table 6 8 Channels Multiplexer L...

Страница 220: ...s Green 15V LVPS is OK Normally lit Green 15V LVPS is OK Normally lit Green AVee LVPS is OK Normally lit Green AVcc LVPS is OK Normally lit Green 5V Dig LVPS is OK Normally lit Green 10V LVPS is OK No...

Страница 221: ...gure 6 2 Back End Power Supply Voltages Section 6 5 VIC Video Signal Setting The Vivid 3N ultrasound scanner and VIC may be configured to operate with either PAL or NTSC video systems as required 6 5...

Страница 222: ...on in this section relates to the new type Samsung monitors as follows Samsung 15 Monitor SyncMaster 591S P N 2336022 2 Samsung 17 Monitor SyncMaster 795MB P N 2336835 6 Most of the adjustments you ma...

Страница 223: ...o move through the icons and highlight items in the menu The name of the function will appear on each window 8 Push the menu button 1 to exit and save your changes Table 6 10 Vivid 3N 15 Monitor Funct...

Страница 224: ...oking like a series of concentric circles or arcs To eliminate this pattern use the vertical moire adjustments The Degauss feature will remove color impurities caused by magnetic fields Do not use the...

Страница 225: ...ertical position of the monitor s entire display Follow these instructions to adjust the horizontal size of the monitor s entire display Follow these instructions to adjust the vertical size of the mo...

Страница 226: ...of the screen image Display changes are indicated by on screen adjustment icons Some functions have sub menus 1 Push the menu button to display the main menu Function icons are arranged across the to...

Страница 227: ...tical edges Geometry Trapezoid Adjusts the width of the top and bottom of screen Parallelogram Tilts the image to the left or the right Rotation Rotates the entire screen left or right Pinbalance Curv...

Страница 228: ...Monitor Operation on page 6 16 6 6 3 1 On screen Menu System Your monitor has an on screen menu system accessed by the buttons on the front of your monitor that allows you to adjust characteristics o...

Страница 229: ...alance Corner correction when the sides of the display are bowed in or bowed out adjust the side pinbalance corner correction when the top or bottom of the display is too large or small Color1 Color t...

Страница 230: ...nector input and the signal source connected to the D SUB connector input Note When you are finished wait for a few seconds and the screen will blank then display the image from the new signal source...

Страница 231: ...to have too much contrast The display monitor takes twenty minutes to warm up before it shows its final contrast brightness and color hues Perform fine screen calibration only after the display monit...

Страница 232: ...ghtness on the front of the monitor 2 Press the arrows button on the front of the monitor to decrease or increase the selected value These recommended settings are stable and do not drift over time bu...

Страница 233: ...regular scanning mode enables you to perform three types of calibration as described in the following sections Monitor Calibration section page 6 23 Beamformer Calibration section page 6 24 Video Grab...

Страница 234: ...04 VIVID 3N PRO EXPERT SERVICE MANUAL 6 22 Section 6 8 Calibration 6 8 1 Accessing the Calibration Options cont d 2 Trackball to the Calibration button and press Select The following calibration optio...

Страница 235: ...to the Display option and press Select The Calibration Display window is displayed as shown below Figure 6 6 Calibration Display Window 3 Adjust the brightness of the monitor so that the black square...

Страница 236: ...voltages are stored in the back end When changing the BFs swapping the BFs or changing the hard disk perform the BF calibration procedure 1 Access the calibration options as described in Section 6 8...

Страница 237: ...ation Video Grabbing calibration is performed when the system s Y C Video Output is connected to the Y C Video Input 1 Access the calibration options as described in Section 6 8 Calibration on page 6...

Страница 238: ...t the right side has almost the same quality as the left side NOTE The video signal path is from the Back End SVGA board output to the VIC via the rear panel connector IP and then back to the Back End...

Страница 239: ...up and run diagnostic tools to locate system problems and failures The Vivid 3N ultrasound unit includes built in diagnostic tools that can be accessed from the scanner application Table 7 1 Contents...

Страница 240: ...When the Back End is operating you can verify proper voltages and temperatures in the Front End motherboard and in the AC Distribution Box To check the Front End parts the tests must follow a logical...

Страница 241: ...stic tools are accessed from 2D Mode by simultaneously pressing Ctrl F11 on the alphanumeric keyboard The Diagnostic menu is displayed as shown below Figure 7 1 Diagnostic Menu NOTE Once the test has...

Страница 242: ...ibed in Section 7 3 Performing Front End FE Diagnostics on page 7 5 Tests various back end hardware components as described in Section 7 4 Performing Back End Diagnostics on the System on page 7 71 Mo...

Страница 243: ...below can be initiated manually and performed by the system as described in this section It is recommended that these diagnostic tests be performed in the following sequence 1 Image Port IMP Diagnost...

Страница 244: ...using the manual options see 7 3 1 3 Manual Options on page 7 9 7 3 1 1 Auto Sequence 1 In the Diagnostic menu trackball to the Auto Sequence button and press Select The Automatic FE Testing dialog bo...

Страница 245: ...o the Pause button under Execute Sequence and press Select if required 6 To resume testing from the point where you paused trackball to the Start button and press Select 7 At any stage during the test...

Страница 246: ...d FE Diagnostics 7 3 1 2 Manual Options 1 In the Diagnostic menu trackball to the Front End button and press Select The FE Diagnostics dialog box is displayed as shown in Figure 7 3 or Figure 7 4 belo...

Страница 247: ...stics Troubleshooting 7 9 7 3 1 3 Manual Options 1 In the Diagnostic menu trackball to the Front End button and press Select The FE Diagnostics dialog box is displayed as shown below Figure 7 4 FE Dia...

Страница 248: ...s Test Description Area Displays a description of the selected diagnostic test Test Area Displays the buttons that enable you to perform diagnostic tests Each button has an LED that indicates the foll...

Страница 249: ...r of the two tests Self Test or Full Test as required While the Full Test is in progress it may be necessary to wait a while since this requires longer than the Self Test for completion 3 Verify that...

Страница 250: ...oblems were identified but the problem persists contact your local GE Medical Systems field engineer for assistance If errors were identified but the results were marginal perform calibration as descr...

Страница 251: ...stics dialog box as described in 7 3 1 Accessing the Front End Diagnostic Options on page 7 6 2 In the FE Diagnostics dialog box trackball to the IMP tab and press Select OR Trackball to the IMP butto...

Страница 252: ...Review the test results in the Comment area and proceed as follows If no problems were identified proceed to the VME test as described in 7 3 4 VME Bus VME Diagnostic Tests RFT Configuration on page...

Страница 253: ...on page 7 13 If the VME Bus test is performed without first performing this test and errors are identified you must perform the IMP test to ensure that the VME board is the source of the error 1 Acces...

Страница 254: ...w the test results in the Comment area and proceed as follows If no problems were identified proceed to the RFT test as described in 7 3 5 RFT Diagnostic Tests RFT Configuration on page 7 17 If no pro...

Страница 255: ...nd VME Bus tests as described in 7 3 3 Image Port IMP Diagnostic Tests on page 7 13 and in 7 3 4 VME Bus VME Diagnostic Tests RFT Configuration on page 7 15 If the RFT test is performed without first...

Страница 256: ...blems were identified Red Problems were identified during the performance of the test 5 Review the test results in the Comment area and proceed as follows If no problems were identified proceed to the...

Страница 257: ...temperature sensor Thr Temp Test Diagnoses the temperature threshold for TEE probes Pencil ID Test Checks the pencil ID circuit in the FEC NOTE Before performing any of the FEC tests perform the IMP V...

Страница 258: ...FK091075 REVISION 04 VIVID 3N PRO EXPERT SERVICE MANUAL 7 20 Section 7 3 Performing Front End FE Diagnostics 7 3 6 Front End Controller FEC Diagnostic Tests RFT Configuration cont d Figure 7 10 FEC T...

Страница 259: ...on to perform the Pencil ID Test independently The relevant LED changes color as follows Yellow The test is in progress Green The test has been completed and no problems were identified Red Problems w...

Страница 260: ...nd the IMP test to ensure that the BF board is the source of the error NOTE When replacing the BF perform calibration as described in Section 6 8 Calibration on page 6 21 NOTE IMPORTANT Do not perform...

Страница 261: ...the Digital Test 0 and Digital Test 1 independently as follows 5 Trackball to the Digital Test 0 button and press Select 6 When complete trackball to the Digital Test 1 button and press Select 7 In th...

Страница 262: ...L SYSTEMS DIRECTION FK091075 REVISION 04 VIVID 3N PRO EXPERT SERVICE MANUAL 7 24 Section 7 3 Performing Front End FE Diagnostics 7 3 7 Beamformer BF Diagnostic Tests cont d Figure 7 13 Ultrasound Scop...

Страница 263: ...ency 2 5 is within a range of 5 to 20 Verify that the amplitude at frequency 5 is below 50 Verify that the amplitude at frequency 7 5 is below 60 NOTE If the RMS level is above or below the specified...

Страница 264: ...additional details about the FB circuits and boards NOTE Before performing the FB tests make sure that the RFI or IMP VME Bus RFT FEC and BF diagnostic tests have been performed as described beginning...

Страница 265: ...log box as described in 7 3 1 Accessing the Front End Diagnostic Options on page 7 6 2 In the FE Diagnostics dialog box trackball to the F B tab and press Select OR Trackball to the F B button in the...

Страница 266: ...Receive Test on page 7 35 c TR Switch Test Checks the transmit switches as described in 7 3 8 5 TR Switch Test on page 7 41 d FLA Jumper Test Checks the jumpers that connect the side elements to the...

Страница 267: ...ansmit test is in good condition 1 Connect either a 7S or 3S probe and lock it in place 2 Access the F B tab of the FE Diagnostics dialog box as described in 7 3 8 1 Accessing the Front Board Assembly...

Страница 268: ...it is bad 6 Check the test result message in the Report dialog box If one or more channels were identified as bad trackball to the Save Report button and press Select then contact a GE Medical Systems...

Страница 269: ...ilure results it is imperative that only this probe is used and that it be in good condition 2 Access the F B tab of the FE Diagnostics dialog box as described in 7 3 8 1 Accessing the Front Board Ass...

Страница 270: ...heckbox to display only bad channels in the Display area Mark bad channel Select this checkbox to manually mark the currently selected channel as bad 6 Check the test result message and proceed as fol...

Страница 271: ...tation of the front board elements as follows Each element is represented by a button highlighted in green that displays the element and the channel number that is associated with that element Each bu...

Страница 272: ...Save Report and press Select and contact a GE Medical Systems service representative If no errors were identified proceed with the next test If no errors were identified but the problem persists cont...

Страница 273: ...re boot is required if the tests are not being performed in the sequence described in Section 7 3 Performing Front End FE Diagnostics on page 7 5 1 Disconnect all the probes 2 Access the F B tab of t...

Страница 274: ...w Only Bad Channels Select this checkbox to display only bad channels in the Display area Mark bad channel Select this checkbox to manually mark the currently selected channel as bad 5 Check the test...

Страница 275: ...4 sockets Each group consists of four TR4 sockets each socket containing four vectors channels as follows Each vector is represented by a button highlighted in green that displays the number of the so...

Страница 276: ...ems Service Representative If no channels were identified as bad mark the channels suspected as being bad as follows Trackball to each of the channels in the Display area and press select Trackball to...

Страница 277: ...cket containing four vectors channels as follows Each vector is represented by a button highlighted in green that displays the number of the socket to which the TR4 is connected Each button is highlig...

Страница 278: ...ve Report and press Select and contact a GE Medical Systems service representative If no errors were identified proceed with the next test If no errors were identified but the problem persists contact...

Страница 279: ...the F B tab of the FE Diagnostics dialog box as described in 7 3 8 1 Accessing the Front Board Assembly Options on page 7 27 3 In the Select Socket area of the F B tab trackball to the socket to whic...

Страница 280: ...If one or more channels were identified as bad trackball to the Save Report button and press Select then contact a GE Medical Systems Service Representative If no channels were identified as bad mark...

Страница 281: ...he test has two phases namely the open pencil probe test and the close pencil probe test 1 Connect a 2D pencil probe 2 Access the F B tab of the FE Diagnostics dialog box as described in 7 3 8 1 Acces...

Страница 282: ...channels in the Display area Mark bad Channel Select this checkbox to manually mark the currently selected channel as bad 5 Check the test result message and proceed as follows If one or more relays...

Страница 283: ...raphic representation of the eight front board pencil probe relays as follows Each relay is represented by a button highlighted in green that displays the relay number Each button is highlighted in ye...

Страница 284: ...rackball to Save Report and press Select and contact a GE Medical Systems service representative If no errors were identified proceed with the next test If no errors were identified but the problem pe...

Страница 285: ...lts are displayed in the Comments area 4 Check the test results and proceed as follows If no errors were identified proceed with the next test If no errors were identified but the problem persists con...

Страница 286: ...the form focal beam NOTE You must reboot the system after performing the RAM test 1 Access the F B tab of the FE Diagnostics dialog box as described in 7 3 8 1 Accessing the Front Board Assembly Optio...

Страница 287: ...the problem persists contact your local GE Medical Systems field engineer for assistance If errors were identified but the results were marginal perform calibration as described in Section 6 8 Calibr...

Страница 288: ...c Test Options 1 Access the FE Diagnostics dialog box as described in 7 3 1 Accessing the Front End Diagnostic Options on page 7 6 2 In the FE Diagnostics dialog box trackball to the MUX tab and press...

Страница 289: ...3N PRO EXPERT SERVICE MANUAL Chapter 7 Diagnostics Troubleshooting 7 51 7 3 9 1 Accessing the MUX Diagnostic Test Options cont d Figure 7 28 MUX Tab FE Diagnostics Dialog Box RFT Configuration Data Fl...

Страница 290: ...ing tests TEE Probe Control on page 7 61 AC Power Input Test on page 7 63 LVPS Voltage Test on page 7 65 HVPS Voltage Test on page 7 66 Temp Test on page 7 67 Show History on page 7 68 7 3 9 2 Normal...

Страница 291: ...SYSTEMS DIRECTION FK091075 REVISION 04 VIVID 3N PRO EXPERT SERVICE MANUAL Chapter 7 Diagnostics Troubleshooting 7 53 7 3 9 2 Normal Channels Diagnostic Tests cont d Figure 7 29 Normal Channels Diagno...

Страница 292: ...ow Only Bad Channels Select this checkbox to display only bad channels in the Display area Mark bad channel Select this checkbox to manually mark the currently selected channel as bad 4 Check the test...

Страница 293: ...four groups of TR4 sockets Each group consists of four TR4 sockets each socket containing four vectors channels as follows Each vector is represented by a button highlighted in green that displays th...

Страница 294: ...Trackball to Save Report and press Select and contact a GE Medical Systems service representative If no errors were identified proceed with the next test If no errors were identified but the problem p...

Страница 295: ...eshooting 7 57 7 3 9 3 Expanded Low Channels Diagnostic Tests Tests output signals in CW Mode only when the input channels are connected to the output channels If one channel is missing the output wil...

Страница 296: ...Performing Front End FE Diagnostics 7 3 9 4 Expanded High Channels Diagnostic Tests Tests the output signals from the input of the high channels If one channel is missing the output will be 6db The i...

Страница 297: ...MS DIRECTION FK091075 REVISION 04 VIVID 3N PRO EXPERT SERVICE MANUAL Chapter 7 Diagnostics Troubleshooting 7 59 7 3 9 5 Port Test The Port test is a general logic control test Figure 7 33 Port Test RF...

Страница 298: ...E MEDICAL SYSTEMS DIRECTION FK091075 REVISION 04 VIVID 3N PRO EXPERT SERVICE MANUAL 7 60 Section 7 3 Performing Front End FE Diagnostics 7 3 9 5 Port Test cont d Figure 7 34 Port Test RFT Configuratio...

Страница 299: ...EE Probe Control The TEE probe control test checks the position setting of the probe as well as its normal operation 1 Access the MUX tab of the FB Diagnostics dialog box as described in 7 3 9 1 Acces...

Страница 300: ...N 04 VIVID 3N PRO EXPERT SERVICE MANUAL 7 62 Section 7 3 Performing Front End FE Diagnostics 7 3 9 6 1 TEE Probe Control cont d Figure 7 36 TEE Probe Test Dialog Box 5 Verify the test results and then...

Страница 301: ...y percentage 1 Access the MUX tab of the FB Diagnostics dialog box as described in 7 3 9 1 Accessing the MUX Diagnostic Test Options on page 7 50 2 Trackball to the Advanced board tests button and pre...

Страница 302: ...gnostics 7 3 9 6 2 AC Power Input Test cont d 4 Trackball to the AC Power Input button and press Select The AC Power Input dialog box is displayed Figure 7 38 AC Power Input Dialog Box 5 Trackball to...

Страница 303: ...t Options on page 7 50 2 Trackball to the Advanced board tests button and press Select The Advanced System Tests options are displayed as shown in Figure 7 35 MUX Advanced System Tests Options on page...

Страница 304: ...7 3 9 1 Accessing the MUX Diagnostic Test Options on page 7 50 2 Trackball to the Advanced board tests button and press Select The Advanced System Tests options are displayed as shown in Figure 7 35 M...

Страница 305: ...rackball to the Advanced board tests button and press Select The Advanced System Tests options are displayed as shown in Figure 7 35 MUX Advanced System Tests Options on page 7 61 3 Trackball to the M...

Страница 306: ...tton and press Select The Advanced System Tests options are displayed as shown in Figure 7 35 MUX Advanced System Tests Options on page 7 61 3 Trackball to the Monitor button and press Select The View...

Страница 307: ...a report displaying the Front End boards software versions and hardware revisions 1 Access the FE Diagnostics dialog box as described in the Accessing the Front End Diagnostic Options section on page...

Страница 308: ...ton in the FE Diagnostics dialog box enables you to generate a report of the current test and failure results 1 Access the FE Diagnostics dialog box as described in the Accessing the Front End Diagnos...

Страница 309: ...hardware components NOTE The Back End Diagnostic Tests may be performed independently regardless of sequence 7 4 1 Accessing the Back End Diagnostic Options 1 In 2D Mode press Ctrl F11 on the alphanu...

Страница 310: ...hono Enables you to test the ECG and Phono options as described in 7 4 3 ECG Phono Diagnostic Test on page 7 74 External Keyboard Enables you to test the keyboard options and lights in different modes...

Страница 311: ...formed for each of the speakers at various PRFs and frequencies Left and right are as seen when standing behind the unit 3 In the User controls area trackball to the Right radio button and press Selec...

Страница 312: ...urself or to an appropriate ECG simulator In this case select the External ECG radio button in the TestECGDevice dialog box 2 Access the HW Diagnostics menu as described in 7 4 1 Accessing the Back En...

Страница 313: ...3 Trackball to the ECG Phono button and press Select The TestECGDevice dialog box is displayed as shown in Figure 7 48 Test ECG Device Dialog Box on page 7 74 4 In the Select trace area trackball to t...

Страница 314: ...tic Test on page 7 79 7 4 4 1 Manual Extended Keyboard Test 1 Access the HW Diagnostics menu as described in 7 4 1 Accessing the Back End Diagnostic Options on page 7 71 2 Trackball to the Extended Ke...

Страница 315: ...rockers are activated on screen in the KB Panel tab 7 Rotate each of the rotaries and verify that the correct rotaries are activated on screen in the KB Panel tab 8 Slide each of the sliders and verif...

Страница 316: ...that all the backlights on the alphanumeric and extended keyboards are illuminated 6 When you are finished trackball to the Exit button and press Select 7 4 4 3 Manual Lights Test 1 Access the HW Diag...

Страница 317: ...o log at all 7 4 5 Keyboard Diagnostic Test The keyboard diagnostic test enables you to check the functionality of the alphanumeric keyboard keys 1 Access the HW Diagnostics menu as described in 7 4 1...

Страница 318: ...D Diagnostic Test 1 Insert a new MO Media Sony EDM 2300B 2 3G into the MOD 1 Access the HW Diagnostics menu as described in 7 4 1 Accessing the Back End Diagnostic Options on page 7 71 2 Trackball to...

Страница 319: ...6 Trackball to the Load button and press Select The message Media is inside is displayed Verify that the media is actually inside 7 Trackball to the Format button and press Select The message Media in...

Страница 320: ...lect The message Finalize Media is displayed 7 Select No The message Media is outside is displayed Verify that the media has actually been ejected 8 Trackball to the Load button and press Select The m...

Страница 321: ...ory usage 7 4 7 1 Benchmark Testing 1 Access the HW Diagnostics menu as described in 7 4 1 Accessing the Back End Diagnostic Options on page 7 71 2 Trackball to the Computer Testing button and press S...

Страница 322: ...Diagnostics on the System 7 4 7 1 Benchmark Testing cont d Figure 7 55 Benchmark Testing Results In the information displayed under CPU Description Memory and Frame Rate make sure that the values disp...

Страница 323: ...83 are displayed 3 Trackball to the Check Disc Bus button and press Select The Disk Bus Bench window is displayed as shown in Figure 7 56 Disk Bus Bench Window on page 7 85 Figure 7 56 Disk Bus Bench...

Страница 324: ...and press Select The system enters Standby mode The light on the ON OFF button on the control console blinks repeatedly 3 Disconnect the AC power cable from the mains wall power outlet 4 Check that th...

Страница 325: ...the parallel port on the rear panel 1 Turn ON the system by pressing the ON OFF button on the control console and re boot into Technical Support Mode using the T plug While re booting the system be p...

Страница 326: ...tware Connectivity Provides basic connectivity between the scanner and the OnLine Center OLC or the field engineer in the field Configuration Provides the interface to configure the various iLinq para...

Страница 327: ...ure 7 59 below Figure 7 59 Technical Support System Configuration 2 Trackball to OK and press Select The System Configuration window closes NOTE If iLinq was not found to be enabled in step 1 it is ne...

Страница 328: ...al host OR if you are running the application as a field engineer from a remote location select Remote from the Profile Name drop down list 5 Trackball to the Start Communicator button and press Selec...

Страница 329: ...about the system The navigation bar at the top of the page enables you to select the required tool or application as described in the following sections Error Logs Page section on page 7 92 Diagnosti...

Страница 330: ...Error Logs Page When the Error Logs page is selected as shown in Figure 7 63 below the log viewing options described in the following sections are available Log Viewer section on page 7 93 Log Browser...

Страница 331: ...u to view a number of different system logs Figure 7 64 Log Viewer Menu Options The Log Viewer is driven by the following high level requirements Simple filtering of the scanner log s with filtering c...

Страница 332: ...T SERVICE MANUAL 7 94 Section 7 5 Common Service Interface 7 5 3 1 1 Logs The Logs option on the Logs Viewer menu enables you to view the following logs System Displays all the system logs including e...

Страница 333: ...er Displays all the power logs including errors monitoring dates and values as shown below Figure 7 66 Power Logs Temperature Displays all the temperature logs including errors monitoring dates and va...

Страница 334: ...e or Power logs in graphical format Select Power or Temperature from the Log option on the Logs Viewer menu and then select Plot Log to display the results as shown below Figure 7 68 Plot Log Window P...

Страница 335: ...se sensitive text that you want to filter from the logs or pages that you are currently viewing as shown below Figure 7 70 Search for Text in Log or Page 7 5 3 1 4 Filter The Filter option on the Logs...

Страница 336: ...Log Viewer Select the Exit Log Viewer option to return to the Common Service Desktop Figure 7 72 Exit Option 7 5 3 2 Log Browser When Log Browser is selected in the left pane of the Error Logs page y...

Страница 337: ...eshooting 7 99 7 5 3 2 Log Browser cont d Each system re boot will generate a new log file each log file can be viewed by selecting the appropriate link as shown in the example in Figure 7 74 below Fi...

Страница 338: ...e Save function from this screen Figure 7 74 i e when you are connected to the system remotely or you may save the file to a floppy disk on the system itself Only three log files may be reviewed in th...

Страница 339: ...ics Interactive The user is required to perform an operation on the ultrasound unit in order for the test to be completed successfully This option is not applicable when used remotely Non Interactive...

Страница 340: ...Green pass or Grey abort Execute Button Enables you to start a selected diagnostic test Once the diagnostic is running the Execute button becomes the Abort button enabling you to stop the diagnostic...

Страница 341: ...ON FK091075 REVISION 04 VIVID 3N PRO EXPERT SERVICE MANUAL Chapter 7 Diagnostics Troubleshooting 7 103 7 5 4 2 Utilities cont d Reset Power Supply Enables you to reset the Front End power supply Figur...

Страница 342: ...ION 04 VIVID 3N PRO EXPERT SERVICE MANUAL 7 104 Section 7 5 Common Service Interface 7 5 4 2 Utilities cont d Restart Scanner Software System Shutdown Enables you to remotely shutdown or restart the s...

Страница 343: ...VID 3N PRO EXPERT SERVICE MANUAL Chapter 7 Diagnostics Troubleshooting 7 105 7 5 4 2 Utilities cont d Save System State to Log This performs the same system operation as that initiated when pressing C...

Страница 344: ...listed CPU String Operations Tests the proper operation of the string commands LODS MOVS SCAS and STOS with 8 16 and 32 bit operands If errors are detected the failed commands and operands are listed...

Страница 345: ...g testing these diagnostics will also look for parity errors and other exceptions If encountered these are added to the test log as errors Memory Pattern Test Uses several test patterns to test as muc...

Страница 346: ...rs are detected the locations of the problems are displayed Video Text Output Prints a text string in random sizes and colors to test the video device driver and video controller 7 5 4 3 6 PCI Board C...

Страница 347: ...s the panel display on laptops and LCD screens This test display a solid color on the screen to ensure that all the color pixels are operating correctly VESA Video Electronics Standards Association Te...

Страница 348: ...opriate section as follows Image Port see Image Port IMP Diagnostic Tests on page 7 13 VME Bus see VME Bus VME Diagnostic Tests RFT Configuration on page 7 15 RFT Board see RFT Diagnostic Tests RFT Co...

Страница 349: ...FK091075 REVISION 04 VIVID 3N PRO EXPERT SERVICE MANUAL Chapter 7 Diagnostics Troubleshooting 7 111 7 5 4 4 Front End Diagnostics cont d Figure 7 83 Interactive Tests NOTE Interactive tests are perfo...

Страница 350: ...TE On the TR Switch Test Socket 1 and Socket 2 relate to which socket the probe is plugged into Select the appropriate Pulser Pencil Probe Test see 7 3 8 6 Pencil Probe Test on page 7 43 7 5 5 Image Q...

Страница 351: ...on Page When the Configuration page is selected you can configure the GSUI InSite No changes should be made in this page without the help of GE Medical Systems Service Personnel as any modifications m...

Страница 352: ...d the size already utilized IP Configuration shows the IP configuration of the different remote devices such as the network or the modem Network Status shows the communication status of active connect...

Страница 353: ...GE MEDICAL SYSTEMS DIRECTION FK091075 REVISION 04 VIVID 3N PRO EXPERT SERVICE MANUAL Chapter 7 Diagnostics Troubleshooting 7 115 7 5 8 1 Windows 2000 Utility cont d Figure 7 88 System Shutdown...

Страница 354: ...w System Shutdown There are three options provided described on previous page also see Figure 7 88 Reset Database used to empty the database and reset a new one see Figure 7 89 below Figure 7 89 Reset...

Страница 355: ...ar User defined Settings CAUTION THIS PROCESS IS IRREVERSIBLE Before proceeding make sure you have a complete backup of the current settings if they will be required in the future When selecting Clean...

Страница 356: ...ser 1 Select the Prodiags Browser under the Configuration Utility option The following message is displayed Wait a few minutes until the following screen is displayed Figure 7 91 ProDiags Browser Sche...

Страница 357: ...XPERT SERVICE MANUAL Chapter 7 Diagnostics Troubleshooting 7 119 7 5 8 3 1 ProDiags Browser cont d Figure 7 92 ProDiags Browser Task The Task tab indicates all the tasks that are available for activat...

Страница 358: ...5 REVISION 04 VIVID 3N PRO EXPERT SERVICE MANUAL 7 120 Section 7 5 Common Service Interface 7 5 8 3 1 ProDiags Browser cont d Figure 7 93 ProDiags Browser Time Slot The Time Slot tab indicates the tim...

Страница 359: ...iagnostics Troubleshooting 7 121 7 5 8 3 1 ProDiags Browser cont d Figure 7 94 ProDiags Browser Log and Result The Log Result tab indicates the logs and results of any tasks that have been performed A...

Страница 360: ...CE MANUAL 7 122 Section 7 5 Common Service Interface 7 5 8 3 2 File Transfer Configuration The File Transfer Configuration utility can be used to transfer files to the GE Service center Follow the on...

Страница 361: ...3 iLinq Configuration Utility When the iLinq Configuration Utility option is selected in the left pane of the Configuration page see Figure 7 96 below the InSite Interactive Platform Configuration win...

Страница 362: ...E MANUAL 7 124 Section 7 5 Common Service Interface 7 5 8 3 3 iLinq Configuration Utility cont d Click Accept and select the modem device as the communication device to the OLC in the Device Connectio...

Страница 363: ...OLC to receive all the setup information required for the InSite Checkout tab as shown below When all the settings have been entered click the CHECKOUT NOW button twice The OLC will attempt to commun...

Страница 364: ...K and press Select The scanning screen is re displayed 7 5 8 4 2 iLinq IP Restore Procedure When required for example after software re installation you can perform Restore of iLinq IP settings from t...

Страница 365: ...nt details and ordering information is displayed as described in Chapter 9 Renewal Parts Figure 7 100 Replacement Page NOTE This page is not populated in this version 7 5 10 PM Page When the PM page i...

Страница 366: ...tic activity logging you can also enter your own comments as well as screen captures pertaining to system functionality These comments are saved as part of the daily logger report 1 When an error occu...

Страница 367: ...7 128 2 Select the date on which the report that you want to save was generated from the calendar displayed when you expand the dropdown list in the Store Daily History area as shown below By default...

Страница 368: ...tion 7 6 Automatic Error Log 7 6 3 Sending the Logger Report Send the zipped file as an attachment to an e mail message In the e mail message briefly describe the problem and indicate approximately wh...

Страница 369: ...c 2252979 2252978 2253016 2252977 2252975 2252982 2258801 2252964 2253011 2252976 2252981 2253009 2253015 2292972 2276874 2300847 2253014 2276875 2269429 2253080 2253079 RS232 1 2266742 2269430 C B L...

Страница 370: ...GE MEDICAL SYSTEMS DIRECTION FK091075 REVISION 04 VIVID 3N PRO EXPERT SERVICE MANUAL 7 132 Section 7 6 Automatic Error Log This page was intentionally left blank...

Страница 371: ...r 8 This chapter provides replacement procedures for system parts Table 8 1 Contents in Chapter 8 Section Description Page Number 8 1 Overview 8 1 8 2 Cover Replacement Procedures 8 2 8 3 Control Cons...

Страница 372: ...re 8 1 Vivid 3N Ultrasound Unit Table 8 2 Vivid 3N Ultrasound Unit Covers Figure 8 1 Label Item Label Item 1 Right Side Cover 7 Bottom Keyboard Cover not shown 2 Left Side Cover 8 Speakers Cover 3 Fro...

Страница 373: ...moving any part of the power unit turn the power OFF and disconnect the power cord CAUTION Before removing circuit boards turn the power OFF and wear the ESD wrist band strap 8 2 1 2 Order of Cover Re...

Страница 374: ...o side covers four in total an example of which is shown below To easily access the screws turn the wheels inwards by 90 degrees Figure 8 2 Wheel Arch Screw 2 Slide the right side cover down and outwa...

Страница 375: ...vid 3N Pro Expert ultrasound unit as described in Chapter 3 Installation 8 2 3 3 Front Cover Removal Procedure 1 Pull out and remove the air filter as shown below Figure 8 3 Air Filter 2 Remove the si...

Страница 376: ...the unit taking care to first insert its upper edge under the top cover 2 Fasten the front cover with the three screws at the edge of the top cover as shown in Figure 8 5 above 3 Fasten the left and r...

Страница 377: ...our screws that secure the rear cover in position Two screws are located on the sides of the rear cover as shown below The other two screws are located in the AC Input Box Unit as shown in Figure 8 7...

Страница 378: ...dures 8 2 5 2 Preparations Shut down the Vivid 3N Pro Expert ultrasound unit as described in Chapter 3 Installation 8 2 5 3 Connector Panels Cover Removal Procedure 1 Remove the two screws located one...

Страница 379: ...escribed in 8 2 2 Side Covers Replacement Procedures on page 8 4 2 Remove the rear cover as described in 8 2 4 Rear Cover Replacement Procedures on page 8 7 3 Raise the control console to its maximum...

Страница 380: ...the AC Outlet in the AC Distribution Box as shown below Figure 8 10 AC Distribution Box Cables CAUTION Do not unplug any cables from below the rear panels except for those indicated in this procedure...

Страница 381: ...vious step leaving an open gap at the rear of the top cover as shown below Figure 8 12 Top Cover with Collar Removed 10 Remove the four screws that secure each connector panel to the top cover 11 Gent...

Страница 382: ...n Installation Procedure 1 Return the gas spring cover section back to its original position in the top cover 2 Align the opened gap of the gas spring cover to be in parallel with the opened gap of th...

Страница 383: ...ver as described in 8 2 4 4 Rear Cover Installation Procedure on page 8 7 14 Return the side covers as described in 8 2 2 4 Side Covers Installation Procedure on page 8 4 8 2 7 Gas Spring Cover Replac...

Страница 384: ...ation Shut down the Vivid 3N Pro Expert ultrasound unit as described in Chapter 3 Installation 8 2 8 3 Bottom Keyboard Cover Removal Procedure 1 Raise the control console monitor to its maximum height...

Страница 385: ...cedure 1 Raise the control console monitor to its maximum height 2 Position the bottom keyboard cover so that the Up Down height adjustment handle is correctly aligned with the slot on the cover 3 Wit...

Страница 386: ...ver as described in 8 2 8 3 Bottom Keyboard Cover Removal Procedure on page 8 14 2 Remove the two screws located beneath the keyboard on either side and the fastening bracket in the middle that secure...

Страница 387: ...Bottom Cover Upper Section Removal Procedure 1 Raise the control console to its maximum height 2 Remove any peripherals 3 Unplug the AC cable and VGA cable from the rear of the control console as sho...

Страница 388: ...he opened space at the rear of the gas spring using a long screw driver as shown below Figure 8 19 Removing Screws from the AC VGA Connectors Box 8 Remove the four screws fastening the metal cover und...

Страница 389: ...ccessed from the opened space at the back of the gas spring using a long screw driver 6 Return the white painted metal shelf to its original position inside the compartment located on the left side of...

Страница 390: ...Remove the monitor as described in 8 3 1 Vivid 3N Monitor 15 Replacement Procedure on page 8 28 5 Remove the two screws that fasten the rear section of the gas spring cover and remove this section 6 R...

Страница 391: ...D 3N PRO EXPERT SERVICE MANUAL Chapter 8 Replacement Procedures 8 21 8 2 11 3 Control Console Top Cover Removal Procedure Upper Section cont d Figure 8 22 Removing Top Cover Screws 2 Figure 8 23 Remov...

Страница 392: ...on and fasten it with its two screws These screws can be accessed from the opened space at the rear of the gas spring using a long screw driver as shown in Figure 8 19 Removing Screws from the AC VGA...

Страница 393: ...1 Remove the bottom keyboard cover as described in 8 2 8 3 Bottom Keyboard Cover Removal Procedure on page 8 14 2 Remove the two 8mm securing nuts located below the keyboard that fasten each of the p...

Страница 394: ...Figure 8 24 Probe Holder Nuts on page 8 23 3 Remove the probe holders Figure 8 25 Front Handle Securing Nuts 4 Remove the five 8mm securing nuts located below the keyboard that fasten Front Handle to...

Страница 395: ...GE MEDICAL SYSTEMS DIRECTION FK091075 REVISION 04 VIVID 3N PRO EXPERT SERVICE MANUAL Chapter 8 Replacement Procedures 8 25...

Страница 396: ...bed in the Vivid 3 Monitor 15 Removal Procedure on page 8 28 or the Vivid 3 17 Monitor Removal Procedure 1 on page 8 30 as appropriate 2 Remove the control console lower cover as described in the Cont...

Страница 397: ...SYSTEMS DIRECTION FK091075 REVISION 04 VIVID 3N PRO EXPERT SERVICE MANUAL Chapter 8 Replacement Procedures 8 27 8 2 14 3 Rear Handle Removal Procedure cont d Figure 8 27 Rear Handle Securing Screws Sc...

Страница 398: ...nt Procedure on page 8 38 Keypad see Keypad Replacement Procedure on page 8 39 Trackball see Trackball Replacement Procedure on page 8 43 Speakers see Speaker Replacement Procedure on page 8 44 8 3 1...

Страница 399: ...N 15 Monitor NOTE Ensure that the Teflon washer remains in place when you remove the monitor 4 Carefully lay the monitor on a soft surface and turn it upside down so that the bottom of the monitor is...

Страница 400: ...towards the front of the monitor so that the remaining four hinges slide into the four slots on the monitor case 4 Mount the base assembly locking bracket and fasten it with its two screws 5 Return th...

Страница 401: ...e main AC power cable from the wall outlet 3 Unplug the VGA cable and AC power cable from the rear control console 4 Remove the four screws that fasten the plastic cover to the base assembly two from...

Страница 402: ...base is resting on the Teflon washer 3 Position the monitor directly in line with the front of the control console and tighten the securing screw located at the rear of the monitor base 4 Mount the pl...

Страница 403: ...move the machine s side covers see 8 2 2 3 Side Covers Removal Procedure on page 8 4 2 Unscrew and remove the two screws located on the upper BEP bracket 3 Unscrew and remove the two screws located at...

Страница 404: ...oved in step 3 9 Fasten the upper back end BEP bracket in position using the two screws removed in step 2 10 Reassemble the side covers see 8 2 2 4 Side Covers Installation Procedure on page 8 4 11 Ch...

Страница 405: ...cable and AC power cable from the rear control console 2 Remove the four screws that fasten the plastic cover of the base assembly two screws from either side Remove the plastic cover 3 Loosen the se...

Страница 406: ...he VGA cable at the back of the monitor 8 Remove the two remaining screws from the back of the monitor This will release the space bar located between the back of the monitor and the monitor base asse...

Страница 407: ...d to the left of the VGA cable at the back of the monitor 8 Mount the bracket at the front of the monitor case with its three screws NOTE Ensure that the Teflon washer is in place before you return th...

Страница 408: ...uts and two M5 side screws securing the front handle and pull the front handle backwards to free the front edge of the keyboard 7 Lift out the keyboard 8 3 4 4 Keyboard Installation Procedure 1 Return...

Страница 409: ...e keypad you wish to remove and its neighboring keypad see Figure 8 39 below 2 Use the screw driver to gently lever off the defective keypad until it is completely loosened from its base 3 Lift off an...

Страница 410: ...ocedure 1 Carefully place a small flat screw driver between the ATGC slider keycap you wish to remove and the surface of the keyboard 2 Use the screw driver to gently lever off the defective keycap un...

Страница 411: ...described in Chapter 3 Installation 8 3 7 3 Rotary Knob Removal Procedure 1 Carefully place a small flat screw driver between the rotary knob you wish to remove and the surface of the keyboard see Fig...

Страница 412: ...ositioned with the curved surface facing towards the center of the hole as shown in Figure 8 42 below Figure 8 42 Tension Plate Fitted in Centre of Knob 2 Carefully place the new rotary knob into posi...

Страница 413: ...keyboard cover as described in 8 2 8 4 Bottom Keyboard Cover Installation Procedure on page 8 15 2 Disconnect the trackball cable from the trackball unit see Figure 8 43 below 3 Remove the two screws...

Страница 414: ...n 8 2 9 3 Speaker Cover Removal Procedure on page 8 16 3 Remove the four speaker screws one from each corner of both of the speakers 4 Gently pull the speakers towards you 5 Disconnect the wires at th...

Страница 415: ...O TAKING THE NECESSARY ESD PRECAUTIONS 1 ALWAYS CONNECT YOURSELF VIA AN ARM WRIST STRAP TO THE ADVISED ESD CONNECTION POINT LOCATED ON THE REAR OF THE SCANNER TO THE RIGHT OF THE POWER CONNECTOR 2 FOL...

Страница 416: ...iginal location using the metal frame guiding tracks 2 Use the plastic latches to firmly lock in the card in position so that the connectors are firmly placed in their sockets 3 Return the front door...

Страница 417: ...Removal Procedure on page 8 44 2 Place the FE Board on a desk or a stable surface on top of an ESD mat 3 Remove each of the four screws two from each side that hold the two brackets that secure the TR...

Страница 418: ...bracket previously removed that secures the TR4 boards to its original location above the TR4 boards 3 3 Return and tighten the four screws two on each side to fasten the bracket in position and secur...

Страница 419: ...ecuring clip and disconnect the AC power supply cable from the bottom of the DC power supply 3 Disconnect the AC power supply cable that is connected to the Tx P S HV P S 4 Remove the four small screw...

Страница 420: ...2 Remove the DC power supply refer to the 8 4 3 3 DC Power Supply Removal Procedure on page 8 49 3 Remove the two screws located at the top of the Tx power supply unit 4 Remove the Tx power supply uni...

Страница 421: ...probes from the probe sockets 3 Remove the right side cover as described in 8 2 2 3 Side Covers Removal Procedure on page 8 4 4 Remove the front door of the crate by unscrewing the two large screws at...

Страница 422: ...ide wall of the front end crate 4 Gently slide the front end crate back to its original position 5 Fasten the front end crate to the frame with the eight screws 6 Reconnect the PCI cable to the Image...

Страница 423: ...an Removal Procedure 1 Remove the front end crate as described in 8 4 5 3 Front End Crate Removal Procedure on page 8 51 2 Unscrew and remove the four screws that secure the fans to the top of the fro...

Страница 424: ...51 Fan Part Details on page 8 53 CAUTION Ensure that you position the fan in the correct airflow direction pushing air inwards into the crate and that you connect the fan to the connector that was ma...

Страница 425: ...ernal Back End Processor components This should be done by qualified personnel only However if replacing internal BEP components ensure replacement is with new components of the same type version and...

Страница 426: ...o Bracket PCI2IP Card Multifunction I O Card Key Board Control Card MO Driver ECG Module CD R Driver Floppy Driver HD Driver Mother Board P S Battery Slot 1 Slot 2 Slot 3 Slot 4 Slot 5 Slot 6 AGP Slot...

Страница 427: ...115 8 5 1 3 Back End Processor Removal Procedure 1 Remove the Vivid 3N left and right side covers as described in 8 2 2 3 Side Covers Removal Procedure on page 8 4 NOTE If the BEP only needs to be ope...

Страница 428: ...5 Slide the BEP slightly outwards and proceed to reconnect all the cables at the rear of the BEP as described in the following steps refer to Figure 8 55 Cable Connections on BEP2 Rear Panel on page 8...

Страница 429: ...ailable on the system connect the modem communication cable to the COM 3 and 4 socket 12 15 Connect the Back End KB Cont P1 cable to the Ext Keyboard socket 13b 16 Connect the Back End KB Cont P2 cabl...

Страница 430: ...ON the system and boot up in Technical Support mode make sure the T plug dongle is inserted into the parallel port on the rear panel 22 Re install the Software see the 8 7 1 Software Installation Upgr...

Страница 431: ...Set to 5 for BT01 systems UPS Change the UPS setting to Used or Not Used as appropriate If the Plug Scan option was purchased the UPS setting can be selected as Used If this option not purchased selec...

Страница 432: ...cribed in Chapter 3 Installation 8 5 2 3 BEP1 Left and Right Side Cover Removal Procedure Note The procedure is the same for Left and Right side covers 1 Remove the two screws that hold the cover in p...

Страница 433: ...cover in position see Figure 8 58 BEP1 Front Cover Screw on page 8 63 2 Press the two plastic latches while pushing the front cover until it released 8 5 2 6 BEP1 Front Cover Installation Procedure 1...

Страница 434: ...Preparation Shut down the Vivid 3N Pro Expert ultrasound unit as described in Chapter 3 Installation 8 5 3 3 BEP2 Side Cover Removal Procedure 1 Remove the two screws that secure the side cover in po...

Страница 435: ...BEP2 Front Cover Removal Procedure 1 Remove the two screws that secure the BEP front cover in position see Figure 8 60 Front Cover BEP2 on page 8 65 2 Press on the two latches on the side to release t...

Страница 436: ...Procedure cont d 8 5 3 6 BEP2 Front Cover Installation Procedure 1 Return the front cover to the front of the BEP and press the two latches on the side in order to push the cover back into position 2...

Страница 437: ...ure the Octopus Card Holder in position as shown in Figure 8 62 below 2 Remove the Octopus Card Holder 8 5 3 8 BEP2 Octopus Card Holder Installation Procedure 1 Place the Octopus Card Holder in positi...

Страница 438: ...Card Holder Removal Procedure on page 8 67 5 Disconnect all cables connected to the Plug Scan board from the keyboard control card the battery and the power supply Note Counting from the top the boar...

Страница 439: ...st in the system when a Plug Scan is present Ensure that a full shutdown of the system is performed otherwise voltage might be present that can cause injury and or damage 8 5 5 3 Plug Scan Battery Rem...

Страница 440: ...Velcro Strips 1 Place the battery inside the battery bracket Ensure that the cable is positioned at the lower end and that the rear of the battery with the two velcro strips faces the inner wall of t...

Страница 441: ...of the BEP 3 Remove the BEP side cover as described in 8 5 3 3 BEP2 Side Cover Removal Procedure on page 8 64 4 Remove the octopus card holder as described in 8 5 3 7 BEP2 Octopus Card Holder Removal...

Страница 442: ...the BEP side covers as described in the appropriate procedure 8 5 2 3 BEP1 Left and Right Side Cover Removal Procedure on page 8 62 or 8 5 3 3 BEP2 Side Cover Removal Procedure on page 8 64 4 If appl...

Страница 443: ...5 7 4 SCSI Board Installation Procedure cont d 7 Return the Vivid 3N rear and left and right side covers see the 8 2 4 4 Rear Cover Installation Procedure on page 8 7 and the 8 2 2 4 Side Covers Insta...

Страница 444: ...e on page 8 67 5 Disconnect the PCI cable that is connected to the BEP Note Counting from the top the PC2IP board is positioned in the fourth slot 6 Release the securing screw located on the left of t...

Страница 445: ...internal cables connected to the keyboard control board Note Counting from the top the keyboard control board is positioned in the sixth PCI slot 6 Release the securing screw located on the left of t...

Страница 446: ...8 7 and the 8 2 2 4 Side Covers Installation Procedure on page 8 4 2 Disconnect the power cable from the rear of the BEP 3 Remove the BEP left and right side covers as described in the appropriate pr...

Страница 447: ...e drive previously removed 2 Carefully slide the CDRW Drive into the front of the BEP refer to Figure 8 66 CDRW Drive Removal on page 8 76 3 Reconnect the cables data and power to the rear of the CDRW...

Страница 448: ...e on page 8 4 3 Remove the Vivid 3N rear cover refer to the 8 2 4 3 Rear Cover Removal Procedure on page 8 7 4 Remove the BEP left and right side covers as described in the appropriate procedure 8 5 2...

Страница 449: ...2nd from the top and insert the SCSI card see 8 5 7 4 SCSI Board Installation Procedure on page 8 72 4 Connect the data cable between the SCSI card and the rear of the MO Drive 5 Connect the power ca...

Страница 450: ...emoval Procedure NOTE BEP1 refers to a Pentium III based BEP earlier type 1 Disconnect the mains AC power cable for the mains power wall outlet 2 Remove the Vivid 3N left and right side covers refer t...

Страница 451: ...hapter 8 Replacement Procedures 8 81 8 5 12 3 BEP1 ECG Module Removal Procedure cont d 8 Disconnect the power cable and COM2 cable from the rear of the ECG Module see Figure 8 68 below 9 Carefully sli...

Страница 452: ...in Figure 8 69 below Note In the event that screws or side rails are misplaced one can use the screws slides and rails from the ECG Module that was removed from the BEP 2 Remove the protective layer...

Страница 453: ...the right as possible tighten first the left lower bracket then the right lower bracket and finally the upper left side bracket Use two screws to fasten each bracket securely 9 Reconnect all cables at...

Страница 454: ...Procedure on page 8 7 4 Disconnect all cables from the rear of the BEP 5 Remove the BEP from the machine as described 8 5 1 Back End Processor Replacement Procedure on page 8 57 6 Remove both BEP side...

Страница 455: ...ent Procedures 8 85 8 5 12 5 BEP2 ECG Module Removal Procedure cont d 9 Disconnect the footswitch cable from the KB Controller card 10 Disconnect the COM2 cable from the rear of the ECG Module 11 Care...

Страница 456: ...ble and the COM 2 cable to the rear of the new ECG Module 5 Install the BEP left and right side covers as described in 8 5 3 4 BEP2 Side Cover Installation Procedure on page 8 64 6 Carefully return th...

Страница 457: ...ibed in Chapter 3 Installation 8 5 13 3 PC VIC Removal Procedure 1 Remove the left cover as described 8 2 2 3 Side Covers Removal Procedure on page 8 4 2 Remove the BEP side cover as described in the...

Страница 458: ...C VIC Removal on page 8 87 3 Reconnect all the cables at the rear of the PC VIC module and the hard disk 4 Carefully slide the PC VIC into position in the same location as that of the removed PC VIC 5...

Страница 459: ...lation 8 5 14 3 Hard Disk Removal Procedure 1 Remove the left cover as described 8 2 2 3 Side Covers Removal Procedure on page 8 4 2 Remove the BEP side cover as described in the appropriate procedure...

Страница 460: ...SION 04 VIVID 3N PRO EXPERT SERVICE MANUAL 8 90 Section 8 5 Back End Parts Replacement 8 5 14 3 Hard Disk Removal Procedure cont d 6 Disconnect all the cables at the rear of the hard disk 7 Remove the...

Страница 461: ...fully slide the module holder into position in the unit 5 Return and fasten the screw that holds the hard disk module in position as shown in Figure 8 74 PC VIC on page 8 87 6 Install the BEP side cov...

Страница 462: ...n 8 6 1 3 AC Distribution Box Removal Procedure 1 Remove the Vivid 3N left right and rear covers as described in 8 2 2 3 Side Covers Removal Procedure on page 8 4 and 8 2 4 3 Rear Cover Removal Proced...

Страница 463: ...2 Fasten the AC Distribution Box using the two screws located in the lower bracket of the AC Distribution Box 3 Tighten the screw that connects the Ground cable to the AC Distribution Box 4 Plug in a...

Страница 464: ...over Removal Procedure on page 8 7 3 Unplug the internal power cable from the AC Distribution Box 4 Unscrew the Ground cable from the AC Distribution Box 5 Remove the two screws on both the left and t...

Страница 465: ...ck containing all the cables at the back of the unit 4 Open the track by hooking a thumb or finger under the right side of one of the tracks and pulling the side of the track The track clicks open ena...

Страница 466: ...Allen keys as indicated in the cable replacement procedure 8 6 4 1 Preparation Shut down the Vivid 3N Pro Expert ultrasound unit as described in Chapter 3 Installation 8 6 4 2 AC BEP or FE Cable Remov...

Страница 467: ...3 Rear Cover Removal Procedure on page 8 7 3 Remove the front end crate as described in 8 4 5 3 Front End Crate Removal Procedure on page 8 51 4 Raise the control console to its maximum height 5 Remov...

Страница 468: ...leeve 7 Adjust the securing nut so that there is no backlash of the release handle and secure the adjustment with the nut 8 Using the release handle lower and raise the control console several times t...

Страница 469: ...e with support see 8 6 6 5 Up Down Handle Replacement Procedure on page 8 102 8 6 6 1 Tools Use the appropriate the Phillips type screw drivers as indicated in the up down handle removal procedure 8 6...

Страница 470: ...6 6 3 Up Down Handle Removal Procedure 1 cont d 3 Extract the M6 screw from the up down handle by sliding it out 4 Release the gas spring cable from the broken up down handle see Figure 8 83 Gas Spri...

Страница 471: ...Slide the cable out of the retaining bracket and slide the end of the cable out through the slot on the handle assembly see below and refer to the detail in Figure 8 86 Fitting Gas Spring Cable to Up...

Страница 472: ...as shown in Figure 8 85 below 2 Tighten the M6 nut fully to secure the handle mounting brackets to the handle assembly 3 Insert the end of the gas spring cable through the slot on the gas spring cable...

Страница 473: ...hassis using one long and one short screw for each bracket as shown in Figure 8 87 Tighten the screws to secure the brackets firmly in position Figure 8 86 Fitting Gas Spring Cable to Up Down Handle F...

Страница 474: ...e handle is fastened securely on the chassis 6 Return the front handle to the console and secure in position as described in 8 2 13 4 Front Handle Installation Procedure on page 8 24 7 Return the righ...

Страница 475: ...ge 8 51 4 Lower the control console to its minimum height 5 Remove the two screws located at the bottom of the left compartment of the control console and then remove the white metal box from the comp...

Страница 476: ...the Hex M8x80mm screw in the appropriate hole to the left of the compartment at its base and then tighten the screw until the pin L at the lower end of the gas spring is loose enough to be removed and...

Страница 477: ...end stopper D on to the trigger arm E 5 Fit the groove of the cable end sleeve C on the hinge F of the gas spring head 6 Turn the cable holder B over the cable end sleeve C and then fasten it with th...

Страница 478: ...ions Front Wheel Removal Procedure 2 on page 8 110 Front Wheel Installation Procedure 2 on page 8 112 8 6 8 1 Tools Use the appropriate flat and Phillips type screw drivers a wire cutter the appropria...

Страница 479: ...8 3 Front Wheel Removal Procedure 1 cont d Figure 8 92 Releasing the Spring Washer from the Center of the Transverse Arm 3 Remove the four bolts three wrench bolts and one Allen bolt that secure the...

Страница 480: ...move the Vivid 3N front cover as described in 8 2 3 3 Front Cover Removal Procedure on page 8 5 2 Remove the locking washer located on the black wheel position bar and lift the wheel position bar 3 Us...

Страница 481: ...ls to the chassis and remove the wheel 7 Proceed to step 1 of the Front Wheel Installation Procedure 2 on page 8 112 to install a new front wheel in place of the one removed 8 Repeat step 6 above to r...

Страница 482: ...to remove the second wheel 1 Having removed one wheel from the machine chassis as described in 8 6 8 4 Front Wheel Removal Procedure 2 on page 8 110 install one of the new wheels in its place ensuring...

Страница 483: ...he machine must be safely supported on two wooden blocks or on a jack capable of supporting the weight of the machine Always remove and replace one wheel at a time before attempting to remove the seco...

Страница 484: ...emove and replace one wheel at a time before attempting to remove the second wheel 1 Having removed one rear wheel position the new wheel on the chassis in the same position as that of the wheel remov...

Страница 485: ...ve tray will load the software CD 3 Hold down the ON OFF button for 5 seconds to shutdown the system The shutdown options are displayed on screen 4 Select Full Shutdown The system powers down 5 Hold d...

Страница 486: ...pe screw drivers 8 8 1 2 Manpower One person 30 mins 8 8 1 3 Preparations 1 Shut down the Vivid 3N Pro Expert ultrasound unit as described in Chapter 3 Installation 2 Remove the Connectors Panel cover...

Страница 487: ...RECTION FK091075 REVISION 04 VIVID 3N PRO EXPERT SERVICE MANUAL Chapter 8 Replacement Procedures 8 117 8 8 1 3 Preparations cont d Figure 8 99 B W Video Printer DIP Switches on the Rear Panel All swit...

Страница 488: ...d 3N ultrasound unit s top surface below the control console as shown in Figure 8 100 and next to the VCR if present allowing sufficient room to access the cables at the rear of the printer Figure 8 1...

Страница 489: ...ors Panels Cover as described in 8 2 5 4 Connector Panels Cover Installation Procedure on page 8 8 6 Reconnect the mains AC power cable from the wall outlet 7 Turn ON the main circuit breaker located...

Страница 490: ...to 8 8 4 5 Color Video Printer Removal Procedure 1 on page 8 139 3 Release the B W printer by undoing the fastening belt secured around it and around the VCR if present 4 Disconnect the Remote cable...

Страница 491: ...ame for both models Figure 8 104 SONY Video Cassette Recorder VCR 8 8 2 1 Tools No special tools needed 8 8 2 2 Manpower One person 30 mins 8 8 2 3 Preparations 1 Shut down the Vivid 3N Pro Expert ult...

Страница 492: ...GE MEDICAL SYSTEMS DIRECTION FK091075 REVISION 04 VIVID 3N PRO EXPERT SERVICE MANUAL 8 122 Section 8 8 Peripherals 8 8 2 3 Preparations cont d Figure 8 105 VCR Switches Setting Pull Front Switch Lock...

Страница 493: ...rol console as shown in Figure 8 106 below and next to the B W Printer if present allowing sufficient room to access the cables at the rear of the VCR Figure 8 106 Video Cassette Recorder VCR Installe...

Страница 494: ...ssing the ON OFF button on the Control Console 9 Under System Configuration VCR ECG Tab select the appropriate VCR mode options For more information see 3 8 9 VCR ECG Tab on page 3 44 Figure 8 108 Son...

Страница 495: ...e 8 139 3 Release the B W printer by undoing the fastening belt around it together with the VCR if present 4 Disconnect the RS 232C cable the Audio and S Video IN and OUT cables and Power cord from VC...

Страница 496: ...VC VCR use the cables supplied with the VCR and not those supplied with the Vivid 3 system 8 8 3 1 Tools No special tools needed 8 8 3 2 Manpower One person 30 mins 8 8 3 3 Preparations 1 Shut down th...

Страница 497: ...igure 8 110 above 2 Check that the switch settings for each of the following switches is correct as shown below If necessary adjust accordingly TBC Set to OFF Hi Fi Select Set to Hi Fi L R If setting...

Страница 498: ...outlet 2 Turn ON power to the VCR 3 If an external monitor is connected to the VCR make sure power to the monitor is also ON 4 Press the Menu button on the JVC Front Panel see Figure 8 112 below The...

Страница 499: ...When the correct time is visible in the LCD display press the Menu button to quit CLOCK ADJUST 8 Turn OFF power to the VCR Remove the AC power cable from the mains power wall outlet and disconnect th...

Страница 500: ...er left corner not visible in Figure 8 113 NOTE When connecting the AC Power cable to the VCR use the adaptor supplied with the VCR 6 Route all the cables through the slot at the rear of the compartme...

Страница 501: ...um height route the cable loom down to the left rear connectors panel at the rear of the Vivid 3 unit 11 Fasten the loom to the Vivid 3N bottom cover using the square adhesive cable fastener supplied...

Страница 502: ...lation Procedure on page 8 19 14 Re install the Connectors Panel Cover as described in 8 2 5 4 Connector Panels Cover Installation Procedure on page 8 8 15 Reconnect the mains AC power cable from the...

Страница 503: ...age 8 132 3 Remove the adhesive velcro strip from the edge of the side compartment on the left side of the Vivid 3N ultrasound unit refer to Figure 8 114 JVC VCR Installed in Compartment on page 8 131...

Страница 504: ...on page 8 139 For units that are not equipped with a previously installed B W printer and or VCR refer to 8 8 4 6 Color Video Printer Installation Procedure 2 on page 8 140 and 8 8 4 7 Color Video Pri...

Страница 505: ...console as described in 8 2 10 Control Console Bottom Cover Upper Section Replacement Procedure on page 8 17 4 Remove the Compartment Tray as described in 8 6 7 3 Gas Spring Removal Procedure on page...

Страница 506: ...ure 8 119 Figure 8 119 Shelf Fastened to Top Cover 10 Route the left end of the top surface belt through the narrow left slot in the shelf closest to the front working from below the shelf upwards 11...

Страница 507: ...disconnected B W Printer and VCR cables 16 Place the Color Video Printer on top of the shelf allowing sufficient room to access the cables at the rear of the printer as shown in Figure 8 120 below Fig...

Страница 508: ...stall the Connectors Panels Cover as described in 8 2 5 4 Connector Panels Cover Installation Procedure on page 8 8 22 Reconnect the mains AC power cable from the wall outlet 23 Turn ON the main circu...

Страница 509: ...uckles Securing Printer 2 Move the color printer forwards to gain access to the rear panel 3 Open the lower middle screw from the color printer s rear panel and remove the Ground cable lug 4 Unplug th...

Страница 510: ...the belt buckles over the color printer and tighten the belt by pulling the remaining length of the belt to fasten the printer securely in position 9 Reconnect the mains AC power cable from the wall o...

Страница 511: ...layed see Figure 8 124 below There are five setup categories COLOR c LAYOUT l PRINTER p INPUT i and OUTPUT o Each setup category can be selected from the Top menu of each category 8 8 4 8 2 Color Setu...

Страница 512: ...or button 4 Press the button to display the WINDOW SETUP menu Figure 8 127 below 5 In the WINDOW SETUP menu adjust the required parameters in accordance with those shown in Table 8 6 below by selectin...

Страница 513: ...ne using the or button for each selected parameter adjust the value using the or button 8 8 4 8 5 Input Setup 1 Return to the PRINTER SETUP top menu using the button Figure 8 128 above 2 Select IN by...

Страница 514: ...OUTPUT SETUP menu adjust the parameters in accordance with those shown in Table 8 8 below by selecting the parameters one by one using the or button for each selected parameter adjust the value using...

Страница 515: ...this section two types of replacement procedures are described as follows For units that are equipped with a previously installed B W printer and or VCR see 8 8 4 4 Color Video Printer Installation P...

Страница 516: ...ing belt on which the printer is placed NOTE If a B W Printer and VCR are not installed then the Color Video Printer can be placed on the top surface of the Vivid 3N ultrasound unit below the keyboard...

Страница 517: ...lacement Procedures 8 147 8 8 5 4 Sony UP 21MD Color Video Printer Installation Procedure1 cont d Note Make sure that all the cables are fitted through the slot in the far end of the Metal Bottom Cove...

Страница 518: ...metal cover on top of the printer shelf either on the right or left side as preferred by the customer and fasten securely into position to protect the connectors using the two screws provided see Figu...

Страница 519: ...ont as shown in Figure 8 135 and Figure 8 136 on page 8 149 12 Repeat step 11 to thread the second belt in position through the slot on the right 13 Attach the male end of the two plastic buckles to e...

Страница 520: ...e UP 21MD Color Video Printer as shown in Figure 1 17 below Figure 8 138 UP 21MD Color Video Printer Ground Cable Connection 19 Connect the RGB and SYNC cables Color Printer Remote cable and AC power...

Страница 521: ...inst the metal protective cover on the side making sure that the connectors are not exposed 21 Connect the two plastic buckles and tighten the belts Verify that the UP 21MD Color Video Printer is secu...

Страница 522: ...eo Printer Removal Procedure 1 NOTE This procedure Procedure 1 is for units that are equipped with a previously installed B W printer and a VCR The color printer option includes a metal shelf and fast...

Страница 523: ...ith your local color system 8 Lock the belt buckles over the color printer and tighten each belt by pulling the remaining length of the belt to fasten the printer securely in position 9 Reconnect the...

Страница 524: ...22 8 8 9 1 Tools Use the appropriate flat and Phillips type screw drivers 8 8 9 2 Manpower One person 15 mins 8 8 9 3 Preparations 1 Shut down the Vivid 3N Pro Expert ultrasound unit as described in C...

Страница 525: ...tor Panels Cover Installation Procedure on page 8 8 4 Reconnect the mains AC power cable from the wall outlet 5 Turn ON the main circuit breaker located on rear of the Vivid 3N 6 Turn ON the Vivid 3N...

Страница 526: ...GE MEDICAL SYSTEMS DIRECTION FK091075 REVISION 04 VIVID 3N PRO EXPERT SERVICE MANUAL 8 156 Section 8 8 Peripherals This page was intentionally left blank...

Страница 527: ...Chapter 9 SECTION DESCRIPTION PAGE NUMBER 9 1 Overview 9 1 9 2 List of Abbreviations 9 2 9 3 Optional Service Parts Kits delivered with Unit 9 3 9 4 AC Power overview 9 4 9 5 Control Panel Parts 9 5...

Страница 528: ...rocessor Ctrl Control FEP Front End Processor FRU 1 Replacement part available in parts hub FRU 2 Replacement part available from the manufacturer lead time involved FRU N Non Stock Parts A in the FRU...

Страница 529: ...tional Service Parts Kits delivered with Unit Figure 9 1 Optional Service Parts Kit A Table 9 2 Optional Service Parts Kit A ITEM NUMBER PART NAME PART NUMBER DESCRIPTION QTY FRU 4 Monitor for Vivid 3...

Страница 530: ...GE MEDICAL SYSTEMS DIRECTION FK091075 REVISION 04 VIVID 3N PRO EXPERT SERVICE MANUAL 9 4 Section 9 4 AC Power overview Section 9 4 AC Power overview Figure 9 2 AC Power Parts 1og 3 2 4 5 9 7 8 6...

Страница 531: ...re 9 2 on page 9 4 1 6 Connector AC voltage secondary 120v FK200338 Figure 9 2 on page 9 4 1 7 Connector AC voltage secondary 100v FK200337 Figure 9 2 on page 9 4 1 8 Connector AC voltage primary 200...

Страница 532: ...T Figure 9 3 on page 9 6 1 2 COVER RIGHT Figure 9 3 on page 9 6 1 3 COVER BOTTOM FRONT UPPER SECTION Figure 9 3 on page 9 6 1 4 COVER BOTTOM REAR Upper Section FK307323 NOT ILLUSTRATED 1 5 SCREEW KIT...

Страница 533: ...pter 9 Renewal Parts 9 7 Section 9 6 Front End Parts Figure 9 4 Front End Parts Part FA200114 Tx Voltage Power Supply TXPS HV Power Supply Part FA200764 PCB Front End Controller Part FB200900 PCB Beam...

Страница 534: ...Controller FEC 1 Figure 9 4 on page 9 7 FA200811 FK200183 PCB Beamformer BF 32ch BT 00 Units ONLY PCB Image Port 2 IP 2 1 Figure 9 4 on page 9 7 FB200900 PCB Beamformer BF 64ch BT 01 BT 02 and BT 03 1...

Страница 535: ...ART NAME FRU REFER TO FK200353 Global Modem Kit 1 Figure 9 5 on page 9 8 Table 9 8 Mechanical HW overview P N PART NAME FRU REFER TO 2301690 Filter Air 2 2389102 Wheel Caster 1 2392789 Wheel Caster Wi...

Страница 536: ...9 Back End Parts Section 9 9 Back End Parts Figure 9 6 Back End Parts Part 2277189 MO Drive 5 25 Part 066E0007 Footswitch Part EP200132 Isolation Box network Part 2269309 Speakers pair Part 2346033 H...

Страница 537: ...E0007 Footswitch 2 Figure 9 6 on page 9 10 2269309 Speakers pair 2 Figure 9 6 on page 9 10 EP200132 Isolation Box network N Figure 9 6 on page 9 10 FK302341 PCB Keyboard Control Card 1 NOT ILLUSTRATED...

Страница 538: ...End Parts 2253043 Keyboard Matrix Assy English V3 1 NOT ILLUSTRATED 2327341 PCB Multifunction I O Card 1 NOT ILLUSTRATED 2399676 PCB Frame Grabber 1 NOT ILLUSTRATED 2277269 PCB Network 1 NOT ILLUSTRA...

Страница 539: ...XPERT SERVICE MANUAL Chapter 9 Renewal Parts 9 13 9 9 1 Cables Figure 9 7 Cables Diagram 1 Part FK200115 VGA Out Part FK200116 VGA VIC PC Part FK200118 Soft Shutdown Part FK200119 Ground VIC Part FK20...

Страница 540: ...MANUAL 9 14 Section 9 9 Back End Parts 9 9 1 Cables cont d Figure 9 8 Cables Diagram 2 Part FK200121 Ground Front End Part FK200123 Fan AC Distribution Box Front End Part FK200124 Ground Keyboard Par...

Страница 541: ...s cont d Figure 9 9 Cables Diagram 3 Part FK200132 ECG Internal Footswitch Keyboard Control Part FK200130 ECG Back End Internal Part FK200131 Patient I O ECG ECG Phono Part FK200127 Keyboard VIC Inter...

Страница 542: ...7 8 0 GND J7 8 J7 J8 J7 J8 GND P11 P11 J7 J8 INTER 2 PHERI 1 2 RED RED BLACK BLACK ORANGE ORANGE REAR PANEL PHERI 1 1 PHERI 2 2 PHERI 2 1 INTER 1 Part FK200135 VIC Rear Panel Left Col Pr Part FK200136...

Страница 543: ...Figure 9 11 Cables Diagram 5 Part FK200099 Ground Rear Panel Right Part FK200100 Rear Panel Left B W Printer Part FK200139 Parallel Port Rear Panel Part FK200101 B W Printer Rear Panel Left Print Tri...

Страница 544: ...rts 9 9 1 Cables cont d Figure 9 12 Cables Diagram 6 GND P C INT 2258806 A GND ECG CHASS 2258806 A Part FK200147 Internal Audio Keyboard Control Back End Part FK200148 External Audio Back End Rear Pan...

Страница 545: ...T SERVICE MANUAL Chapter 9 Renewal Parts 9 19 9 9 1 Cables cont d Figure 9 13 Cables Diagram 7 Part FK200155 Audio Out Rear Panel Part FK200156 Audio In Rear Panel Part FK200152 RS232 VCR Rear Panel P...

Страница 546: ...ack End Parts 9 9 1 Cables cont d Figure 9 14 Cables Diagram 8 Part FK200157 Power Monitor Part FK200163 Power Back End Part FK200158 Power Peripherals Part FK200162 Power Front End Part 2368067 Power...

Страница 547: ...9 Renewal Parts 9 21 9 9 1 Cables cont d Figure 9 15 Cables Diagram 9 Part FK200165 Network Rear Panel Right to Isolation Box Part FK200166 Network Back End Rear Panel to Isolation Box option Part FK...

Страница 548: ...MEDICAL SYSTEMS DIRECTION FK091075 REVISION 04 VIVID 3N PRO EXPERT SERVICE MANUAL 9 22 Section 9 9 Back End Parts 9 9 1 Cables cont d Figure 9 16 Cables Diagram 10 Part 2252971Cable ECG Back End 0 CO...

Страница 549: ...Cable Keyboard VIC External Power Figure 9 8 on page 9 14 FK200127 Cable Keyboard VIC Internal Power Back End Figure 9 9 on page 9 15 FK200128 Cable Back End Keyboard Matrix alphanumeric keyboard Figu...

Страница 550: ...re 9 13 on page 9 19 FK200155 Cable Audio OUT Rear Panel Figure 9 13 on page 9 19 FK200156 Cable Audio IN Rear Panel Figure 9 13 on page 9 19 FK200157 Cable Power Monitor Figure 9 14 on page 9 20 FK20...

Страница 551: ...New 2252970 Cable Ground Front End 2252972 Cable Fan AC Dist Box Front End 2252973 Cable Ground Keyboard 2252975 Cable KB Matrix Control 2252976 Cable KB VIC External Power 2252981 Cable KB VIC Int P...

Страница 552: ...Rev New 2258803 Cable Ext Audio BE Rear Panel 2258804 Cable Speakers Back End Rev New 2258805 Cable ON OFF Motherboard Keyboard Controller Rev 002 066E8200 Cable Panasonic Adaptor RS232 VCR Rear Pane...

Страница 553: ...CTION FK091075 REVISION 04 VIVID 3N PRO EXPERT SERVICE MANUAL Chapter 9 Renewal Parts 9 27 Section 9 10 ECG Table 9 11 Back End Parts P N PART NAME FRU REFER TO FK200340 ECG Box Assembly Patient I O M...

Страница 554: ...nual English N FK092193 V3N User Guide N FK040193 V3N Release Notes N FK092006 V3N User s Manuall French N FK040199 V3N Release Notes N FK092199 V3N User Guide N FK092002 V3N Reference Manual English...

Страница 555: ...39L Linear 1 2252157 H4701SZ Probe 3S Sector 1 2263669 H4000P H40422LB Probe 7S Sector 1 2290751 H40422LA H4901RA Probe 5S Sector 1 2294523 H40412LG Probe 10L 739L Linear 1 2295377 H40412LH Probe 39A...

Страница 556: ...6Tv 1 TY200774 H45001B Probe Wall Rack TEE 1 TE100024 H4830JE Probe Pencil P2D 1 TQ100002 H4830JG Probe Pencil P6D 1 2301954 H40602LN Probe E721 OB GYN 1 KQ100006 H45511NW Probe i8L Linear 1 H45511NT...

Страница 557: ...1JC Sony UP2800P PAL Color Video Printer no shelf 2 H45001CL Sony UP2950MD NTSC Color Video Printer with shelf 2 H45001JD Sony UP2950MD NTSC Color Video Printer no shelf 2 066E2955 H45001PY Sony UP 21...

Страница 558: ...op Lower Section A FK307321 Up Down Handle 1 FK307322 Cover Top Upper Section A FK307323 Cover Bottom Rear Upper Section A FK307324 Cover Bottom Front Upper Section A FK307325 Cover Gas Spring Sleeve...

Страница 559: ...FC200507 PCB RF Interface RFI P N Spare part kit Keybd Controller FK200365 GEVU P N Description Revi sion FK302341 PCB Keyboard Ctrl Card A FK200334 AC Voltage Distribution Box 1 FC200507 PCB RF Inte...

Страница 560: ...2272035 PC2IP Cable R G B Sync 2252979 2252978 2253016 2252977 2252975 2252982 2258801 2252964 2253011 2252976 2252981 2253009 2253015 2292972 2276874 2300847 2253014 2276875 2269429 2253080 2253079...

Страница 561: ...ors 2253001 2252998 2252999 2253002 2253004 2253000 2252966 USB1 TR4 1 TR4 16 I2 C COM1 Rear Panel Left Rear Panel Right Composite Video Out1 Temp Sens To monitor bracket 2269432 Audio Gen K B Ctrl Fr...

Страница 562: ...To color printer FANS CTRL VOLT Mother Board FRONT END 2253029 BACK END 2292295 K B Assy 2253043 From AC Outlet AC System 2272035 PC2IP Cable R G B Sync 2252979 2252978 2253016 2252977 2252975 2252982...

Страница 563: ...GE MEDICAL SYSTEMS DIRECTION FK091075 REVISION 04 VIVID 3N PRO EXPERT SERVICE MANUAL Chapter 9 Renewal Parts 9 37 This page was intentionally left blank...

Страница 564: ...GE MEDICAL SYSTEMS DIRECTION FK091075 REVISION 04 VIVID 3N PRO EXPERT SERVICE MANUAL 9 38 Section 9 18 Cabling Block Diagram Vivid 3N BT 00...

Страница 565: ...re are several places on the backplane the AC distribution box and the DC distribution box that could be dangerous Be sure to disconnect the system power plug and to open the main circuit breaker befo...

Страница 566: ...ound scanner or nearby 10 2 2 Quality Assurance In order to gain accreditation from organizations such as the American College of Radiology USA it is the customer s responsibility to have a Quality As...

Страница 567: ...t ultrasound scanner as recommended in the Periodic Maintenance Schedule in order to retain the high levels of safety dependability and system performance Your GE Medical Systems Service Representativ...

Страница 568: ...rent Leakage Checks Also after corrective maintenance or as required by your facility s QA program Peripheral Current Leakage Checks Also after corrective maintenance or as required by your facility s...

Страница 569: ...rical and power cables for cuts or abrasions Equipment for loose or missing hardware The keyboard for defects Brakes for defective operation DANGER To avoid electrical shock hazard do not remove the p...

Страница 570: ...wrist strap 3M 3051 conductive Ground cord Anti Static Vacuum Cleaner 46 194427P278 46 194427P279 120V 230V Air Filter 2256176 Air intake Safety Analyzer 46 285652G1 DALE 600 KIT or equivalent for ele...

Страница 571: ...he customer if they have any problems or questions about the equipment 2 Paperwork Fill in the appropriate details at the top of the Vivid 3N Preventative Maintenance Inspection Certificate see page 1...

Страница 572: ...peration Check the basic system controls that affect this mode of operation 5 Applicable Software Optionsa a Some software may be considered as standard depending upon system model configuration Verif...

Страница 573: ...copy output of the Color video page printer Clean heads and covers if necessary 4 DICOM Verify that DICOM is functioning properly Send an image to a DICOM device 5 InSite iLinq Verify that InSite is f...

Страница 574: ...ray any liquid directly onto the unit 2 Monitor On a weekly basis apply glass cleaner to a soft non abrasive folded cloth Gently wipe the monitor face 3 Console Frequent and diligent cleaning of the V...

Страница 575: ...MOD disks must be stored away from dust and cigarette smoke Do not use alcohol or benzene to clean the MOD cartridge 10 CD Drive Clean the drive head and media with the vendor supplied cleaning kit Ad...

Страница 576: ...eriodic Maintenance 10 5 6 Diagnostic Checks Optional To complete the periodic maintenance checks perform the diagnostic tests as described in Diagnostics Troubleshooting Review the system error log f...

Страница 577: ...m a visual check of the probe pins and system sockets before plugging in a probe Avoid pulling pinching or kinking the probe cable since a damaged cable may compromise the electrical safety of the pro...

Страница 578: ...ls Failure to follow these precautions can result in serious injury and equipment damage Failure to properly handle or maintain a probe may also void its warranty TEE and Interoperative probes often h...

Страница 579: ...ct or sterilize probes without damaging them Use gas sterilization and legally marked sterile pyrogen free probe sheaths on probes used for surgery Use cold chemical sterilization suitable for plastic...

Страница 580: ...roughly rinse the washed lens in clear water Apply sterile distilled water for at least 60 seconds Air dry 6 Check the lens for cracking and the cable insulation for separation 7 Store the probe in it...

Страница 581: ...s must be properly removed from any part or equipment prior to shipment GEMS employees as well as customers are responsible for ensuring that parts equipment have been properly decontaminated prior to...

Страница 582: ...it under test must not be connected to other electrical equipment Remove all interconnecting cables and wires The operator and patient must not come into contact with the unit while the tests are bein...

Страница 583: ...ry Normal Condition Open Ground Reverse Polarity Open Neutral Mains Applieda a Mains Applied is the Sink Leakage Test In this test mains supply voltage is supplied to the part or equipment to determin...

Страница 584: ...d the Grounding protective earth conductor have been reversed If later tests indicate high current leakages this should be suspected as a possible cause and the outlet wiring should be visually inspec...

Страница 585: ...ow these steps to test the Ground wire resistance 1 Turn the Vivid 3N unit OFF 2 Connect one of the Ohmmeter probes to the tested AC wall outlet Ground pin 3 Using the other Ohmmeter probe touch the e...

Страница 586: ...s powered ON Be sure to turn the unit power OFF before switching them using the Polarity switch and or the Neutral switch 10 7 5 2 Generic Procedure The test verifies the isolation of the power line f...

Страница 587: ...Table 10 14 Record all data on the Vivid 3N Preventative Maintenance Inspection Certificate see page 10 31 Table 10 17 Typical Data Sheet for Chassis Source Current Leakage Test Unit Power Tester Pol...

Страница 588: ...ts should be made with the Ground Open and Closed with the Vivid 3N unit ON and OFF and with the power line polarity Normal and Reversed Record the highest reading For each combination the operating c...

Страница 589: ...olated Patient Lead Sink Leakage Isolation Test NOTE Refer to the procedure in the IEC 60601 1 CAUTION Line voltage is applied to the ECG leads during this test To avoid the risk of possible electric...

Страница 590: ...wer Source Maximum Allowance Limit GROUND OPEN GROUND CLOSED Patient Lead to Ground Current Leakage Test and Patient Lead to Lead Current Leakage Test 115V 10uA 10uA 220 240V 500uA 10uA Table 10 19 Ma...

Страница 591: ...ld be made with the Ground OPEN and CLOSED with power line polarity Normal and Reversed and with the unit OFF and ON For each combination the probe must be active to find the worst case condition NOTE...

Страница 592: ...rnal probe into the meter EXTERNAL connector 4 Set the meter s FUNCTION switch to EXTERNAL position 5 Connect the probe for test with the connector of the console 6 Add the saline probe and the imagin...

Страница 593: ...page 10 31 CAUTION When power to the unit is ON never switch the Polarity and the status of Neutral Be sure to turn OFF power to the unit before switching them using the POLARITY switch and or the NEU...

Страница 594: ...ult lies with the probe or the scanner NOTE Each probe will have some amount of leakage dependent on its design Small variations in probe current leakages are normal from probe to probe Other variatio...

Страница 595: ...can Format Model Number Serial Number Probe 6 Frequency Scan Format Model Number Serial Number Probe 7 Frequency Scan Format Model Number Serial Number Probe 8 Frequency Scan Format Model Number Seria...

Страница 596: ...assis Source Current Leakage CRT Patient Lead Source Leakage Lead to Ground Patient Lead Source Leakage Lead to Lead Patient Lead Source Leakage Isolation Peripheral 1 Current Leakage Peripheral 1 Gro...

Страница 597: ......

Страница 598: ...ystems Telex 3797371 P O Box 414 Milwaukee Wisconsin 53201 U S A Asia Pacific Latin America North America GE Ultraschall Tel 49 0 212 28 02 208 Deutschland GmbH Co KG Beethovenstrasse 239 Postfach 11...

Отзывы: