GE M
EDICAL
S
YSTEMS
D
IRECTION
FK091075, R
EVISION
04
V
IVID
3N P
RO
/E
XPERT
S
ERVICE
M
ANUAL
Chapter 10 Periodic Maintenance
10-11
10-5-5
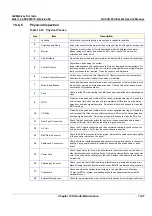
Physical Inspection
Table 10-10 Physical Checks
Step
Item
Description
1
Labeling
Verify that all system labeling is present and in readable condition.
2
Scratches and Dents
Inspect the console for dents, scratches or cracks. Use touch-up paint, as required.
3
Monitor
Clean the monitor with a soft cloth dampened with mild detergent and water.
Repeat using only water, and wipe with a dry cloth. Inspect the monitor for
scratches and raster burns.
4
Probe Holders
Clean the probe holders with warm water and a damp cloth to remove all traces of gel.
5
Control Console
Power-down and unplug the system.
Inspect the keyboard and control console. Note any damaged or missing items. Fix
any loose buttons, and verify that the control console light bulb is working. Replace
faulty components, as required. Clean the console and keyboard.
6
Control Console Movement
Verify ease of control console (Operator I/O Panel) movement in all acceptable
directions. Ensure that it latches in position, as required.
7
Wheels and Brakes
Check all wheels and castors for wear and verify operation of the foot brake to stop
the unit from moving, and release mechanism. Check all wheel locks and wheel
swivel locks for proper operation.
8
Fans
Check that the FE crate cooling fans, BE fan and peripheral fans are operating and
clean.
9
MOD
Clean the drive head and media with the vendor-supplied cleaning kit. Advise the
user to repeat this often, to prevent future problems. MOD disks must be stored
away from dust and cigarette smoke. Do not use alcohol or benzene to clean the
MOD cartridge.
10
CD Drive
Clean the drive head and media with the vendor-supplied cleaning kit. Advise the
user to repeat this often, to prevent future problems. CDs must be stored away from
dust and cigarette smoke. Do not use alcohol or benzene to clean the CD drive.
11
Rear Panel Connectors
Check the rear panel connectors for bent pins, loose connections and loose or
missing hardware. Verify that the labeling is in good condition.
12
AC Unit
Check the AC board connectors and the associated cabling for good connection
and proper insulation. Verify that the connections are secured.
13
BEP Rear Connector
Check the BEP rear connector for bent pins. Screw all the cable connectors tightly
to the connector sockets on the panel.
14
Cables and Connectors
Check all internal cable harnesses and connectors for wear, and secure connector
seating. Pay special attention to footswitch assembly and probe strain or bend
reliefs.
15
Power Cord
Check the power cord for cuts, loose hardware, tire marks, exposed insulation or
other deterioration, and verify continuity. Tighten the clamps that secure the power
cord to the unit and the outlet plug to the cord. Replace the power cord and clamp,
as required.
16
Shielding and Covers
Check to ensure that all EMI shielding, internal covers, panels and screws are in
place. Missing covers and hardware can cause EMI/RFI problems during scanning.
17
Peripherals
Check and clean the peripherals according to the manufacturer’s directions.
To prevent EMI or system overheating, dress the peripheral cables inside the
peripheral cover.
18
External Microphones
Check for proper operation of any external microphones by recording an audio test.
Содержание Vivid 3N Pro Series
Страница 2: ......
Страница 5: ...GE MEDICAL SYSTEMS DIRECTION FK091075 REVISION 04 VIVID 3N PRO EXPERT SERVICE MANUAL ii iii...
Страница 24: ...GE MEDICAL SYSTEMS DIRECTION FK091075 REVISION 04 VIVID 3N PRO EXPERT SERVICE MANUAL xxii...
Страница 597: ......

