GE M
EDICAL
S
YSTEMS
D
IRECTION
FK091075, R
EVISION
04
V
IVID
3N P
RO
/E
XPERT
S
ERVICE
M
ANUAL
Chapter 8 Replacement Procedures
8-69
8-5-5
Plug & Scan Battery Replacement Procedure
If the Plug & Scan battery is replaced, ensure that you properly transport or dispose of it according to
the procedures established by your facility, company, or regional regulatory agency.
8-5-5-1
Tools
Use the appropriate flat and Phillips-type screw drivers, a wire cutter and the appropriate Hex wrenches,
as indicated in the Plug & Scan battery replacement procedure.
8-5-5-2
Preparation
Shut down the Vivid 3N Pro/Expert ultrasound unit, as described in
Chapter 3 -
Installation
. Voltage may
exist in the system when a Plug & Scan is present. Ensure that a full shutdown of the system is
performed, otherwise voltage might be present that can cause injury and/or damage.
8-5-5-3
Plug & Scan Battery Removal Procedure
1) Remove the left cover, as described in
8-2-2-3 "Side Covers Removal Procedure" on page 8-4
.
2) Disconnect the power cable from the rear of the BEP.
3) Remove the BEP cover as described
8-5-1 "Back End Processor Replacement Procedure" on page
8-57
. The Plug & Scan battery and its cover are located to the right of the BEP.
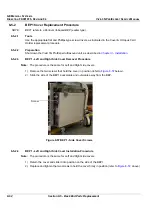
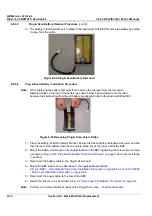
4) Remove the screws that secure the battery bracket in position (see
Figure 8-63
below - BEP1 has
three
screws; BEP2
has
two
); remove the bracket.
Figure 8-63 Plug & Scan Battery Bracket and Screws
5) Disconnect the battery cable from the Plug & Scan board.
BEP2
BEP1
Battery Bracket
Battery Bracket
(third screw not visible)
Screw
Screw
Screw
Содержание Vivid 3N Pro Series
Страница 2: ......
Страница 5: ...GE MEDICAL SYSTEMS DIRECTION FK091075 REVISION 04 VIVID 3N PRO EXPERT SERVICE MANUAL ii iii...
Страница 24: ...GE MEDICAL SYSTEMS DIRECTION FK091075 REVISION 04 VIVID 3N PRO EXPERT SERVICE MANUAL xxii...
Страница 597: ......


