5-50
►
5
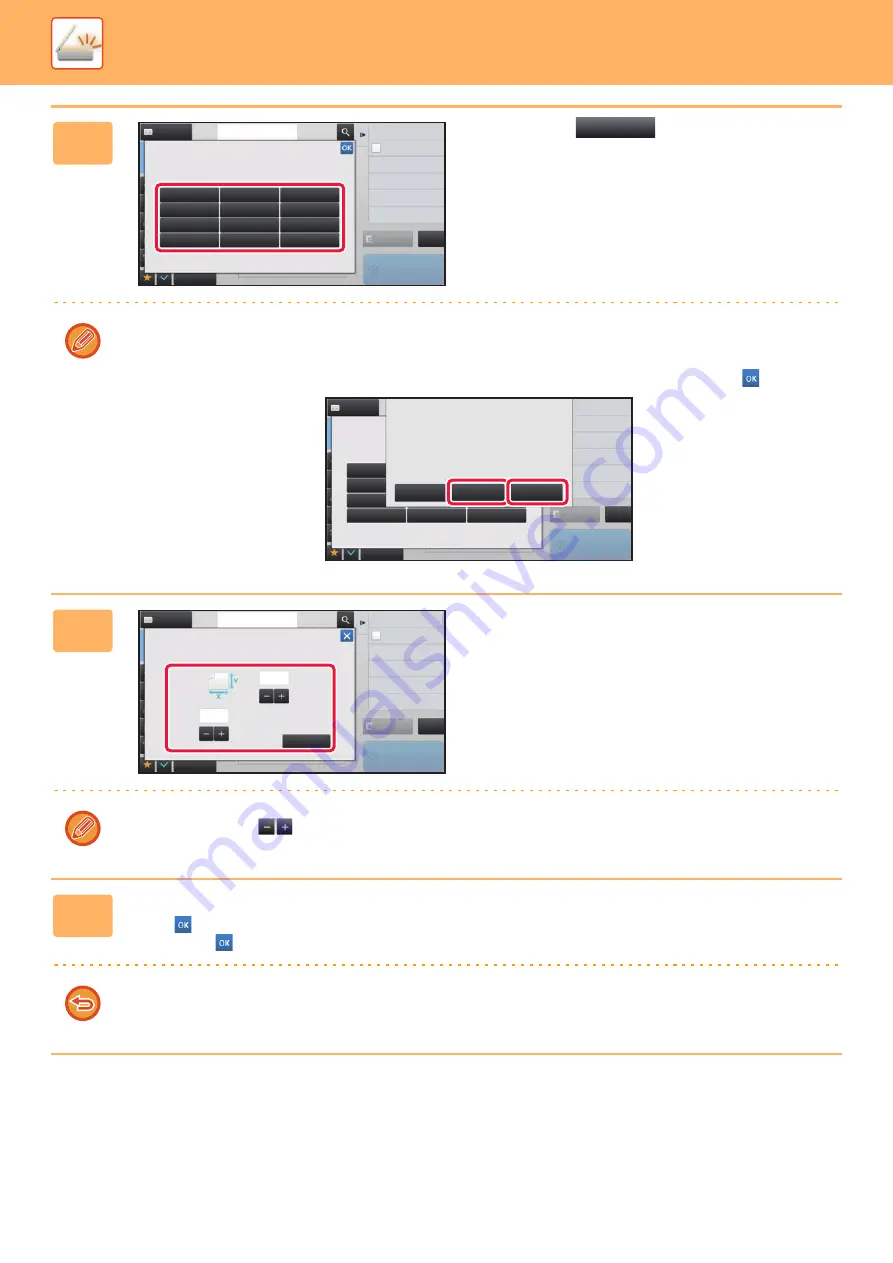
Tap a key (
) for storing a
custom original size.
Tap a key that does not show a size.
To modify or delete a previously stored key:
Tap the key that you want to modify or delete. The following screen will appear.
• To modify the key, tap the [Modify] key and go to the next step.
• To delete the key, tap the [Delete] key. Make sure that the original size has been cleared and tap the
key.
6
Specify the original size.
Tap the areas displaying width and height sizes respectively,
and enter the sizes using the numeric keys.
It is convenient to use
to finely adjust the entered size.
7
Tap the [Execute] key.
Tap the
key, and check that the key of the size stored on the Scan Size screen is added properly. After you have
checked it, tap
.
To cancel the operation:
Tap the [CA] key.
Address
Address Book
Touch to input Address
Skip Blank Page in Original
Blank Page Skip
Scan Thin Paper Original
Slow Scan Mode
Background Adjustment
Color Mode
Adjust Outline of Image
Sharpness
Preview
Start
CA
Others
Scan Size
Store/Delete
Select the size key to store/delete
the custom original size.
Skip Blank Page in Original
Blank Page Skip
Scan Thin Paper Original
Slow Scan Mode
Background Adjustment
Color Mode
Adjust Outline of Image
Sharpness
Scan Size
Store/Delete
Select the size key to store/delete
the custom original size.
X17 Y11
Preview
Start
CA
Address Book
Others
A custom size has already been stored
in this location.
Delete
Modify
Cancel
Background Adjustment
Color Mode
Skip Blank Page in Original
Blank Page Skip
Scan Thin Paper Original
Slow Scan Mode
Adjust Outline of Image
Sharpness
Address
Address Book
Touch to input Address
Preview
Start
CA
Others
Execute
Scan Size
Size Input
Enter Size to Register.
( 1~11 5/8 )
inch
( 1~17 )
inch
11
17
Содержание MX-M905
Страница 130: ...1 127 BEFORE USING THE MACHINE PERIPHERAL DEVICES 4 Close the front cover ...
Страница 138: ...1 135 BEFORE USING THE MACHINE PERIPHERAL DEVICES 10 Push in the staple unit 11 Close the cover ...
Страница 147: ...1 144 BEFORE USING THE MACHINE PERIPHERAL DEVICES 3 Gently push the box back in 4 Close the front cover ...
Страница 151: ...1 148 BEFORE USING THE MACHINE PERIPHERAL DEVICES 3 Gently push the box back in 4 Close the front cover ...
Страница 331: ...3 17 PRINTER FREQUENTLY USED FUNCTIONS 1 Select Printer Features 2 Select Advanced1 3 Select Print Mode Mac OS 1 2 3 ...
Страница 956: ...2016K US1 ...


