4-53
CHANGING THE RESOLUTION
The resolution can be specified to match the characteristics of the original, such as text or photo, the size of the text, and
the darkness of the image.
Resolution settings
Resolution
Suggestion
Standard
Select this setting when your original consists of normal-sized text (like the text in this
manual).
Fine
Select this setting when your original has small text or diagrams with fine lines.
The original will be scanned at twice the resolution of the [Standard] setting.
Super Fine
Select this setting when your original has intricate pictures or diagrams.
A higher-quality image will be produced than with the [Fine] setting.
Ultra Fine
Select this setting when your original has intricate pictures or diagrams.
This setting gives the best image quality. However, transmission will take longer than with
the other settings.
Half Tone
Select this setting when your original is a photograph or has gradations of color (such as a
color original).
This setting will produce a clearer image than [Fine], [Super Fine], or [Ultra Fine] used alone.
Halftone cannot be selected when [Standard] is used.
• When using the automatic document feeder, the resolution setting cannot be changed once scanning has begun.
(However, when "Job Build" or "Preview Setting" in "Others" is used, the resolution can be changed each time a new set of
originals is inserted.)
• When a fax is sent at [Ultra Fine], [Super Fine], or [Fine] resolution, a lower resolution will be used if the receiving machine
does not have that resolution.
1
Tap the [Resolution] key.
2
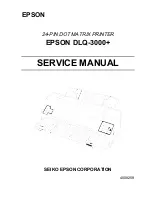
Tap the key of the desired resolution.
When your original is a photograph or has gradations of
color (such as a color original), and you wish to produce a
clearer image than [Fine], [Super Fine], or [Ultra Fine] used
alone, set the [Half Tone] checkbox to
. Halftone cannot
be selected when [Standard] is used.
After the settings are completed, tap
.
Original
Fine
Half Tone
(Original with shades of color)
Standard
Super Fine
Ultra Fine
Preview
CA
Start
Содержание MX-M905
Страница 130: ...1 127 BEFORE USING THE MACHINE PERIPHERAL DEVICES 4 Close the front cover ...
Страница 138: ...1 135 BEFORE USING THE MACHINE PERIPHERAL DEVICES 10 Push in the staple unit 11 Close the cover ...
Страница 147: ...1 144 BEFORE USING THE MACHINE PERIPHERAL DEVICES 3 Gently push the box back in 4 Close the front cover ...
Страница 151: ...1 148 BEFORE USING THE MACHINE PERIPHERAL DEVICES 3 Gently push the box back in 4 Close the front cover ...
Страница 331: ...3 17 PRINTER FREQUENTLY USED FUNCTIONS 1 Select Printer Features 2 Select Advanced1 3 Select Print Mode Mac OS 1 2 3 ...
Страница 956: ...2016K US1 ...


