6-19
[Ori
g
inal] key
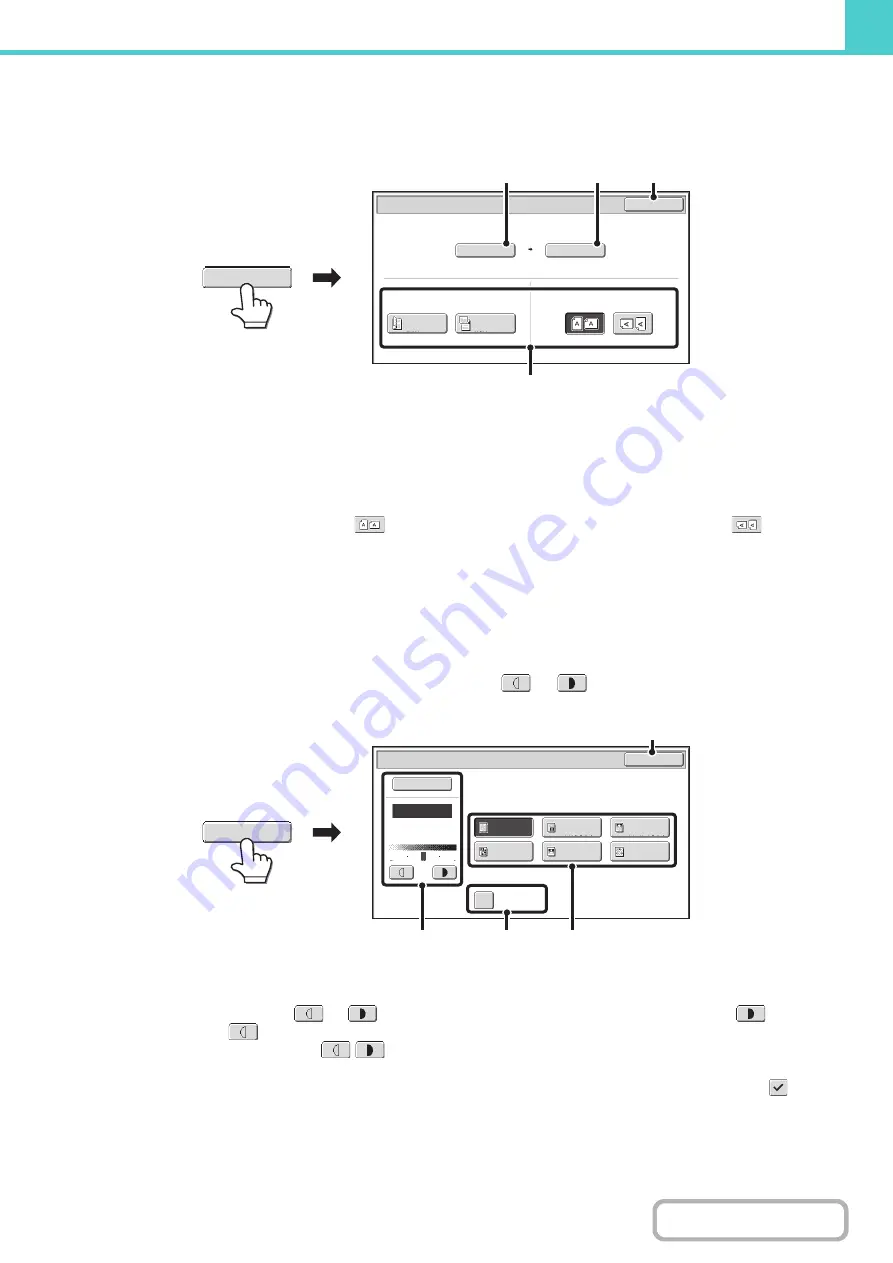
When the [Original] key is touched, the following screen appears. This screen is used to change the original size and
select scanning settings for 2-sided originals.
(1) Touch the [Scan Size] key.
If the original is a non-standard size that cannot be detected by auto original size detection, touch the [Scan Size] key and specify the original size.
(2) Touch the [Store Size] key.
If you wish to store the file at a different size than the original size, touch the [Store Size] key and change the store size.
(3) Touch the appropriate orientation key.
If the top edge of the original is up, touch the
key. If the top edge of the original is to the left, touch the
key.
If the original is a 2-sided original, touch the [2-Sided Booklet] key or the [2-Sided Tablet] key as appropriate for the original type.
(4) Touch the [OK] key.
The settings are stored and you return to the Scan to HDD screen.
[Exposure] key
To adjust the exposure, touch the [Exposure] key.
Select an appropriate exposure mode for the original and touch the
or
key to adjust the exposure level.
When finished, touch the [OK] key.
(1) Select the appropriate ori
g
inal type for the ori
g
inal to be scanned.
(2) Select [Auto] or [Manual].
If you selected [Manual], touch the
or
key to adjust the exposure. (For a darker image, touch the
key. For a
lighter image, touch the
key.)
When the exposure is set to [Auto], the
keys cannot be used.
(A): Moirè Reduction
To reduce the moirè effect when scanning printed matter, touch the [Moirè Reduction] checkbox so that a checkmark
appears.
(3) Touch the [OK] key.
The settings are stored and you return to the Scan to HDD screen.
Scan to HDD/Original
OK
Scan Size
Store Size
100%
2-Sided
Booklet
2-Sided
Tablet
Auto 8½x11
Auto
Image Orientation
(3)
(1)
(2)
(4)
Original
Scan to HDD/Exposure
OK
Manual
1
3
5
Text/
Prtd.Photo
Photo
Text/Photo
Map
Text
Printed
Photo
Moiré
Reduction
Auto
Original Image Type
(1)
(A)
(2)
(3)
Exposure
Summary of Contents for MX-M266N
Page 8: ...Assemble output into a pamphlet Create a stapled pamphlet Staple output Create a blank margin ...
Page 11: ...Conserve Print on both sides of the paper Print multiple pages on one side of the paper ...
Page 35: ...Organize my files Delete a file Delete all files Periodically delete files Change the folder ...
Page 259: ...3 19 PRINTER Contents 4 Click the Print button Printing begins ...


