5-131
4
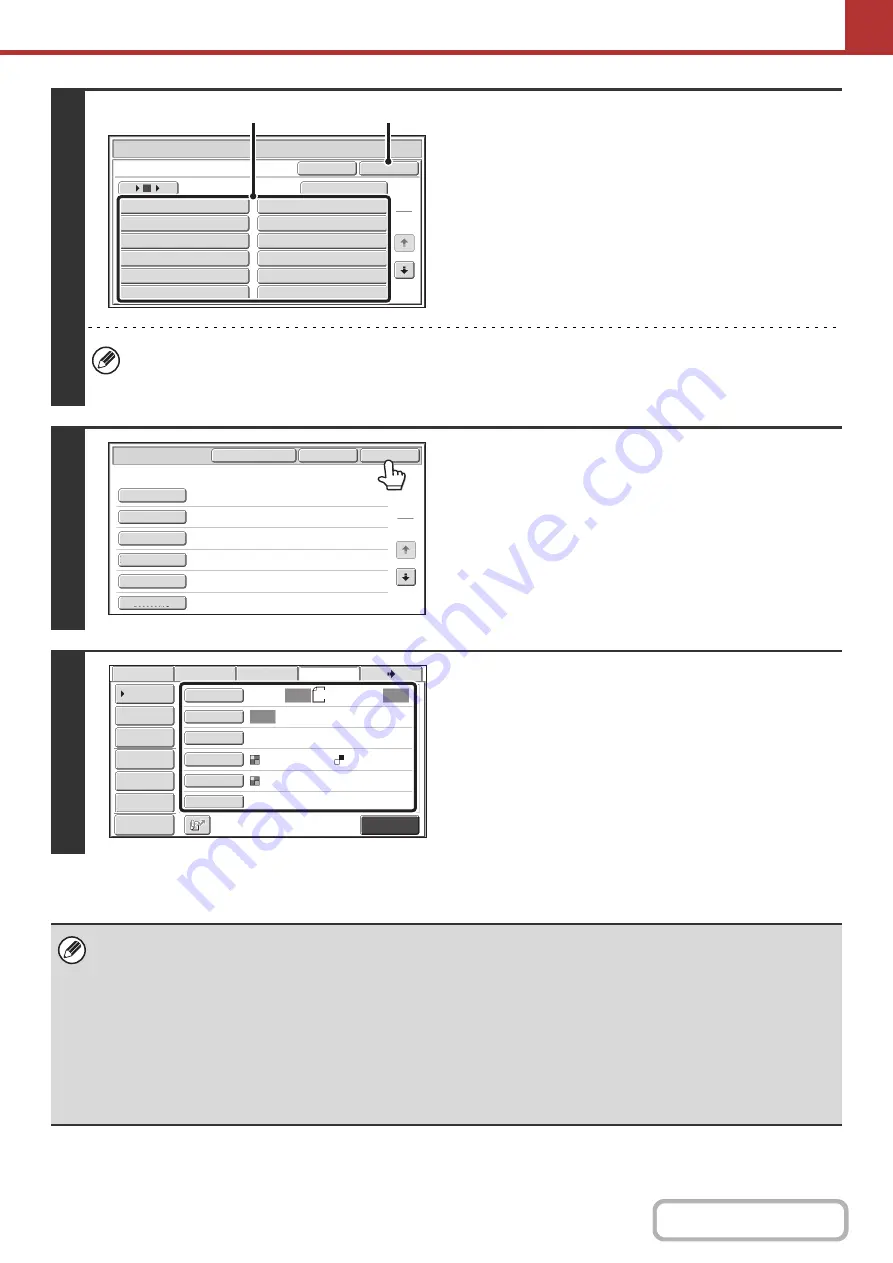
Enter the selected metadata item.
(1) Touch the key of the value that you wish to
enter.
• When the entry values of the metadata item are in the
form of selections, the selections are shown as keys.
When a value is editable, you can touch the [Direct
Entry] key to manually enter the value.
• If the metadata item requires the entry of text, a text
entry screen will appear. Enter the required information.
(2) Touch the [OK] key.
• To change the number of keys displayed in the screen, touch the number of displayed items selector key. Select 6,
12, or 18 keys.
• For the procedure for entering text, see "
" (page 1-59) in "1. BEFORE USING THE MACHINE".
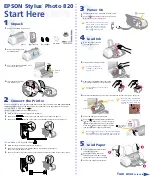
5
When you have finished enterin
g
all
items, touch the [OK] key.
6
Select ima
g
e settin
g
s and any other
settin
g
s, and perform the scan send
procedure.
• The procedures for selecting settings and performing
transmission are the same as in the other modes.
• To make changes to entered values, touch the [Metadata
Entry] key once again. The entry screen of the selected
metadata set will appear.
• Transmission cannot be performed if the [Data Entry] tab is displayed and no metadata settings have been configured. To
perform transmission without sending metadata, switch to a different mode by touching the tab of that mode and then
perform transmission.
• Before configuring metadata settings, you can specify addresses in all modes to be used. After metadata settings have
been configured, only addresses in modes that are allowed in the selected metadata set can be specified.
• When metadata settings have been configured or an address is specified in the [Data Entry] tab, it will not be possible to
switch to another mode.
• Metadata delivery is possible using the document filing function. The [Data Entry] tab appears in the transmission settings
screen of document filing mode to allow metadata delivery. In addition, metadata delivery using document filing can be
performed in [Document Operations] in the Web pages.
Data Entry
User ID
OK
Cancel
Direct Entry
1
2
Value 1
Value 2
Value 3
Value 4
Value 5
Value 6
Value 7
Value 8
Value 9
Value 10
Value 11
Value 12
6
18
12
(1)
(2)
Value 1
xxxx xxxx
xxxxxx
xxxxxx
xxxx xxxx
Data Entry
Set Name:Metadata 1
OK
Cancel
Metadata Set
1
2
appUserId
fromName
replyTo
appUserPassword
billCode1
documentPassword
Metadata Entry
Auto
Auto
Auto
File
Quick File
Send Settings
Address Entry
Address Book
Data Entry
Fax
Internet Fax
Special Modes
Color Mode
File Format
Resolution
Exposure
Original
Scan:
Scan
Send:
Text
200X200dpi
Auto/Grayscale
Mono2
Address Review
8½x11
Preview
Summary of Contents for MX-M266N
Page 8: ...Assemble output into a pamphlet Create a stapled pamphlet Staple output Create a blank margin ...
Page 11: ...Conserve Print on both sides of the paper Print multiple pages on one side of the paper ...
Page 35: ...Organize my files Delete a file Delete all files Periodically delete files Change the folder ...
Page 259: ...3 19 PRINTER Contents 4 Click the Print button Printing begins ...


