5-99
3
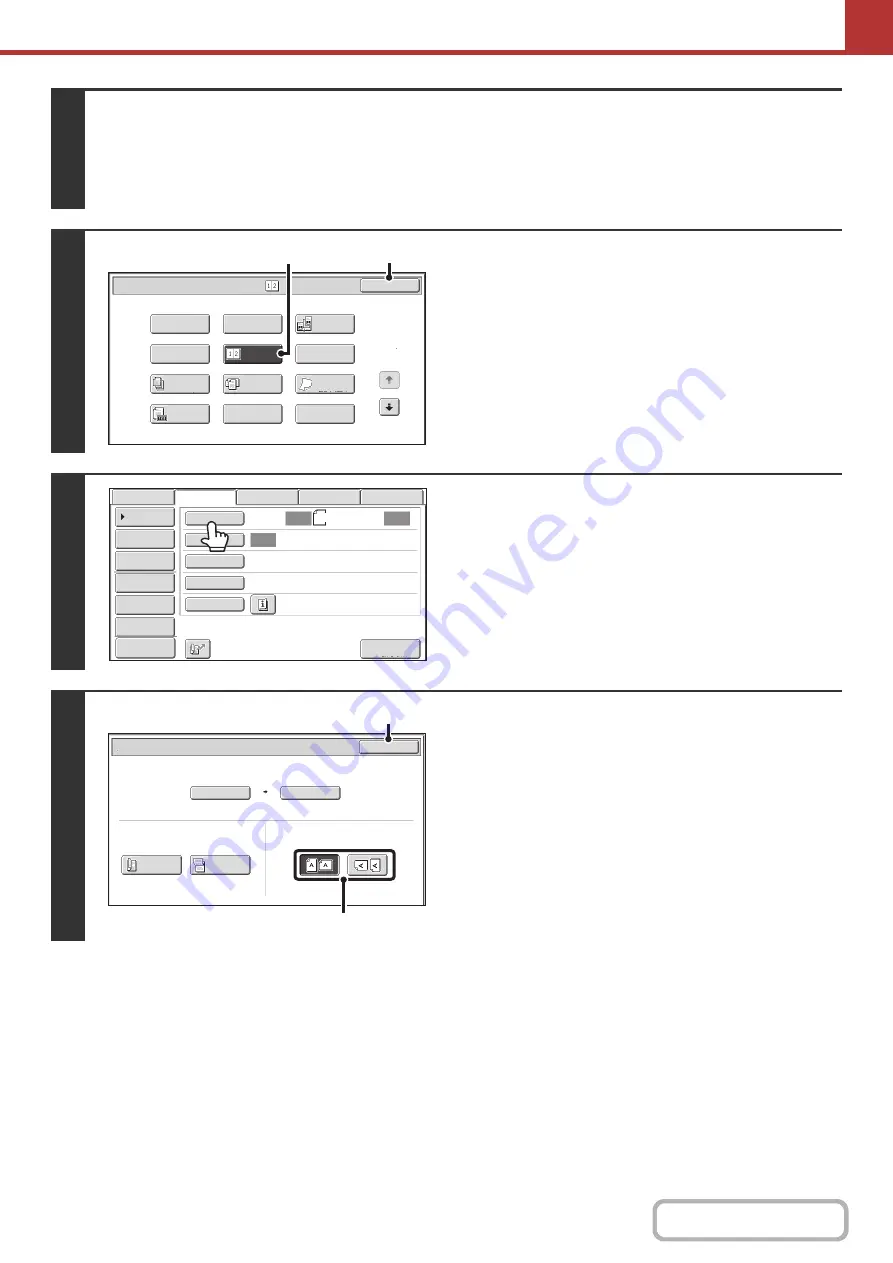
Select the special modes.
(1) Touch the [Internet Fax] tab.
(2) Touch the [Special Modes] key.
+
(page 5-71)
4
Select 2in1.
(1) Touch the [2in1] key so that it is
hi
g
hli
g
hted.
(2) Touch the [OK] key.
5
Touch the [Ori
g
inal] key.
6
Specify the orientation in which the
ori
g
inal is placed.
(1) Touch the "Ima
g
e Orientation" key with the
same orientation as the ori
g
inal ima
g
e.
If this setting is not correct, a suitable image may not be
transmitted.
(2) Touch the [OK] key.
1
2
2in1
Internet Fax/Special Modes
Card Shot
OK
Dual Page
Scan
Slow Scan
Mode
Quick File
Mixed Size
Original
Erase
Job
Build
File
Program
Timer
Original
Count
(2)
(1)
Auto
Auto
Auto
File
Quick
File
I
-
Fax
Manual
Reception
Address
Review
Send
Settings
Address
Entry
Address
Book
USB
Mem.
Scan
Fax
Internet
Fax
PC
Scan
Special
Modes
File
Format
Resolution
Exposure
Original
Scan
:
Scan
Send
:
200X100dpi
TIFF
-
F
8
½
x11
Preview
Internet Fax/Original
OK
2-Sided
Booklet
2-Sided
Tablet
Auto 8½x11
Scan Size
Send Size
100%
Auto
Image Orientation
(2)
(1)
Summary of Contents for MX-M266N
Page 8: ...Assemble output into a pamphlet Create a stapled pamphlet Staple output Create a blank margin ...
Page 11: ...Conserve Print on both sides of the paper Print multiple pages on one side of the paper ...
Page 35: ...Organize my files Delete a file Delete all files Periodically delete files Change the folder ...
Page 259: ...3 19 PRINTER Contents 4 Click the Print button Printing begins ...


