


February 2013
2-609
ColorQube® 9303 Family
OF 10
Status Indicator RAPs
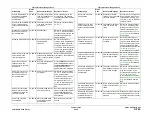
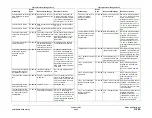
OF 10 Intermittent Failure RAP
Use this RAP to locate failures when no specific cause can be found, i.e. if the machine resets
to ‘Ready to scan your job’ or ‘Please wait’ during a print / copy run, or a fault code occurs
which cannot easily be repeated.
Initial Actions
WARNING
Ensure that the electricity to the machine is switched off while performing tasks that do
not need electricity. Refer to
GP 14
. Disconnect the power cord. Electricity can cause
death or injury. Moving parts can cause injury.
WARNING
Take care during this procedure. Sharp edges may be present that can cause injury.
Perform the following to gather additional information about the fault:
•
Ask the customer if there are any specific print / copier functions that cause the fault to
occur; e.g. using the input or output module, or making reduced images.
•
Enter Machine Status and check the active messages and the event log. If a fault code is
raised when the failure occurs, then go to the appropriate RAP.
•
Make copies and observe where the paper stops and which components are switched ON
or OFF when the failure occurs.
•
Check if there is a repeating pattern to the failure.
Procedure
Go to the relevant checkout:
•
Customer Power Supply Checkout
•
External Electrical Equipment Checkout
•
Common Causes Checkout
•
Connectors and Wiring Checkout
•
Power Supply Checkout
•
EPROMs Checkout
•
Electric Motors Checkout
•
Solenoids and Clutches Checkout
•
Switches and Sensors Checkout
•
Electrostatic Discharge Checkout
•
Paper Trays 1 to 5 Checkout
•
Output Device Checkout
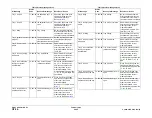
Customer Power Supply Checkout
WARNING
Take care when measuring AC mains (line) voltage. Electricity can cause death or injury.
CAUTION
If you suspect that the customer AC power is incorrect, DO NOT try to correct the customer
power. DO NOT reconnect the printer. Inform the customer and your manager.
•
Measure the customer power voltage at the power outlet and check that the customer
power is within specification. Refer to
GP 22
Electrical Power Requirements.
•
Check that the customer power does not drop below the specification when the copier is
making copies; use a digital meter and select “Peak Hold”. Refer to
GP 22
Electrical
Power Requirements.
External Electrical Equipment Checkout
WARNING
Take care when measuring AC mains (line) voltage. Electricity can cause death or injury.
CAUTION
If you suspect that the customer power is incorrect, DO NOT try to correct the customer power.
DO NOT reconnect the machine. Inform the customer and your manager.
Perform the following:
•
Ask the customer if there is any electrical equipment, which uses a large amount of cur-
rent, that is connected to the same supply circuit as the machine.
•
With the customer's assistance, check if the failure occurs when electrical equipment near
to the machine is switched ON or OFF.
•
If possible, connect the machine to a different supply circuit from the equipment that is
causing the problem.
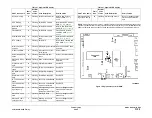
Common Causes Checkout
Make the following checks of common causes of intermittent failures:
•
Check for intermittent connections in the wiring to the LED exposure lamp.
•
Check that the front door interlock switch is fully actuated by the front door interlock actu-
ator. If the fault is eliminated when an interlock cheater is installed, check that the inter-
lock actuator is not damaged. Install new parts as necessary.
•
Check that the chassis fan,
PL 3.11 Item 5
is working correctly. Refer to
OF 6
Fans and
Air Systems RAP.
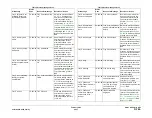
Connectors and Wiring Checkout
Refer to
REP 1.1
for details of wiring harness repair.
Check the following:
•
Visible signs of damage to the wiring and the ribbon cables. Especially check wiring to
components that move.
•
Check for pinched wires near moving parts.
•
The DADH module harness for broken wiring and ensure that the earth terminals are
secure.
•
To check for wire breaks inside insulation, gently pull the relevant connector and wire
while measuring continuity.
•
Check that all the PWB and in-line connections are good; refer to
PJ Locations
.
•
Check the continuity of the ground connections to the input and output modules.
•
Check that all the input and output module static eliminators are connected correctly and
in good condition; refer to the relevant input or output module RAP.
Power Supply Checkout
Check the power cord for continuity.
EPROMs Checkout
Check that the NVM module PWB, EPC memory PWB and system memory PWB are installed
correctly. If necessary, reseat or install new components,
PL 3.11
.
Summary of Contents for ColorQube 9303 Series
Page 1: ...Xerox ColorQube 9303 Family Service Manual 708P90290 February 2013...
Page 4: ...February 2013 ii ColorQube 9303 Family Introduction...
Page 18: ...February 2013 1 2 ColorQube 9303 Family Service Call Procedures...
Page 92: ...February 2013 2 68 ColorQube 9303 Family 05F Status Indicator RAPs...
Page 104: ...February 2013 2 80 ColorQube 9303 Family 12 701 00 65 Status Indicator RAPs...
Page 200: ...February 2013 2 176 ColorQube 9303 Family 12N 171 Status Indicator RAPs...
Page 292: ...February 2013 2 268 ColorQube 9303 Family 16D Status Indicator RAPs...
Page 320: ...February 2013 2 296 ColorQube 9303 Family 42 504 00 42 505 00 Status Indicator RAPs...
Page 500: ...February 2013 2 476 ColorQube 9303 Family 94B Status Indicator RAPs...
Page 648: ...February 2013 3 2 ColorQube 9303 Family Image Quality...
Page 653: ...February 2013 3 7 ColorQube 9303 Family IQ 1 Image Quality Figure 1 IQ defects 1...
Page 654: ...February 2013 3 8 ColorQube 9303 Family IQ 1 Image Quality Figure 2 IQ defects 2...
Page 655: ...February 2013 3 9 ColorQube 9303 Family IQ 1 Image Quality Figure 3 IQ defects 3...
Page 656: ...February 2013 3 10 ColorQube 9303 Family IQ 1 Image Quality Figure 4 IQ defects 4...
Page 657: ...February 2013 3 11 ColorQube 9303 Family IQ 1 Image Quality Figure 5 IQ defects 5...
Page 658: ...February 2013 3 12 ColorQube 9303 Family IQ 1 Image Quality Figure 6 IQ defects 6...
Page 660: ...February 2013 3 14 ColorQube 9303 Family IQ 1 Image Quality Figure 9 IQ defects 9...
Page 661: ...February 2013 3 15 ColorQube 9303 Family IQ 1 Image Quality Figure 10 IQ defects 10...
Page 662: ...February 2013 3 16 ColorQube 9303 Family IQ 1 Image Quality Figure 11 IQ defects 11...
Page 663: ...February 2013 3 17 ColorQube 9303 Family IQ 1 Image Quality Figure 12 IQ defects 12...
Page 664: ...February 2013 3 18 ColorQube 9303 Family IQ 1 Image Quality Figure 13 IQ defects 13...
Page 728: ...February 2013 3 82 ColorQube 9303 Family IQ 29 IQ 30 Image Quality...
Page 736: ...February 2013 3 90 ColorQube 9303 Family TP 15 Image Quality Figure 2 Media path test pages...
Page 758: ...February 2013 3 112 ColorQube 9303 Family IQS 7 IQS 8 Image Quality...
Page 778: ...February 2013 4 20 ColorQube 9303 Family REP 1 9 Repairs Adjustments...
Page 794: ...February 2013 4 36 ColorQube 9303 Family REP 3 10 Repairs Adjustments...
Page 1144: ...February 2013 4 386 ColorQube 9303 Family REP 94 1 Repairs Adjustments...
Page 1176: ...February 2013 4 418 ColorQube 9303 Family ADJ 62 3 ADJ 62 4 Repairs Adjustments...
Page 1182: ...February 2013 4 424 ColorQube 9303 Family ADJ 75 3 Repairs Adjustments...
Page 1184: ...February 2013 4 426 ColorQube 9303 Family ADJ 82 1 Repairs Adjustments...
Page 1186: ...February 2013 4 428 ColorQube 9303 Family ADJ 91 1 Repairs Adjustments...
Page 1552: ...February 2013 6 260 ColorQube 9303 Family dC140 General Procedures Information...
Page 1576: ...February 2013 6 284 ColorQube 9303 Family dC640 General Procedures Information...
Page 1578: ...February 2013 6 286 ColorQube 9303 Family dC708 dC715 General Procedures Information...
Page 1600: ...February 2013 7 2 ColorQube 9303 Family Wiring Data...
Page 1696: ...February 2013 8 2 ColorQube 9303 Family Principles of Operation...
Page 1808: ...February 2013 8 114 ColorQube 9303 Family Principles of Operation...
Page 1809: ...XEROX EUROPE...
Page 1810: ...XEROX EUROPE...
Page 1811: ...XEROX EUROPE...
Page 1812: ...XEROX EUROPE...