


February 2013
6-290
ColorQube® 9303 Family
dC967, dC968
General Procedures/Information
dC967 Head to Drum Spacing Check
Purpose
To check the head to drum spacing. The procedure checks for contact between each printhead
and the drum.
This check will run automatically if a new printhead serial number is detected during power-up.
The dc967 window will not be present, but a status message will reflect this check is taking
place.
If a printhead is reinstalled (not replaced) in the same position on a carriage, the machine will
not recognize it as new during power-up, and this check will not automatically occur. To prevent
carriages from automatically docking during power-up, boot the machine directly into IME
Diagnostics Mode,
GP 1
and then proceed to step 1 anytime a printhead has been reinstalled.
Procedure
The procedure normally takes approximately 7 - 10 minutes to run and cannot be stopped once
in operation.
NOTE: The dC967 routine will stop if potential printhead to drum contact is detected. If poten-
tial printhead to drum contact is identified, perform
ADJ 91.1
Printhead Attachment Check.
Perform the following:
1.
Boot the machine directly into IME Diagnostics Mode,
GP 1
.
2.
Select the Diagnostics tab.
3.
Select dC967 Head to Drum Spacing Check.
4.
Select Start. The following sequence of events are controlled by the IME:
•
The IME brings the printhead and drum to operating temperature.
•
The drum is stopped.
•
Both the upper and lower carriage assemblies are placed into the docked position.
•
The upper carriage assembly is parked while the lower carriage is docked and the
process is reversed.
•
Once the temperature measurements are complete, the IME will move the carriage
assemblies into the parked position.
•
Results are reported:
–
Passed.
–
Head to Drum Spacing Check Failed.
5.
Select Start to repeat the process or Close to exit the procedure.
6.
Select Close to return to the service mode window.
7.
Select Call Closeout to exit service mode.
dC968 Head Purge
Purpose
To force ink through all jets on the selected printheads.
Initial Actions
Before running this routine check the following:
•
Sufficient ink must be available for each colour.
•
The waste tray must not be full.
•
A4 or letter size paper should be loaded.
•
The IME is ready to print.
NOTE: All test prints should be printed long edge feed.
Procedure
1.
Enter service mode,
GP 1
.
2.
Select the Maintenance tab.
3.
Select dC968 Head Purge.
The dC968 Head Purge window opens. Follow the on screen instructions.
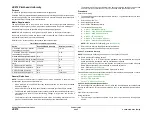
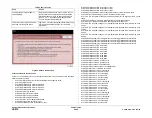
NOTE: The main head purge screen has 3 selectable routines:
•
Jet test pages (
TP 21
)
•
Cleaning pages (
TP 22
)
•
Purge head routine
4.
Select Jet Test Pages. The machine will run the jet test routine which will print 2 pages for
each colour.
NOTE: Before printing the jet test page, ensure that A4 or 8.5 x11 inch plain paper is
loaded LEF into tray 4. Use the best quality media available. Do not use hole punched
paper.
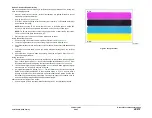
5.
Use the jet test pages to identify any defective heads. Refer to
TP 21
Jet Test Pages to
interpret the jet test output.
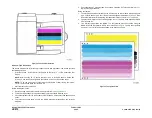
CAUTION
Empty the waste tray before purging the heads. When the waste tray has been emptied touch
the Reset Waste Counter button.
6.
Select head 1, 2, 3 or 4 from the Purge Heads buttons and touch the Purge button to start
the purge routine.
NOTE: The Head Purge routine takes from 4 to 8 minutes depending on the number of
heads selected.
When the heads have finished purging the machine will run a cleaning page for the
purged heads. Depending on the number of heads purged the machine will print 1 or 2
cleaning pages with 2 heads cleaned on each page.
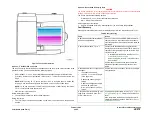
7.
Select Jet Test Pages.
The machine will run the jet test routine which will print 2 pages for each colour.
8.
Inspect the Jet Test Pages. If a defect is found repeat the procedure.
9.
Select Close to return to the maintenance window.
10. Select Call Closeout.
Summary of Contents for ColorQube 9303 Series
Page 1: ...Xerox ColorQube 9303 Family Service Manual 708P90290 February 2013...
Page 4: ...February 2013 ii ColorQube 9303 Family Introduction...
Page 18: ...February 2013 1 2 ColorQube 9303 Family Service Call Procedures...
Page 92: ...February 2013 2 68 ColorQube 9303 Family 05F Status Indicator RAPs...
Page 104: ...February 2013 2 80 ColorQube 9303 Family 12 701 00 65 Status Indicator RAPs...
Page 200: ...February 2013 2 176 ColorQube 9303 Family 12N 171 Status Indicator RAPs...
Page 292: ...February 2013 2 268 ColorQube 9303 Family 16D Status Indicator RAPs...
Page 320: ...February 2013 2 296 ColorQube 9303 Family 42 504 00 42 505 00 Status Indicator RAPs...
Page 500: ...February 2013 2 476 ColorQube 9303 Family 94B Status Indicator RAPs...
Page 648: ...February 2013 3 2 ColorQube 9303 Family Image Quality...
Page 653: ...February 2013 3 7 ColorQube 9303 Family IQ 1 Image Quality Figure 1 IQ defects 1...
Page 654: ...February 2013 3 8 ColorQube 9303 Family IQ 1 Image Quality Figure 2 IQ defects 2...
Page 655: ...February 2013 3 9 ColorQube 9303 Family IQ 1 Image Quality Figure 3 IQ defects 3...
Page 656: ...February 2013 3 10 ColorQube 9303 Family IQ 1 Image Quality Figure 4 IQ defects 4...
Page 657: ...February 2013 3 11 ColorQube 9303 Family IQ 1 Image Quality Figure 5 IQ defects 5...
Page 658: ...February 2013 3 12 ColorQube 9303 Family IQ 1 Image Quality Figure 6 IQ defects 6...
Page 660: ...February 2013 3 14 ColorQube 9303 Family IQ 1 Image Quality Figure 9 IQ defects 9...
Page 661: ...February 2013 3 15 ColorQube 9303 Family IQ 1 Image Quality Figure 10 IQ defects 10...
Page 662: ...February 2013 3 16 ColorQube 9303 Family IQ 1 Image Quality Figure 11 IQ defects 11...
Page 663: ...February 2013 3 17 ColorQube 9303 Family IQ 1 Image Quality Figure 12 IQ defects 12...
Page 664: ...February 2013 3 18 ColorQube 9303 Family IQ 1 Image Quality Figure 13 IQ defects 13...
Page 728: ...February 2013 3 82 ColorQube 9303 Family IQ 29 IQ 30 Image Quality...
Page 736: ...February 2013 3 90 ColorQube 9303 Family TP 15 Image Quality Figure 2 Media path test pages...
Page 758: ...February 2013 3 112 ColorQube 9303 Family IQS 7 IQS 8 Image Quality...
Page 778: ...February 2013 4 20 ColorQube 9303 Family REP 1 9 Repairs Adjustments...
Page 794: ...February 2013 4 36 ColorQube 9303 Family REP 3 10 Repairs Adjustments...
Page 1144: ...February 2013 4 386 ColorQube 9303 Family REP 94 1 Repairs Adjustments...
Page 1176: ...February 2013 4 418 ColorQube 9303 Family ADJ 62 3 ADJ 62 4 Repairs Adjustments...
Page 1182: ...February 2013 4 424 ColorQube 9303 Family ADJ 75 3 Repairs Adjustments...
Page 1184: ...February 2013 4 426 ColorQube 9303 Family ADJ 82 1 Repairs Adjustments...
Page 1186: ...February 2013 4 428 ColorQube 9303 Family ADJ 91 1 Repairs Adjustments...
Page 1552: ...February 2013 6 260 ColorQube 9303 Family dC140 General Procedures Information...
Page 1576: ...February 2013 6 284 ColorQube 9303 Family dC640 General Procedures Information...
Page 1578: ...February 2013 6 286 ColorQube 9303 Family dC708 dC715 General Procedures Information...
Page 1600: ...February 2013 7 2 ColorQube 9303 Family Wiring Data...
Page 1696: ...February 2013 8 2 ColorQube 9303 Family Principles of Operation...
Page 1808: ...February 2013 8 114 ColorQube 9303 Family Principles of Operation...
Page 1809: ...XEROX EUROPE...
Page 1810: ...XEROX EUROPE...
Page 1811: ...XEROX EUROPE...
Page 1812: ...XEROX EUROPE...