Brivo OEC 715/785/865/865 Mobile C-Arm X-Ray Product Service Manual
2-12
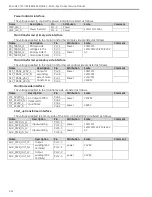
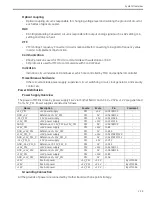
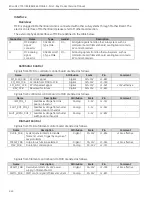
Power Indicator interface
The voltages used to control the power indicator are listed as follows.
Name
Description
Pin
Attribution
Scale
Comment
PWR_LED_L
Power indicator
PJ1-5
Power
100/110/120VAC
PWR_LED_N
PJ1-6
Power
Main transformer primary side interface
The voltages applied to the main transformer primary side are listed as follows.
Name
Description
Pin
Attribution
Scale
Comment
PRI_TRANS_L1
PDU provide
voltages to the
primary side of
main transformer
PJ7-1
Power
100/110/
120/200/220/230/240V
AC
PRI_TRANS_N1
PJ7-2
PRI_TRANS_L2
PJ7-3
Power
PRI_TRANS_N2
PJ7-4
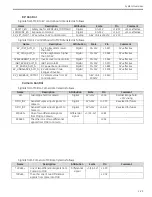
Main transformer secondary side interface
The voltages applied to the main transformer secondary side are listed as follows.
Name
Description
Pin
Attribution
Scale
Comment
SEC_TRANS_220V_L
Output of
secondary
side of main
transformer
PJ2-3
Power
100/110/
120/200/
220/230/
240VAC
SEC_TRANS_220V_N
PJ2-6
SEC_TRANS_28V_L
PJ2-1
Power
SEC_TRANS_28V_N
PJ2-4
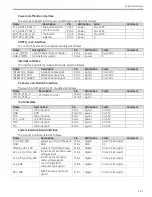
Mainframe side interface
The voltages applied to the mainframe side are listed as follows.
Name
Description
Pin
Attribution
Scale
Comment
MF_AC220V_L
AC Output of PDU
delivered to
mainframe
PJ6-4
power
220VAC
MF_AC220V_N
PJ6-5
MF_AC28V_L
PJ6-1
power
28VAC
MF_AC28V_N
PJ6-2
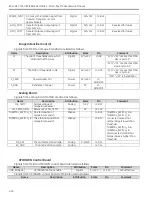
Start_up transformer interface
The voltages applied to primary side of the start_up transformer are listed as follows.
Name
Description
Pin
Attribution
Scale
Comment
AUX_PWR_IN_L1
Input winding
PJ13-1
power
100/110/
120/200/220/230/240V
AC
AUX_PWR_IN_N1
PJ13-4
AUX_PWR_IN_L2
Input winding
PJ13-3
power
AUX_PWR_IN_N2
PJ13-6
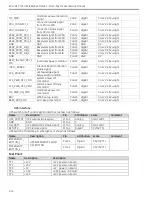
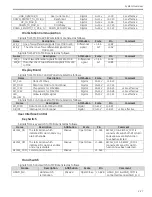
Name
Description
Pin
Attribution
Scale
Comment
AUX_PWR_OUT_L1
Output
winding (24V
normaly)
PJ12-1
power
24VAC
AUX_PWR_OUT_N1
PJ12-3
AUX_PWR_OUT_L2
Output
winding (24V
normaly)
PJ12-2
power
24VAC
AUX_PWR_OUT_N2
PJ12-4
Содержание Brivo OEC 715
Страница 2: ......
Страница 19: ...Chapter1 Introduction and Safety...
Страница 41: ...Introduction and Safety 23 46 54 20 18 26...
Страница 55: ...Chapter2 System Overview...
Страница 137: ...Chapter3 Installation...
Страница 147: ...Installation 3 11 7 Put the ramp in position Release all bracket and move the workstation along the ramp off the pallet...
Страница 211: ...Installation 3 75 3 9 Reporting For U S Systems Complete and submit Form 2579 within 15 days of installation...
Страница 212: ...Chapter4 Calibration...
Страница 223: ...Brivo OEC 715 785 865 Mobile C Arm X Ray Product Service Manual 4 12 Mainframe Control Board TP7...
Страница 231: ...Brivo OEC 715 785 865 Mobile C Arm X Ray Product Service Manual 4 20 Mainframe Control Board TP17 POT4 J5 TP7 POT7 POT5...
Страница 275: ...Brivo OEC 715 785 865 Mobile C Arm X Ray Product Service Manual 4 64...
Страница 284: ...Chapter5 Software...
Страница 312: ...Software 5 29 4 Click Next 5 Click Install 6 Click Finish button to complete installation procedure...
Страница 326: ...Software 5 43 2 Click on install to continue 3 Click Next to continue...
Страница 335: ...Chapter6 Troubleshooting...
Страница 408: ...Chapter7 Replacement...
Страница 418: ...Replacement 7 11 166...
Страница 488: ...Chapter8 Periodic Maintenance...
Страница 502: ...Periodic Maintenance 8 15...
Страница 505: ...Chapter9 Technical Reference...
Страница 520: ...Brivo OEC 715 785 865 Mobile C Arm X Ray Product Service Manual 9 16 Lateral configuration 1 5m Lateral configuration 1m...
Страница 521: ...Technical Reference 9 17 Vertical configuration 1 5m Vertical configuration 1m...
Страница 526: ...11 Appendix System Schematics...

