Brivo OEC 715/785/865/865 Mobile C-Arm X-Ray Product Service Manual
2-64
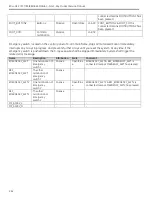
Mother Board
Collimator
MCB
CCB
SPI
Command
Position
Drive
Position
Ref voltage
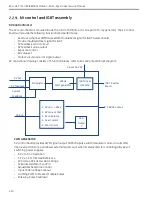
There is an independent control loop working for each motion. The negative feedback control loop is used.
E.g. for iris control, the following steps will be operated:
a)
Firmware in MCB sends a command to CCB by SPI bus to tell the required position of iris.
b)
CCB receives the command and compares it with the feedback position signal coming from the
Collimator. A PI operation is performed and works out the control signal. The signal is converted to drive
voltage by a power amplifier and sends to collimator.
c)
The drive voltage drives iris motor moving and the position feedback will be closer to command. So the
difference between command and feedback will reduce. The drive voltage returns almost zero while the
feedback is very close to the command. The control loop is finished.
Collimator control subsystem works in following situations.
a)
Move the iris and shutter to default position for each Mag mode. The default position is sent to
Collimator Control Board in one command.
b)
Move the iris and shutter to default position for film mode and return to last position while recovering
from the film mode. The default or last positions is sent to CCB in one command.
c)
Follow the operation of collimator from control panel. And the initial collimator position in each Mag is
the calculated result in collimator calibration recorded by system.
Image Intensifier
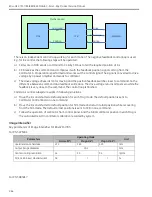
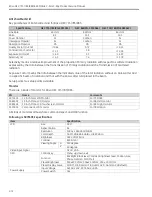
Key parameters of Image Intensifier for Brivo715/785:
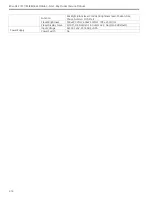
For PN 5075001:
Parameters
Operating Mode
Unit
Normal(9”)
Magn.1(6”)
Magn.2(4.5”)
Useful entrance field size
215
160
120
mm
Output image diameter
20.2
mm
Center Limiting resolution
44
50
54
lp/cm
DQE at 59.5 keV- absolute (IEC)
58
/
/
%
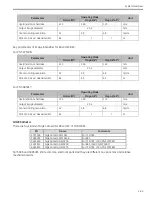
For PN 5085917:
Содержание Brivo OEC 715
Страница 2: ......
Страница 19: ...Chapter1 Introduction and Safety...
Страница 41: ...Introduction and Safety 23 46 54 20 18 26...
Страница 55: ...Chapter2 System Overview...
Страница 137: ...Chapter3 Installation...
Страница 147: ...Installation 3 11 7 Put the ramp in position Release all bracket and move the workstation along the ramp off the pallet...
Страница 211: ...Installation 3 75 3 9 Reporting For U S Systems Complete and submit Form 2579 within 15 days of installation...
Страница 212: ...Chapter4 Calibration...
Страница 223: ...Brivo OEC 715 785 865 Mobile C Arm X Ray Product Service Manual 4 12 Mainframe Control Board TP7...
Страница 231: ...Brivo OEC 715 785 865 Mobile C Arm X Ray Product Service Manual 4 20 Mainframe Control Board TP17 POT4 J5 TP7 POT7 POT5...
Страница 275: ...Brivo OEC 715 785 865 Mobile C Arm X Ray Product Service Manual 4 64...
Страница 284: ...Chapter5 Software...
Страница 312: ...Software 5 29 4 Click Next 5 Click Install 6 Click Finish button to complete installation procedure...
Страница 326: ...Software 5 43 2 Click on install to continue 3 Click Next to continue...
Страница 335: ...Chapter6 Troubleshooting...
Страница 408: ...Chapter7 Replacement...
Страница 418: ...Replacement 7 11 166...
Страница 488: ...Chapter8 Periodic Maintenance...
Страница 502: ...Periodic Maintenance 8 15...
Страница 505: ...Chapter9 Technical Reference...
Страница 520: ...Brivo OEC 715 785 865 Mobile C Arm X Ray Product Service Manual 9 16 Lateral configuration 1 5m Lateral configuration 1m...
Страница 521: ...Technical Reference 9 17 Vertical configuration 1 5m Vertical configuration 1m...
Страница 526: ...11 Appendix System Schematics...

