


Chapter 64 DHCP
XS3800-28 User’s Guide
474
The following table describes the labels in this screen.
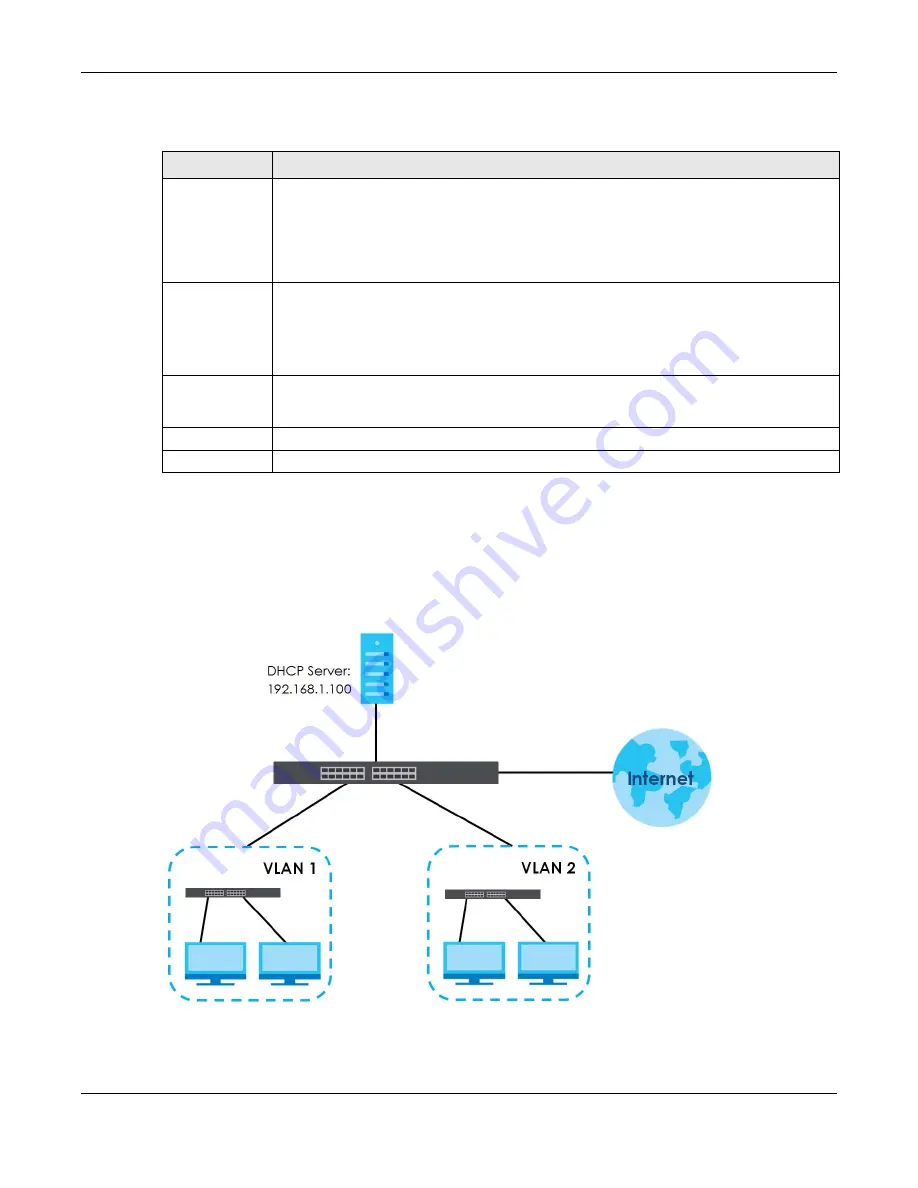
64.5.2 DHCP Smart Relay Configuration Example
The follow figure shows a network example where the Switch is used to relay DHCP requests for the
VLAN1
and
VLAN2
domains. There is only one DHCP server that services the DHCP clients in both
domains.
Figure 366
DHCP Smart Relay Network Example
Configure the
NETWORKING
>
DHCP
>
DHCPv4 Relay
>
DHCP Smart Relay
screen as shown. Make sure
you select a DHCP option 82 profile (
default1
in this example) to set the Switch to send additional
information (such as the VLAN ID) together with the DHCP requests to the DHCP server. This allows the
Table 242 NETWORKING > DHCP > DHCPv4 Relay > DHCP Smart Relay > Add/Edit
LABEL
DESCRIPTION
Port
Enter the number of ports to which you want to apply the specified DHCP option 82 profile.
You can enter multiple ports separated by (no space) comma (,) or hyphen (-) for a range. For
example, enter “3-5” for ports 3, 4, and 5. Enter “3,5,7” for ports 3, 5, and 7.
In Stacking mode, the first number represents the slot and the second the port number. Enter 1/
1-1/24,2/28 for ports 1 to 24 for the Switch in slot 1 and port 28 for the Switch in slot 2, for example.
Option 82 Profile
Select a pre-defined DHCP option 82 profile that the Switch applies to the specified ports. The
Switch adds the Circuit ID sub-option and/or Remote ID sub-option specified in the profile to
DHCP requests that it relays to a DHCP server.
The profile you select here has priority over the one you select in the
NETWORKING
>
DHCP
>
DHCPv4 Relay
>
DHCPv4 Smart Relay
screen.
Apply
Click
Apply
to save your changes to the Switch’s run-time memory. The Switch loses these
changes if it is turned off or loses power, so use the
Save
link on the top navigation panel to save
your changes to the non-volatile memory when you are done configuring.
Clear
Click
Clear
to clear the fields to the factory defaults.
Cancel
Click
Cancel
to not save the configuration you make and return to the last screen.
Summary of Contents for XS3800-28
Page 29: ...29 PART I User s Guide...
Page 54: ...54 PART II Technical Reference...
Page 88: ...Chapter 4 Web Configurator XS3800 28 User s Guide 88 Figure 51 Online Web Help...
Page 148: ...Chapter 20 Cloud Management XS3800 28 User s Guide 148 Figure 94 SYSTEM Cloud Management...
Page 263: ...Chapter 36 OAM XS3800 28 User s Guide 263 Figure 182 PORT OAM OAM Status OAM Details...
Page 540: ...Chapter 72 VRRP XS3800 28 User s Guide 540 Figure 434 VRRP Example 2 VRRP Status on Switch B...
Page 581: ...Chapter 77 Policy Rule XS3800 28 User s Guide 581 Figure 456 Policy Example...