4: C
on
fig
uri
ng G
PI
O •
41
©2016 Axia Audio- Rev 1.8.1
Chapter Four:
Configuring GPIO
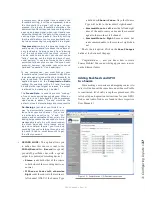
Since the days of rotary-switch source selectors, it’s
been a challenge to properly route machine logic along
with audio. Some complicated schemes have been de-
vised over the years, but broadcasters wanted a simple,
fast way to associate logic with audio in a routable en-
vironment.
Since the Axia IP-Audio system was designed as a
true computer network, we were able to start with a clean
sheet of paper to design the first truly routable machine
logic/audio interface. Unlike conventional logic connec-
tions which require each command circuit to be wired
individually, Axia sends machine controls over the same
Ethernet your audio travels on, further reducing infra-
structure, cost and tedium.
Along with controlling external audio devices,
Element’s GPIO (General Purpose Input/Output) inter-
face also includes logic commands for routine studio/
control room operations such as tally lights, monitor
muting, On-Air lights and more.
The last chapter explained source profiles and
showed you how you can associate GPIO with a source.
This chapter explains how to set up Element or Power-
Station GPIO to handle these functions. We also invite
you to read the GPIO Node User’s Manual, for more in-
depth information on the topic of GPIO.
Note: The Element console can be used with:
- a combination 8-port GPIO Node/PSU that
also contains the Element CPU
- a PowerStation that includes four GPIO ports
- one or more standalone 8-port GPIO node.
These units are all convection cooled, and we
strongly recommend that when rack-mounting
these units, you leave at least 1RU of space
above and below to ensure adequate ventila-
tion.
GPIO Port Definitions
Each Axia GPIO device has either four or eight DB-
15 connectors on its back panel. Each connector (also
known as a GPIO port) can be associated with a device
in your studio, and provides five opto-isolated inputs and
five opto-isolated outputs per device for machine control,
lamp drives and remote channel controls. GPIO ports
can also be monitored and controlled by our Pathfind-
erPC software.
GPIO ports are programmed to support several dif-
ferent types of devices. How does a GPIO port “know”
which type of device is assigned to it?
Back in Chapter 3, when you constructed a Source
Profile for a telephone hybrid, you defined the source
type (see “Adding Backfeeds and GPIO to a Source Pro-
file” in Chapter 3). This is important, because when that
source is assigned to a console fader, Element uses this
Source Profile selection to tell the GPIO Node what sort
of command to send to the attached device.
If Element “sees” in the Source Profile that the as-
signed device is a microphone, it tells the GPIO Node to
send logic for
On, Off, Remote Mute
and Remote
Talk
commands on the appropriate pins. If it “sees” a line
input, it tells the GPIO Node to send
Start, Stop
and
Reset
commands, plus closures for
Ready
lights, etc.
Axia GPIO ports can deliver unique command sets
for the following types of devices:
1. Microphone (Operator, Guest or Producer)
2. Line Input
3. Codec
4. Telephone Hybrid
5. Computer Playback Device
6. Control Room Monitor
7. Studio Monitor
8. Profanity Delay Device
9. Recording Device
10. Accessory Button Panel Device
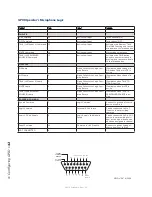
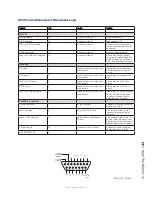
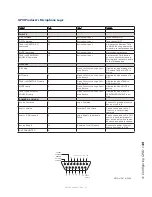
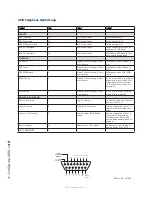
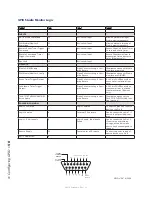
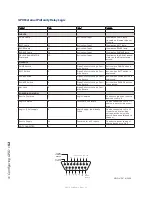
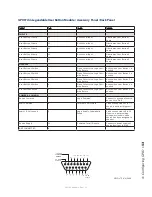
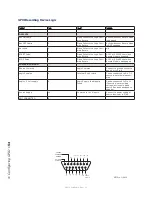
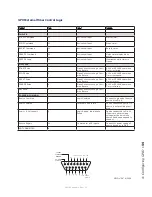
The next few pages contain tables that explain what
function the pins provide in each different device mode.
Содержание element v.2.0
Страница 100: ...5 Element Operations 90 2016 Axia Audio Rev 1 8 1 Capital budget may you never decrease for we need new test gear...
Страница 149: ...Appendix A Specifications 139 2016 Axia Audio Rev 1 8 1...
Страница 183: ...Warranty 173 2016 Axia Audio Rev 1 8 1 TCP IP How did we live without thee Analogicly...
Страница 184: ...THIS PAGE INTENTIONALLY LEFT BLANK...
Страница 185: ...THIS PAGE INTENTIONALLY LEFT BLANK...

