7:
Vi
rtu
al
Mi
xe
r •
10
5
©2016 Axia Audio- Rev 1.8.1
tion is not clear, please review material in Chapter 3
on backfeeds and mix-minus earlier in this manual to
understand what these terms mean.)
•
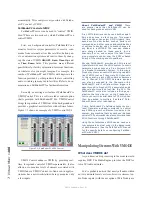
Status/Audio:
These are status fields;
OK
is shown
for valid streams and
ERR
for invalid streams (usu-
ally, an invalid stream error indicates a duplicate or
missing source - double-check your Channel Num-
ber entries). The
Audio
box provides a snapshot of
the audio level with color indicator. Since this indica-
tor is not Java-enabled, it is not dynamically updat-
ed. You will need to refresh your browser to observe
changes in level.
•
Enable:
Turns the input channel
ON
or
OFF;
the
boxes just below provide an option to set the “fade
up” and “fade down” times.
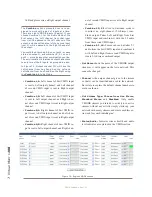
• Fade Time: These two fields contain time values
that control the rate in which the audio goes from
OFF to ON and visa versa. If the source is off, gain
is negative infinity (not adjustable, just a law of na-
ture). When the source goes ON, the time in which
the audio adjusts form OFF to ON (the gain value set
in the first field) is the “Up time”. It the field is set to
1 second, the audio will “fade up” to the gain value
in 1 second. If the field is set to 0, the audio will have
no fade period and simply just turn on at the gain
value specified. The second field controls the ON to
OFF fade time. This function can be used to create
cross fades between sources when PathfinderPC is
dynamically making changes to the VMIX based on
conditions met.
•
Gain:
You’ll find a Master gain setting for the Sub-
mix (the mix of all five inputs) at the top of this col-
umn, followed by individual gain settings for each
input that establish the gain for the input when it is
in the
ON
state.
•
Out Name:
This column shows the name of the
stream as it will appear when viewed in source as-
signment boxes elsewhere on the network.
•
Channel
(the 2nd instance of it)
:
Assigns a chan-
nel number to the VMIX output which is a Livewire
source. Just as each audio source from an Audio Node
and each mix and monitor feed from a StudioEngine
must have a unique channel number, so do each of
the VMIX sources that you want to make available
to the network. In most cases only the Submix output
itself needs a unique channel number, but if you so
desire, each VMIX input can also be sent back to the
network as a unique source, post the ON/OFF and
gain stage of the VMIX. Just provide a channel num-
ber to each “VMIX Fader” you’d like to send out.
•
Out Stream Type:
Set the stream type you want to
provide to the network for each VMIX output (Live
Stream, Standard Stream or Disabled) After you’ve
given the Submix output a unique Channel number,
enable it here. (Normally all of the VMIX “fader”
channels remain “Disabled” unless you have other
uses for them.)
•
Status/Audio:
An indicator field to tell you whether
the stream is valid and audio is present. Note that if
you have just enabled VMIX streams, you will need
to click
Apply
to commit your changes. This will re-
load the browser page and refresh the Status fields.
What can you do with a VMIX?
Now that you know how to set up and enable VMIX,
what might you do with it? Here are some examples.
A mix of sources to monitor
Some facilities may need to monitor one or more
sources in addition to program audio, like the “squawk
channel” some satellite feed providers use to relay an-
nouncements. If you wanted to monitor this “squawk”
audio on your Preview speaker without taking up a fader
assignment, you could create a mix of the “squawk”
source and the Preview mix from the engine. The Sub-
mix Out would be the audio source that you would route
to the Preview speaker.
Note: In this example, the “squawk” audio
would not be muted if the CR Mic were turned
on, as a normal Preview channel would be.
GPIO control of your VMIX
Imagine that you have a night jock that should moni-
tor all four radio stations in your cluster. To help make
sure this actually happens, you could send all four off-air
signals as sources into a VMIX and take the output of
its submix to a monitor. An Accessory Panel or external
button wired to a GPIO port could provide a “press and
hold” function to allow the jock to monitor the sources
Содержание element v.2.0
Страница 100: ...5 Element Operations 90 2016 Axia Audio Rev 1 8 1 Capital budget may you never decrease for we need new test gear...
Страница 149: ...Appendix A Specifications 139 2016 Axia Audio Rev 1 8 1...
Страница 183: ...Warranty 173 2016 Axia Audio Rev 1 8 1 TCP IP How did we live without thee Analogicly...
Страница 184: ...THIS PAGE INTENTIONALLY LEFT BLANK...
Страница 185: ...THIS PAGE INTENTIONALLY LEFT BLANK...

