A
pp
en
di
x C
: F
A
Q / D
ia
gn
os
tic
s / M
ai
nt
en
an
ce •
14
9
©2016 Axia Audio- Rev 1.8.1
nected.
Tools and supplies you will need to remove and ser-
vice a fader:
»
A
1
/
16
” hex wrench (for fader removal)
»
A 2.5 mm hex wrench (for module removal)
»
A jeweler’s screwdriver (
5
/
64
” or smaller)
»
Cotton swabs
»
Dow Corning 510 lubricating oil
Fader Disassembly and Cleaning
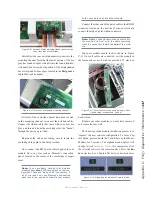
1. Use the 2.5 mm hex wrench to remove the re-
taining screw(s) at the top of the module requir-
ing service. With the screwes removed, lift the
module at the top, tilting it upward, and pull the
locating tab at the bottom of the module from the
mounting channel.
2. Turn the module over and locate the ribbon cable
that connects the module to its overbridge display
(if present). Gently press the “ears” on each side
of the board connector to release the cable.
3. Locate and disconnect the RJ45 patch cable that
connects the module to Element’s connection
panel.
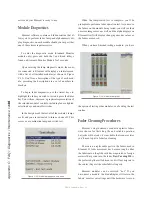
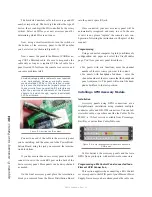
4. Remove the four-conductor fader cable from the
pins on the bottom of the fader (Figure C-16).
5. Now that the fader is disconnected, turn the mod-
ule right-side up. Remove the knob from the fad-
er to be serviced by pulling gently upward.
6. Using the
1
/
16
” hex wrench, remove the two hex
screws at the top and bottom of the fader slot.
The fader will drop out from the bottom of the
module.
7. Lay the fader assembly on your work surface, la-
bel-side up. Remove the snap-on fader assembly
cover; it’s held in place by round stamped bosses
at each end. With the fader sitting label up and
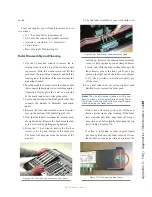
the connector pins to the front, you’ll see a pry-
point on the right end of the fader cover (Figure
C-17). Use a jeweler’s screwdriver to gently pry
off the cover.
8. Use a dry cotton swab, or a cotton swab wet with
distilled water, to clean the fader parts.
Note: The use of chemical cleaners on the con-
ductive plastic will substantially shorten fader
life. Never touch the fader slider contact fingers
while cleaning the fader parts.
Always use a clean dry swab to dry off the con-
ductive plastic tracks after cleaning. If the fader
rails are noticeably dirty, wipe them off using a
dry cotton swab before lightly lubricating the top
rail with Dow Corning 510.
If coffee, a soft drink or other sugared liquid
has been spilled into the fader, remove it from
the module as soon as possible and remove the
Figure C-15: Tilt module up to remove from frame.
Figure C-16: Remove the fader connector cable
Figure C-17: Pry point on fader cover
Содержание element v.2.0
Страница 100: ...5 Element Operations 90 2016 Axia Audio Rev 1 8 1 Capital budget may you never decrease for we need new test gear...
Страница 149: ...Appendix A Specifications 139 2016 Axia Audio Rev 1 8 1...
Страница 183: ...Warranty 173 2016 Axia Audio Rev 1 8 1 TCP IP How did we live without thee Analogicly...
Страница 184: ...THIS PAGE INTENTIONALLY LEFT BLANK...
Страница 185: ...THIS PAGE INTENTIONALLY LEFT BLANK...

