5. E-axis assembly
Original Prusa i3 MK3S+ kit assembly
77
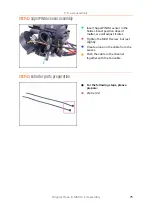
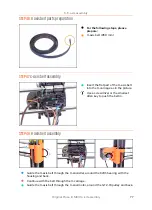
STEP 46
X-axis belt parts preparation
For the following steps, please
prepare:
X-axis belt (850 mm)
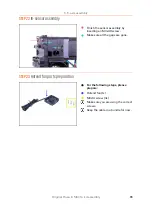
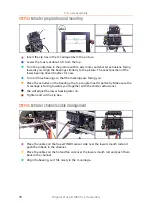
STEP 47
X-axis belt assembly
Insert the flat part of the X-axis belt
into the X-carriage as in the picture.
Use a screwdriver or the smallest
Allen key to push the belt in.
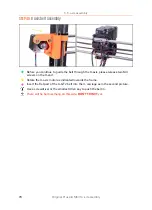
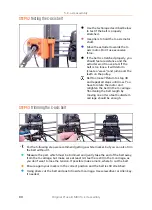
STEP 48
X-axis belt assembly
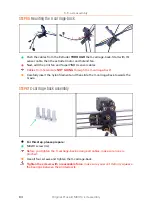
Guide the X-axis belt through the X-end-idler, around the 623h bearing with the
housing and back.
Continue with the belt through the X-carriage.
Guide the X-axis belt through the X-end-motor, around the GT2-16 pulley and back.
Summary of Contents for i3 MK3S+
Page 6: ...6 ...
Page 7: ...Original Prusa i3 MK3S kit assembly 7 1 Introduction ...
Page 15: ...Original Prusa i3 MK3S kit assembly 15 2 Y axis assembly ...
Page 36: ...36 Original Prusa i3 MK3S kit assembly 3 X axis assembly ...
Page 44: ...44 Original Prusa i3 MK3S kit assembly 4 Z axis assembly ...
Page 51: ...Original Prusa i3 MK3S kit assembly 51 5 E axis assembly ...
Page 88: ...88 Original Prusa i3 MK3S kit assembly 6 LCD assembly ...
Page 94: ...94 Original Prusa i3 MK3S kit assembly 7 Heatbed PSU assembly ...
Page 108: ...108 Original Prusa i3 MK3S kit assembly 8 Electronics assembly ...
Page 132: ...132 Original Prusa i3 MK3S kit assembly 9 Preflight check ...
Page 137: ...137 Notes ...
Page 138: ...138 ...
Page 139: ...139 Notes ...
Page 140: ...140 ...
Page 141: ...141 Notes ...
Page 142: ...142 ...
Page 143: ...143 Notes ...
Page 144: ...144 ...

